
VCRUNTIME140.DLL is Missing (Error) in Windows 10 sometimes appears when we try to launch a program. When this error message comes up, you are able to try the methods which will be explained below to get rid of this error on your Windows 10.
Re-registering The VCRUNTIME140.dll File
The first method that you are able to try to fix this error is to re-register the VCRUNTIME140.dll file. To do that, you have to use the Command Prompt and here are the complete steps for applying this method.
- On your keyboard, you have to press the Windows + R keys so that you will be able to open the Run utility. There, you have to type ‘cmd’ into the input field. After that, you have to press the Ctrl + Shift + Enter keys to be able to launch the Command Prompt with the permissions of the administrator.
- In this step, when you are prompted, you have to permit the Command Prompt to make changes on your devices by pressing the Yes button.
- Now, you have to unregister the file. How to do that? You are able to do that by typing in or copy-pasting the next command and then pressing the Enter key: regsvr32 /u VCRUNTIME140.dll
- Then here, you have to re-register the file. It is able to be done with this command: regsvr32 VCRUNTIME140.dll
You have to make sure to press Enter after you input this command.
- At last, you are able to close the Command Prompt window and then try to run the application again.
Running The System File Checker (SFC Scan)
What is the System File Checker? It is a tool which is available in Windows 10 by default or sometimes is also called SFC Scan. This tool can be used by you to be able to fix corrupted system files and some other issues in a quick way. How to use the tool? You are able to follow the steps below for using this tool.
- The first thing that you have to do is to press the Windows + R keys on your keyboard. By pressing these keys, it means that you launch the Run utility. After you launch it, then you have to type in ‘cmd’ and then you are able to press Ctrl + Shift + Enter. By typing these keys, you will open the Command Prompt with administrative permissions.

- When you are prompted, you need to make sure to Allow The Command Prompt To Make Changes on your device. It means that you need an administrator account.
- After that, you have to type this command: sfc /scannow and then, do not forget to press Enter after typing the command above.

- In this step, you have to wait for the System File Checker to complete the scanning process on your computer. If there are any errors, it will be fixed with the SFC command itself.
Reinstalling Visual C++ Redistributable for Visual Studio 2015
If you have problems with .dll files, a lot of experts recommend reinstalling Visual C++ Redistributable for Visual Studio 2015. You are able to do that by downloading the suitable files from Microsoft. Below, you are able to follow the steps for applying this method.
- First, you have to access the official site of Microsoft and navigate to Microsoft Visual C++ Redistributable download page. Here, you have to choose your language and then click on the Download button.

- Here, there will be two available downloads including:
- In case you have a 64-bit system, you have to choose vc_redist.x64.exe.
- In case you have a 32-bit system, you have to choose vc_redist.x86.exe.
- Now, the thing that you have to do after choosing the appropriate file is to click on the Next button. And then, it will be downloaded. It may take time depending on your connection. So, it is better if you have a good internet connection.

- After the download process is completed, now you have to open the file that you have just downloaded and it will bring you to the installer wizard. There, you have to check the I Agree To The License Terms and Conditions option and then click on the Install button.

- Then, you have to wait for the installation process to complete. You will be asked to restart your computer and then you have to test whether the application which previously had an issue can work properly or not.
Downloading and Replacing The Missing VCRUNTIME140.dll File
If the error is only on a specific application, you are able to fix it by downloading and replacing the missing.dll file into the application directory. How to do that? The steps below will be able to help you in doing it.
- You have to download the VCRUNTIME140.dll file from DLL-Files site. After that, you have to choose either the 64-bit or 32-bit version. It depends on the system of your computer.

- It will be in a .zip file which can be opened with applications like WinRAR and 7zip. You have to open the file and then drag the ‘vcruntime140.dll’ into the install directory of the application which has the problem.
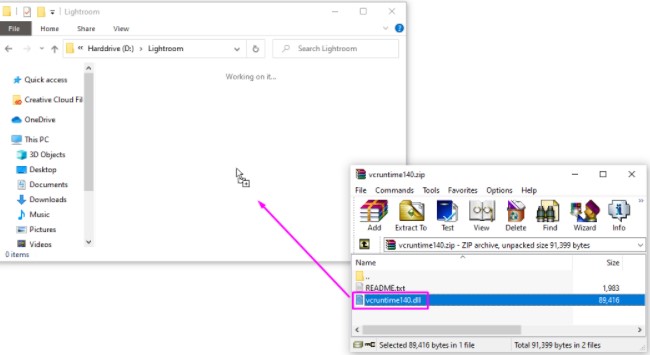
- When you are prompted, you have to select to replace the original file in the destination folder.
- Now, you have to check whether you are able to run the application again after you replace the VCRUNTIME140.dll file.
Updating Windows 10 To The Latest Release
Some users say that they are able to get rid of VCRUNTIME140.dll errors by updating to the latest version release of Windows 10. So, how to update your Windows 10 to the newest release? You are able to see the steps below.
- First, you have to access the Settings application by using the Start menu or the Windows + I keyboard shortcut.
- After that, the thing that you have to do is to click on Update & Security.
- In the Windows Update tab, you have to click on the Check for Updates button.
- If there is a new update, you have to click on the Install button.
- After the latest Windows 10 update is installed successfully on your system, now you will be able to use the application which previously had VCRUNTIME140.dll error.

AUTHOR BIO
On my daily job, I am a software engineer, programmer & computer technician. My passion is assembling PC hardware, studying Operating System and all things related to computers technology. I also love to make short films for YouTube as a producer. More at about me…


Leave a Reply