
A Windows 10 update is indeed necessary because it can improve the performance of your device. Not only that, the system updates also often bring new features. However, Windows 10 often updates automatically, which you may find annoying as it affects both your internet quota and your device.
For those who are annoyed by the notifications to update your device as they are shown too often, you must know the way to permanently turn off Windows 10 auto update. There are several ways to do that. 7 of them recommended by Telset are as follows:

1. Way to Disable Windows 10 Update Through Control Panel
The first method to permanently turn off Windows 10 updates is through the Control Panel. Below is the guide to follow to be able to do that:
- First and foremost, open the Control Panel by typing “Control Panel” in the search field next to the Star Menu.
- Then, choose System and Security and press the Administrative Tools menu.
- By doing so, a new page will show up containing various features with different functions. Now, choose Services only.
- Please scroll down until you find Windows Update and then double click it. Just like that, the Windows Update Properties page appears on the screen.
- Change the option from Startup Type to Disabled and then click the Stop button on Service Status. Do not forget to press Ok.
In case you want to turn on Windows 10 updates, just revert the settings back to the beginning.
2. Way to Turn Off Windows 10 Update Through Metered Connection
Those with WiFi can turn off Windows 10 Update through Metered Connection. The steps to do that include:
- Right click on the name of the WiFi that is already connected and choose the Properties.
- After that, scroll down and turn the toggle to the ON position on Set as metered connection.
3. Way to Turn Off Windows 10 Update Through Configure Automatic Updates
Turning off Windows 10 automatic updates through Configure Automatic Updates is only for Professional, Enterprise, and Education. Here is how to do that:
- Firstly, press the Windows + R on the keyboard and type gpedit.msc. Then, press the Enter.

- Afterward, choose the Computer Configuration and click Administrative Templates.
- Next, go to Windows Components and choose the Windows Update menu.
- Then, double tap Configure Automatic Updates. In order to turn off updates, please choose Disabled and click OK.
- For anyone who wants to turn on updates as before, you just have to change the setting to Enabled.
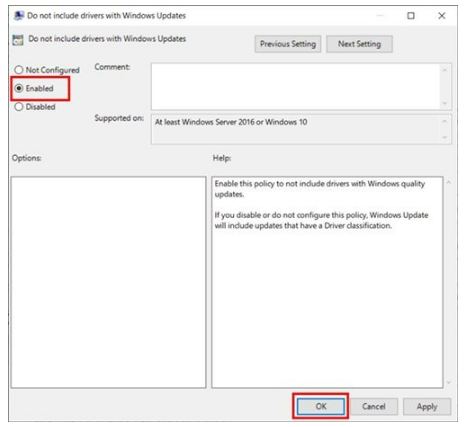
- It is also possible for you to disable Windows 10 OS driver updates only by going to the Do not include drivers with Windows update section in the same location.

- Make sure to double click the settings, change the option to Enabled and click Ok.

- In case you want to allow driver updates, just change the setting to Not Configured.
- Firstly, press the Windows + R on the keyboard and type gpedit.msc. Then, press the Enter.


4. Way to Turn Off Windows 10 Update Through Regedit
The next method to turn off Windows 10 updates is through Regedit. It is a bit hard to do, so make sure to follow everything below well:
- Type regedit in the search field next to the Start Menu.
- After that, access the regedit menu HKEY_LOCAL_MACHINE > SOFTWARE > Policies > Microsoft > Windows.
- Then, right click on Windows and choose New > Key.
- Now, enter WindowsUpdate as the name.
- In the next step, right click on the key and click New > Key. Please name the key as AU.
- Click the AU key and on the right side, right click and press New and choose DWORD (32-bit) Value.
- Lastly, name it NoAutoUpdate. Please double click on that key and set the value to 0 in order to enable automatic updates and 1 to turn it off. Do not forget to press OK.
5. Way to Turn Off Windows 10 Update with Group Policy
The feature called Group Policy is only available on Windows 10 Professional, Enterprise, and Education types. So, those with Windows 10 Home cannot use this feature to turn off the Windows 10 update. If there is a feature in your device, you can follow the following instructions:
- Press Windows + R on the keyboard and then type the keyword gpedit.msc and press Enter or click Ok.
- Then, open the Computer Configuration menu and choose Administrative Templates. Afterward, hit Windows Components and hit Windows Update.

- Do not forget to also double click on Configure Automatic Updates and choose the Disable option. To apply these settings, press the Apply and Ok buttons.

6. Way to Turn Off Windows 10 Automatic Updates Via CMD
It is also possible for you to disable Windows 10 updates permanently by using a command that is executed via CMD or the command prompt. Below is how to do it:
- Type CMD in the search field in the Start Menu. Another way is to press the Windows + R and type CMD and then press Ok or Enter to open it.
- When it opens, run the net stop wuauserv, net stop bits, and net stop dosvc commands in order.
- Then, close CMD and Windows 10 updates will automatically stop.
- Just do the same way in turn if you want to continue the update.
7. Way to Permanently Turn Off Windows 10 Automatic Updates with EaseUS
If the methods above are not enough, you can try to permanently turn off Windows 10 automatic updates with EaseUS. You just have to follow a few steps, as follows:
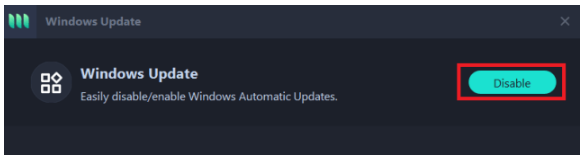
- Download the EaseUS Tools M application for free and then install it.
- After installing it, go to Windows Update.
- Next, click Disable to stop system updates automatically.

- If you want to turn it back on, just press the Disable button again until the menu turns active.

AUTHOR BIO
On my daily job, I am a software engineer, programmer & computer technician. My passion is assembling PC hardware, studying Operating System and all things related to computers technology. I also love to make short films for YouTube as a producer. More at about me…


Leave a Reply