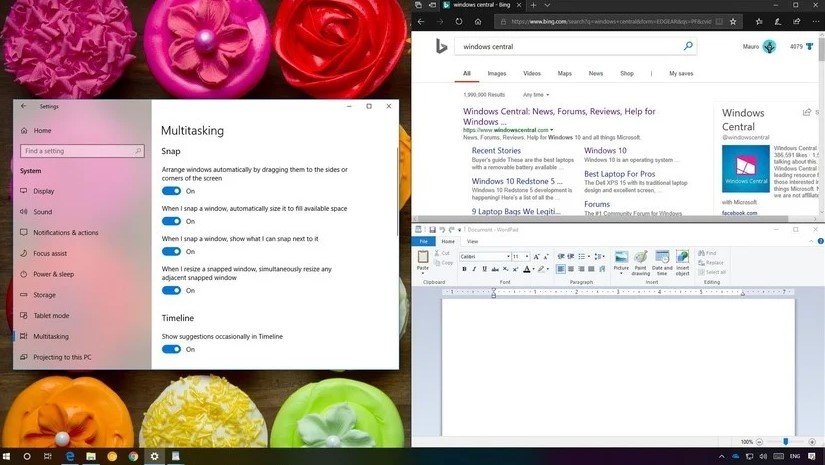
With the ability to run more than one application at the same time and to switch between with relatively ease, Windows has always been a great choice for multitasking. In this program, Microsoft offers the snapping mechanism and has expanded its functionality. Now, there are a few ways to split your screen into some windows and get the work done with the better support for higher resolution displays and some monitors.
One of the most important things to split screen on Windows 10 is called Snap Assist. This one makes it easier for you to choose an open application window when you are selecting which apps to arrange on your screen.
In order to use Snap Assist, the first thing that you will have to do is to select the window that you want to snap to one half of the screen and then drag it to the edge. The step will make the translucent outline of where it will snap to appear. If you are fine with it, you can let go and the window will be snapped into place. Aside from that, you can also press the Windows key and the left or right key to snap the last chosen window to one side of the screen. In case you have the other windows or applications open, when you snap the selected window, you will be able to see a number of options for what to fill the other half of the screen with. Please click one and it will automatically snap into place against the other window.

Once you have placed the windows, you are able to easily resize them. It can be done by dragging the divider. For your information, there is a limit on how thin a window can be to help you avoid making windows that are so small as they are useless.
Do you want to use the faster way to do it on your keyboard? Luckily, there is a shortcut to split windows that are really useful once you get used to the process. All that you have to do is to press down the Windows logo key while in an active window, and then press either the Left or Right Arrow key. This step should automatically assign the side of the screen and split the window over there. Please do the same for the new one and you have a split screen set up in no time. If you want more complex setups, you are also able to use the Up and Down Arrows in order to assign windows to some different kinds of corners.
Are you using the Internet Explorer as the default browser to browse the Internet? If the answer to the question is yes and you want to use multi Windows browser mode, then you have to follow these following steps.
Firstly, press the Start button and open these IE 11 Modern UI apps. Do not forget to open it in full screen. Then, visit any website and right click on a link and choose Open in New Windows. It will open the new IE window. Please wait until the whole new page loads the content and you will be able to see two Internet Explorer windows, with both of them taking up half of your computer screen. Under it is the image showing split screen windows 10 that enables you to browse two pages on a single screen.
Everything is all about multitasking, here are some tips that you may want to use.
Tip 1: Google Chrome is way better compared to Internet Explorer. What is good about this browser is that it has its own Windows app mode. All that should be done is to click on the three horizontal lines and choose relaunch chrome in app mode. After that, Google Chrome will launch immediately in the Modern UI mode. From this step, you are also able to make two web windows stacked to each side on the screen.
For those who have a bigger, or high-resolution display, you are able to take advantage of all of that huge screen real estate by snapping more than two windows. The thing called Corner Snap allows you to snap into place as many as four different windows.
Before anything, you may want to know that a laptop with 1366×768 pixel display will only support a split screen of two apps, while the 1080p display can support three apps on your screen. It means every laptop or computer has a different ability.
First of all, drag and drop the first window into the corner that you want to snap it to. Another way to do it is to press the Windows key and left or right arrow, followed by the up or down arrow. Please do the same with the second window on the same side and you will have two snapped into place. Doing so will make the Corner Snap activated, and much like when snapping just one window, you will be given the option to fill the empty space with the third one. If you want to bring the fourth window into play, you can just drag the third window into the corner and then choose another application from Snap Assist to complete the four window setups.
A split screen can be described as a software program, capability, or feature that can be used to enable you to split your window or screen horizontally or vertically. This one enables you to view some sections of the same document or some files at the same time.
If you split the computer screen, some applications can run at once. One application can be viewed in one half of the screen and the word document in another, or display some different kinds of status displays across the whole monitor. The feature makes it easier for you if you want to copy and paste between windows, see information from more than one source at the same time, or just generally multitask.
AUTHOR BIO
On my daily job, I am a software engineer, programmer & computer technician. My passion is assembling PC hardware, studying Operating System and all things related to computers technology. I also love to make short films for YouTube as a producer. More at about me…


Leave a Reply