Do you want to take a screenshot on Mac with a Logitech keyboard? Before anything, you will have to get the keyboard designed specifically for Mac users by Logitech called MX Keys. Once you have purchased it, then you will be able to take a screenshot on Mac with a Logitech keyboard.
In order to do so, here are the steps that you will have to follow:
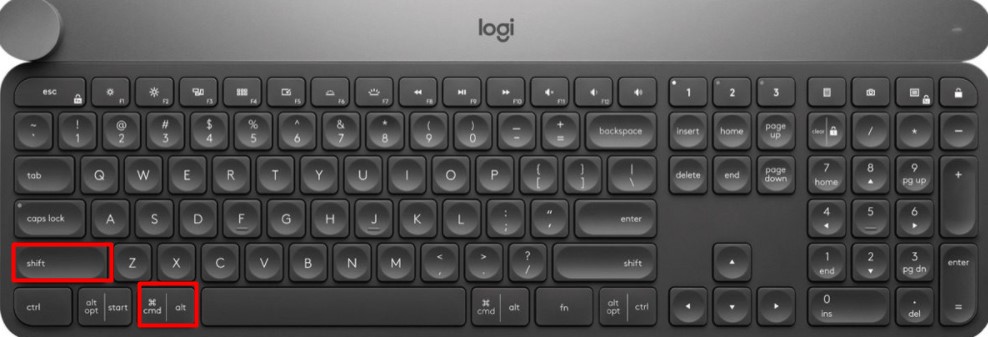
- The first thing that you will need to do is to find the Command and Shift keys. Both of them are located in the lower left side of the Logitech’s keyboard. If you want to take a screenshot on a Mac, you will just have to hold down both of them at once while pressing the number key.

- Then, open a page or go to a screen that you want to take the screenshot of.
- In the next step, take a screenshot of the entire screen. It can be done by pressing Command + Shift + 3 at the same time and then release the key combination. A camera snapshot noise will be heard from the Mac and the image file of the screenshot will be able to be found on the desktop of the Mac.

If you want to take a screenshot of a specific section of the screen, you can just press the Command + Shift + 4 at once to turn the mouse cursor into a crosshair icon, then click and drag the mouse across the area that you want to take a screenshot and release the mouse. Keep in mind that the spacebar is pressed while the mouse is in the crosshair mode, it will switch to the camera icon. Feel free to click an open window with the camera cursor if you want to take a picture of that window only.
![]()
- After that, save the image to the clipboard instead of to the permanent file. All that should be done is to press Control along with the Command and Shift key combination if you want to save the image to the clipboard temporarily instead of to a permanent file. It will allow you to paste the screen image into another app, such as software that allows you to edit the image.
- In the end, you can view the screenshots and they are saved to the desktop by default. To open the screenshot, you can just double click it.
That’s the guide that you have to follow if you want to take a screenshot on a Mac with Logitech keyboard. If you have any question, you can address it to Apple or Logitech.
Logitech has released a brand new item for Mac called MX Keys. This one is actually not really different compared to the existing versions offered by Logitech, but it is a good thing for those who are using Mac.
The Mac version of MX Keys looks aesthetic. To match the Apple color, it has Space Gray. As for the size, it is roughly the same size as Apple’s but there is a high back edge that makes it more ergonomic. While Apple has Lightning, Logitech has USB-C, an amazing option.
MX Keys works through Bluetooth Low Energy or using the unifying receiver of Logitech. The only weakness is that Logitech keeps shipping a USB-A version of its receiver. So, for everyone who wants to use that, you will have to get a dock or USB adapter to make it work with the modern Mac. On the brightness side, Bluetooth is more reliable and the connection is good. Nevertheless, it is still a must for Logitech to update its receiver.
The top of the MX Keys is a full row of functions keys that can be used to screen brightness, view app, expose, media controls, keyboard brightness, eject, and volume. Actually, the keyboard of Apple also has the same keys, with the exception of keyboard brightness and mobile specific shortcuts above the number pad camera, calculator, and locking.
The key layout is specifically made for Mac, throwing the hybrid key labeling of the existing MX Keys of Logitech for the actual dedicated Command and Option keys, as well as a hardware eject key.
Talking about the backlight, it is really easy to control from the function row, but it also adjusts automatically. You will be able to see a light when you approach the keyboard, making a nice effect when you use it.
The only thing about the Logitech MX Key that does not look fit the Mac would be the material. It would be good if it is actually made out of aluminum instead of just silver plastic. The silver plastic actually looks great and has a hefty weight, but it is clear that the quality does not equal the true aluminum of Apple’s.
MX Keys can work across some devices, such as running macOS, iPadOS, and iOS. It comes bundled with a USB-C that can be used as a charging cable and a unifying receiver. Connecting to a Bluetooth is also easy and it can be done to up to three devices with dedicated keys to switch between each.
Some people think that MX Keys is the best option for the third party keyboard as it offers great performance and key feel, unless you are significantly looking for the mechanical keyboards. When it comes to battery life, you are able to expect 19 days of use with the backlighting active. However, if you go without the underlay lighting, it will stretch out for about five months. It is really easy to be changed up directly from the Mac by using the USB-C cable that also allows you to use it while charging.
For anyone who is already using an MX Keys, you can stick with it, but for those who are looking for something new, it is the perfect choice for a Mac user. To get this tool, you will need to spend $129.99.
AUTHOR BIO
On my daily job, I am a software engineer, programmer & computer technician. My passion is assembling PC hardware, studying Operating System and all things related to computers technology. I also love to make short films for YouTube as a producer. More at about me…


