
You may be looking for some information about how to install PIP macOS with Homebrew. Well, if you are looking for that information, you are able to find it here since we will explain about it below. We also give you some other information related to PIP and Homebrew. So, check them out.
Steps to Install PIP Packages with Homebrew
According to GitHub Gist, you are able to install PIP packages with homebrew by following the steps below.

- The first thing that you have to do is to install Homebrew.
- After that, you need to install the brew-pip package.
- Now, you have to add the pip path of Homebrew to your PYTHONPATH environment variable.
- In this step, you have to install any PIP packages with Homebrew.
In the Poptuf site, you are also able to find the steps to install PIP with Homebrew on MacOS. According to that site, Homebrew can be used in order to install Python and PIP. PIP is provided with the python package and you will use the ‘brew’ command with the ‘install’ command as you are able to see below.
$ brew install python
If you find some issues related to the pip usage, you may have to relink the python with the command below.
$ brew unlink python && brew link python
You are able to check and show the PIP version. If you want to check the installed PIP version, you are able to do that with the -V or –version option as you are able to see below.
$ pip -V
$ pip3 -V
You will be able to see that the Python2 pip version is pip 9.0.1 and Python pip version is pip 9.0.1. They are the similar version for both Python2 and Python 3. Why? It is because to prevent version conflicts and synchronize the feature development of the pip command for both Python versions.
What is Homebrew?
Homebrew is an open source software package management system which is free. It can simplify the installation of software on the macOS Operating System of Apple and Linux. It has been recommended to use due to its ease and also its integration into the command line interface. It is a non-profit project member of the Software Freedom Conservancy. And it is run wholly by unpaid volunteers.
It was written by Max Howell originally in 2009 and the package manager has gained popularity in the Ruby on Rails community and got praise for its extensibility. It has made extensive use of Github to be able to expand the support of some packages via the user contributions. For your information, in 2010, Homebrew became the third most forked repository on GitHub. And then in 2012, it had the biggest number of new contributors on GitHub. In 2013, it had the largest number of contributors and issues closed of any project on GitHub.
What is PIP?
You may wonder what PIP actually is. Well, it is important for you to know that PIP is the standard package manager for Python. It permits you to be able to install and manage additional packages which are not the part of the Python standard library. You need to know that package management is very important which pip has been included with the Python installer since version 3.4 for Python 3 and 2.7.9 for Python 2. It is used by a lot of Python projects which makes it an essential tool for every Pythonista.
The concept of a package manager may be familiar to you if you are coming from other languages. Ruby uses gem, JavaScript uses npm and .Net uses NuGet. And in Python, pip has been the standard package manager. The installer of Python installs pip. So, it will be ready to use for you. Unless, you installed an old version of Python. If you want to verify that pip is available, you are able to do that by using the command below in your console.
$ pip –version
pip 18.1 from C:\Python37\lib\site-packages\pip (python 3.7)
You will see the same output which shows the pip version and also the location and version of Python. If an old version of Python is used by you, it is important for you to know that it does not include pip. Then, you are able to install it by following the instructions for your system in the pip installation documentation.
For your information, according to Wikipedia, first introduced as pyinstall in 2008 by Ian Bicking, the creator of the virtualenv package as an alternative to easy_install, pip was selected as the new name from one of some suggestions that the creator got on his blog post. Bicking said that the name is a recursive acronym for Pip Installs Packages. Then in 2011, the Python Packaging Authority (PyPA) was made to take over the maintenance of pip and virtualenv from Bicking, which is led by Carl Meyer, Brian Rosner and Jannis Leidel.
With the release of pip version 6.0 in 2014, the naming process of the version was changed to have version in X.Y format. And, it drops the preceding 1 from the version label.
Steps to Install PIP on Windows
If you are a Windows user, you may also want to know how to install PIP on your Windows PC. To do that, you have to check whether PIP has been installed or not. To do that, you can open a command prompt and then type this: pip help. If the Pip installed, you will get a message which explains how to use the program. But if not, you will get an error message which says that the program is not found.
Then, you also must confirm that Python is installed properly. If so, you can install PIP by following the steps below.
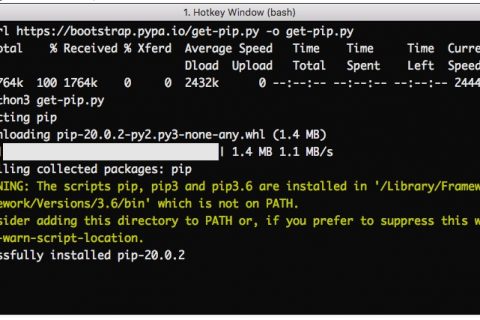
- The first thing that you have to do is to download get-pip.py to a folder on your computer.
- After that, you have to open a command prompt and then you have to go to the folder which contains the get-pip.py installer.
- Then, you have to run this command: python get-pip.py.
- Now, PIP should be installed successfully.

AUTHOR BIO
On my daily job, I am a software engineer, programmer & computer technician. My passion is assembling PC hardware, studying Operating System and all things related to computers technology. I also love to make short films for YouTube as a producer. More at about me…


Leave a Reply