
Sometimes you get your MacBook Pro & Air getting slower than before or even there are some symptoms which indicate something wrong on its system. Of course, if you confront some troubles on your MacBook Pro & Air, you should hurry up to fix it before more complicated issues happen one day.
But how if you do not understand technically to fix your MacBook Pro & Air as you’re not an IT specialist here? You do not have to worry, this post will guide you how to reset your MacBook Pro & Air even though you have to take the factory reset.
How to factory reset your MacBook Pro & Air
Here’s how!
Step 1: Restart your Mac

The primary thing you need to do is to restart your computer. The easiest way to do it is to hold down the power button until the a pop up dialog box displays.
Then, you can select the Restart option.
Hence, you can also choose the Apple icon in the top-left corner of the screen and select Restart option.
If your mac is jammed and you cannot depend on macOS to solve your problem, you actually can also use the shortcut by pressing Control + Command + Eject (or Power button).
Step 2: Open in recovery mode

Once your MacBook is off, you can hold Command + R until the Apple logo shows. Then, release the key to allow the Mac to boot up. It may take for a longer time, you surely must be patient in this step.
Instead of opening to your desktop as normal, your MacBook is going to boot into the Recovery Mode. Here, you need to select the suitable user profile and then enter your password before getting full control.
In macOS utilities window, you will have the option to restore your files or data from a Time Machine backup, access help documentation, install a new copy of macOs, erase all data or repair a damaged disk.
While if you are searching to erase everything and start from scratch, you actually can select Disk Utility.
Step 3: Remove your data
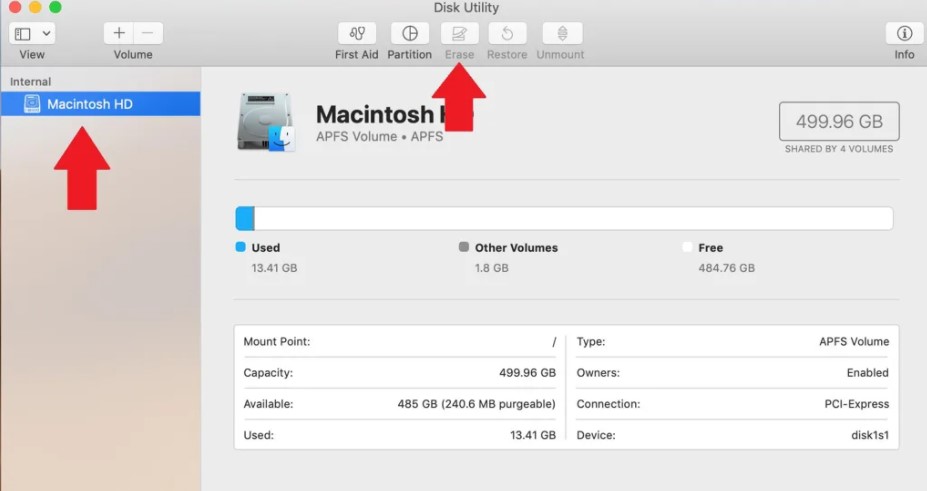
Here, you need to choose your startup disk under the Internal heading. You have to click on Erase option at the top of the Disk Utilities window. Then, a dialog box will appear. From this dialog, you need to change the Format to Mac OS extended and then click on Erase option. After the process is complete, you have to go to the Disk Utilities menu located in the upper-left corner and select Quit Disk Utility.
To note, after the process is finished, you can longer recover any removed data which was left on the drive. Then, if you think you still need the data, we suggest you first back it up into an external hard drive or sync important files to iCloud.
Step 4: Reinstall macOS

Once you remove all data, it is time for you to reinstall macOS onto the computer. Back at macOS Utilities screen, you need to click Reinstall macOS and follow the steps to reinstall a clean version of the operating system. Otherwise, if you have a plan to sell your computer, you actually have to skip this way and let the new owner install macOS.
Step 5: Restore from backup

If you have selected to save your files through a Time Machine Backup, you’re now able to restore those files through the macOS Utilities screen. To restore your file from backup, you actually can click on Restore From Time Machine Backup option. Then, you can choose the suitable backup from the list to reinstall your saved files.
After you have gone through all of the above processes to complete, then the process of resetting your Mac computer has been successful and if you want to sell your Macbook computer, then there is no need to worry about buyers getting into your files or applications.
And if you ever want to turn your Mac computer back on to enter the desktop, follow the prompts as if you were setting up the MacBook for the first time. Then all the problems that were previously caused by the system will disappear and your Macbook will return to normal.
Important! What should you do before factory reset?
In the previous section, we share how to factory reset your MacBook Pro & Air but those ways are recommended to take before resetting your MacBook as if it was just released from the manufacturer. This is done to ensure that you don’t lose any personal files, photos, or applications when you move from one MacBook to another.
Here are a few things you should consider before resetting your MacBook Air or MacBook Pro:
Backup your MacBook
We cannot overstate the importance of this step. Making a backup or backup will protect your important files. If you don’t make a backup of your data, it will be lost when you factory reset.
Quit iTunes
To quit iTunes, you can follow the steps: Choose Account → Authorizations → Deauthorize This Computer. But if you are using the latest macOS Catalina, you surely can skip the previous step.
Sign out of iCloud
To sign out of iCloud, you need to press the Apple menu and then go to System Preferences then click on Apple ID. Select iCloud from the side panel and Turn off Find my Mac. Then click Overview and Sign Out.
Sign out of iMessage
Open the Messages application, select Messages then Preferences. Click iMessage and Sign out.
Unpair Bluetooth Device
To unpair the bluetooth device, you need to open the Apple menu and choose the System Preferences and then select the Bluetooth. Then, you can unpair headphones, keyboards or other Bluetooth-enabled peripherals.
Well, if you want to factory reset your MacBook Pro and Air at least you need to recognize a few things that you should recognize to avoid unwanted things from happening someday.
Those are multiple steps that you can take to factory reset your MacBook Pro and MacBook Air. Following step-by-step of those ways above is really a must for you.

AUTHOR BIO
On my daily job, I am a software engineer, programmer & computer technician. My passion is assembling PC hardware, studying Operating System and all things related to computers technology. I also love to make short films for YouTube as a producer. More at about me…


Leave a Reply