Windows keeps updating the whole year that causes the system to consume a lot of resources causing 100% Disk Usage. The disk usage remains at 100% due to the number of updates in the background, as well as the numerous changes with the settings after the updates. If you want to fix the issue, you can try to disable Connected User Experience and Telemetry.
In order to disable Connected User Experience and Telemetry, please follow these following steps:
-
- Press and hold ALT + Ctrl + Delete keys at the same time. It will open a new screen.
- Choose Task Manager.
- Choose Services tab
- Find DiagTrack
- Once you have found DiagTrack, right click and choose Stop.
-
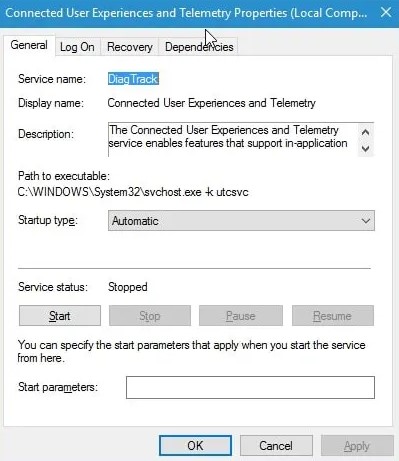
- Right click DiagTrack and choose Open Services.
- Find the service named Connect User Experiences and Telemetry.
- After you have found the Connect User Experiences and Telemetry, double click it.
- Choose Disabled from the drop down menu in Startup type.
- Press the Recovery tab.
- Choose Take no Action from the drop down menu in First Failure. Please repeat this step for the Second Failure and Subsequent Failures.
- Click Apply and then choose OK.
Once everything is done, you need to be good to go. Before trying this method, keep in mind that it is a permanent fix and you will not need to repeat on each reboot.
Disable Connected User Experience and Telemetry is not the only way that you can try to fix the issue related to disk usage on Windows 10. There are some other ones that you can try if disabling the Connected User Experience and Telemetry is not working.
Alternative 1: Disable Windows Search
Disabling the Windows Search is really useful for a lot of people. Windows Search will scan through your files and folders and records information in the index file. The advantage of the Windows Search is that it will accelerate the searching of the files. It means disabling the Windows Search will not have any effect that can be noticed on the searches. The only weakness will be the increased time when looking or files and folders but it is fine. You will not feel any difference if you do not search through a dozen of files on regular basis.
In order to disable the Windows Search, the first thing that you will have to do is to press Windows key once. Then, type Command Prompt in the Start Search. Next, right click the Command Prompt from the search results and choose Run as administrator. After that, type exe stop “Windows search” (with quotes) and hit Enter. Please wait for the system to stop the Windows Search and you will see a message on the screen.
Remember that the process will temporarily disable the Windows Search. Once the Windows Search is turned off, you can open the Task Manager and look at the disk usage. In case the disk usage decreases then you are able to turn the Windows Search permanently by following these following steps.
-
- Hold Windows key and R at once.
- Enter service.msc and hit Enter.

-
- Find a service called Windows Search.

-
- Double click it.
- Choose Disabled from the drop down menu in Startup Type.

-
- If the Service Status is not Stopped, please click the Stop button.
- Click Apply and then choose the OK button.
Actually, disabling Windows Search is not recommended, but if it improves your system and you want to keep it disabled, then feel free to do so. If it does not give the effects to the system speed or disk usage then you are able to turn it back on by heading to service sand choosing Automatic as the Startup Type.
Alternative 2: Disable MSI or Message Signaled Interrupt Mode (Firmware Bug)
StorAHCI.sys is the name of the driver that has the firmware bug linked to the high disk usage. This one may be the culprit of the issue and making it disabled may fix the issue.
-
- Press Windows key and R at the same time.
- Enter devmgmt,msc and hit enter.
- Double click the thing named IDE ATA/ATAPI controllers.
- Double click the thing named Standard SATA AHCI controller.
- Press the Driver tab.
- Hit the Driver Details button.
- If the file name of the driver is StorAHCI.sys then you are running the inbox driver and you have to make some changes to Registry Key.
- Press Details tab.
- Choose Device Instance Path from the drop down menu located under Property.
- Write down the path that is displayed or keep it open.
- Press Windows key and R again.
- Enter regedit.exe and hit Enter.
- Go to HKEY_LOCAL_MACHINE\System\CurrentControlSet\Enum\PCI\”Device Instance Path taken from step”\Device Parameters\Interrupt Management.
- Click MessageSignaledInterruptProperties from the left pane.
- Double click the thing called MSISUpported from the right pane.
- Change the value of it from 1 to 10.
- Hit the OK button.
- Reboot your computer.
Alternative 3: Google Chrome
In some cases, the issue may be because the Google Chrome and its prediction features. A lot of people have made a report about these features using system resources, so making these prediction features disabled from Google Chrome may improve the 100% disk usage issue.
First of all, you will need to open Google Chrome. Then, choose the three dots menu on the top right corner. In the next step, select Settings. Afterward, scroll down and choose Show advanced settings… . After you have selected it, uncheck the option Use a prediction service to load pages more quickly. It is located under the Privacy section. Lastly, close the Google Chrome and check if the issue is fixed.
If no one of the methods above works for you, you can try to turn off Skype, uninstall Flash Updates, unlink OneDrive, disable Windows Notifications, Feedback & diagnostics, and cancelling Windows Performance Recorder or WPR (Workaround).
AUTHOR BIO
On my daily job, I am a software engineer, programmer & computer technician. My passion is assembling PC hardware, studying Operating System and all things related to computers technology. I also love to make short films for YouTube as a producer. More at about me…







Leave a Reply