The Snipping Tool is really useful. Unfortunately, you have to either go through the Start menu or enter the search keyword in the Start menu search every time you want to launch it. it would be really cool if it is possible to run the Snipping Tool with the help of a keyboard shortcut.
The good news is that you are able to create a keyboard shortcut to launch the Snipping tool in Windows 10. In order to create a keyboard shortcut for Snipping Tool, please follow these following steps.
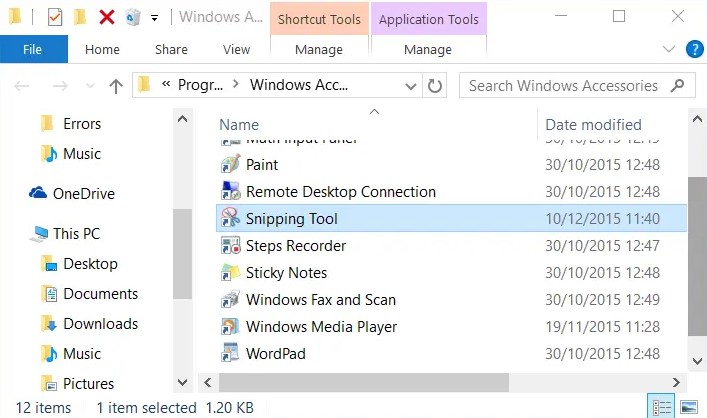
- For those who are using Windows 10, the first thing that you will need to do is to navigate to Start > Windows Accessories, right click on the Snipping Tool entry, click More, and then click Open file location in order to open Windows Accessories folder.
- Then, right click on the Snipping Tool shortcut, click Properties.

3. The next step that should be done is to choose the field next to the Shortcut key field located under the Shortcut tab, and then enter a keyboard shortcut that you want to use to launch the Snipping Tool. Please take note that Windows will automatically add Ctrl + Alt as prefix, so it is better for you to use a shortcut such as Ctrl + Al + S as the keyboard shortcut.

Aside from that, you are also able to pin the Snipping Tool shortcut to the taskbar and then use the Windows key and numerical key to launch the tool. For example, if you pinned the Snipping Tool to the extreme left of the taskbar located next to the Start icon, then you have to press Windows + 1 key to launch the Snipping Tool.
These are the steps that you need to follow if you want to create the Snipping Tool shortcut keyboard on Windows 10. If you want to do it on Windows 7, the steps are different. On Windows 7, first of all, go to Start > All programs > Accessories. Please right click on Snipping Tool and choose Properties. Next, move to the Shortcut tab, choose the Shortcut key box, and then hit any keyboard key that you want as your shortcut to the program. By doing the step, Windows will define the new shortcut to the Snipping Tool and it will also embed Ctrl + Alt as the prefix to the shortcut. For those who have assigned the S key to the Snipping Tool, then please press Ctrl + Alt + S to launch, for example. The last thing that you will need to do is to click the Apply button. Do not forget the new keyboard shortcut.
The Snipping Tool is able to be used to capture text, graphics, and any related annotations and then save them in the format that you want. Microsoft has finally improved how the screenshots are captured, as part of the Windows 10 Insider Preview Build 17661. Now, there is the option that you can use. It is called the Snipping Tool. This one is the app with the ability to choose portions of what is on a display or capture certain application windows. With it, you are also allowed to create a full screen snip or a free form snip that is not rectangular. Adding a note with a pen or highlighter tool is also simple with the help of the app.
The modernized version of the snipping tool is known as Screen Sketch. It was originally introduced as part of Windows Ink Workspace, but it has now been made separately as the app that is able to be updated through the Microsoft Store.
The alt-tab shortcut can be used to switch between applications. Now, it is also able to be used to switch to Screen Sketch. Aside from that, pressing WIN + Shift + S will open a snipping toolbar that will then allow screenshots to be captured and automatically copied to the clipboard. In the end, you will receive a notification as the confirmation that a screenshot has been taken.
It is possible that a button that is rarely used will be put to work again. You can use the Print Screen key to launch the Screen Sketch by enabling an option in Settings. For those who are looking for a full screen capture, there is still the useful shortcut of WIN + Print Screen that will automatically save the screenshot to the Pictures library.
As the effort to keep in line with multimedia improvements, Microsoft is also adding the better support for HEIF image files. Editing of metadata in the details tab of properties dialogs and rotation of pictures in the file explorer is now working.
Creating a keyboard shortcut for snipping tools is recommended for those who are trying to use your mouse less and your keyboard more. Keyboard shortcuts are able to reduce repetitive strain injury from too much using the mouse and to help you to complete writing and editing tasks more efficiently.
Another advantage of using the keyboard shortcut is to save time. As stated by Hilary Powers in her amazing book entitled Making Word 2010 Work for You, it usually takes less time if you want to execute a keyboard shortcut compared to the one it takes for your hand to wander to your mouse, click through a menu in a word processing program or in Windows Explorer, and wander back to the keyboard. A lot of people agree that Hilary Powers has a point.
What are the Windows 10 Snipping Tool shortcut keys? Here is the list of all of them:
- Alt + N or Ctrl + N
- Alt + M
- Alt + D
- Alt + T
- Ctrl + S
- Ctrl + C
- Ctrl + E
- Ctrl + P
- Ctrl + F
- Alt + F then T then E
- Alt + F then T then A
- Alt + T then H
- Alt + T then E
- Alt + T then O
- F1
- Esc
Keep in mind that these shortcuts will only work if the Snipping Tool is opened in the Windows 10. Besides, you should be on the active window when you are using them.
AUTHOR BIO
On my daily job, I am a software engineer, programmer & computer technician. My passion is assembling PC hardware, studying Operating System and all things related to computers technology. I also love to make short films for YouTube as a producer. More at about me…


Leave a Reply