
You may find that your contacts show up in another phone. Then, you may be confused why it can happen and you need to know the things that you have to do to unsync your phone from another phone easily. Here, we will explain about it.
Unsync My Phone From Another Phone
If you find the situation as we explained in the introduction above, it means that your phone is synced. Let’s say that you find that your contacts show up in your dad’s phone. It means that your phone syncs with your dad’s phone. So, the thing that you have to do is to check Sync settings.
It can happen because you are logged in to a Google account in your phone and your dad’s phone is also logged into the same Google account for some reasons. So, both of these phones have turned on the automatic contact sync.
This feature in Android can be useful when you lose your phone. At least, you will not lose your connections. However, if it is synced to another phone that is not yours, it can have a chance where the owner of that phone will know your activities.
So, the thing that you have to do is to change the settings. You are able to check it in Accounts and Sync. There, you have to choose the Google account and then deselect the synced Google account that you want. Tap the menu icon and then you have to choose Remove Account. Since it happens because both of these phones are sharing the same Google contact accounts so that it keeps syncing, so you are able to create a separate email for your dad’s phone to use with his phone.

The Steps to Sync Android Contacts with Gmail
Now, we will explain to you about how to sync android contacts with Gmail. You are able to follow the guide below to do that.
- The first thing that you have to do is to access the Settings on your device. For your information, this is an app which is likely formed like a gear or one that has a set of sliders.
- The next thing that you have to do is to scroll down and then you have to tap on the Accounts. You are able to find it under the Personal section of the menu.
- In this step, you have to tap on Google. You will see that the accounts are listed alphabetically.
- And now, the thing that you have to do is to slide the Contacts button to the On position. You will see that it will turn blueish-green. Now, the contacts of your Gmail will sync with the contacts of your Android.
- At last, you are able to click on the other Google options that you want to sync. Those include Photos, Music and Calendar.
The Steps to Turn Off Google Sync on An Android
You may know that when you set up your Android, it will automatically set your Android Contacts and also your Android Calendar to synchronize with Google. If you want to turn it off, you are able to follow the steps below.
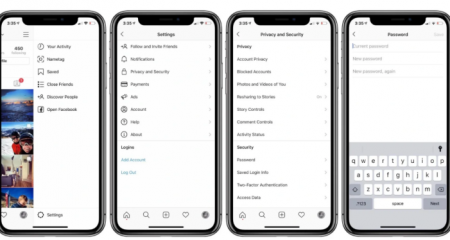
- The first thing that you have to do is to find and tap the Settings on the main Android home screen.
- After that, the thing that you have to do is to choose Accounts and Backup. You see this option as Accounts & Sync, Data Synchronization or Cloud and Account.
- The thing that you have to do here is to tap on the Accounts or you are able to choose the Google account name if it appears directly. Usually, it is designed with the Google G logo.
- Now, you have to choose the Sync Account after you choose Google from the accounts list.
- In this step, you have to tap on the Sync Contacts and Sync Calendar to disable the Contact and Calendar sync with Google.
See and Remove Your Associated Devices for Purchase on Apple
Talking about syncing, you may also need some information about seeing and removing your associated devices for purchases in Apple. For your information, in Apple Music app on a Mac or iTunes for Windows, you are permitted to see a list of devices which are associated with your Apple ID for purchases and remove the devices that you do not want associated anymore.
When you sign in with your Apple ID on a device and then you use that device to make purchases or subscribe to the services of Apple, the device will be associated with your account. You do not have to associate your devices to be able to purchase content or download new purchases. You are able to remove an associated device if you are not able to redownload purchases from the App Store or iTunes Store or you reach your limit of associations and want to add a new one. Or, you are also able to remove an associated device if you want to sell or give away an associated device.
If you want to see or remove your associated devices on a Mac or PC, you can follow the steps that we show you below.
- You have to access the Apple Music app on Mac or iTunes for Windows.
- After that, from the menu bar that you can see at the top of your computer screen or at the top of the iTunes window, you can select Account and then choose View My Account. You may have to sign in with your Apple ID.
- Now, you have to scroll to the iTunes in the Cloud section and then you must click Manage Devices. There will be the list of devices which are associated with your account for purchases. If there are no devices associated with your Apple ID, there will not be this section.
- In this step, if you want to disassociate it, you have to click Remove to the right of a device. If the device is not able to be removed, you may have to sign out of your Apple ID on that device or you are able to wait up to 90 days to be able to associate it with another Apple ID.

AUTHOR BIO
On my daily job, I am a software engineer, programmer & computer technician. My passion is assembling PC hardware, studying Operating System and all things related to computers technology. I also love to make short films for YouTube as a producer. More at about me…


Leave a Reply