
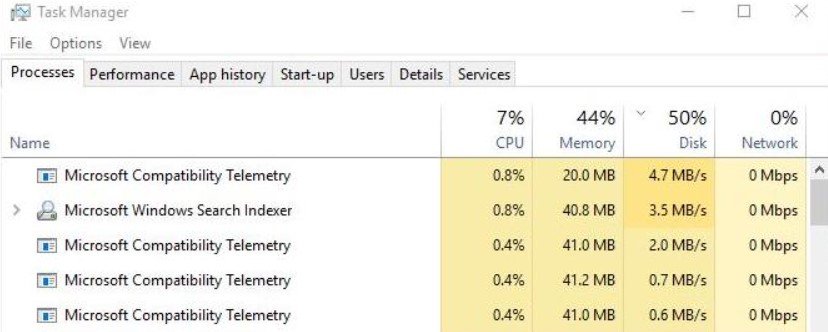
If you experience Microsoft Compatibility Telemetry Process which causes the high CPU usage on your Windows 10, you are not alone. This condition may lead to the huge performance issues so that you have to fix it by using the methods below.
How to Fix Microsoft Compatibility Telemetry High Disk (CPU Usage) by Disabling Microsoft Compatibility Telemetry
There are three ways to disable the service. You are able to choose one of the ways below.
Setting Diagnostic & Usage Data to Basic
It can limit the User Data Collection in Windows 10 system, but it will not totally disable the Windows Telemetry service.
- First, you have to click on Start and then go to the Setting and choose Privacy.

- After that, from the left panel, you must click on Feedback & Diagnostics and then you have to set Diagnostics and Usage Data To Basic.
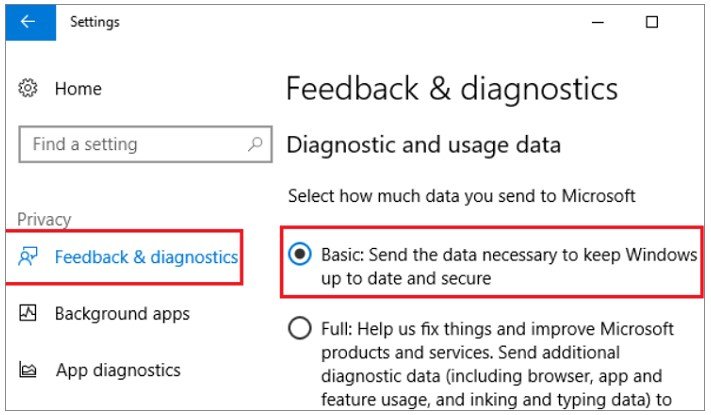
By doing it, it will limit the data which is sent to your Windows and also it can lower the chances of the data from being hacked.
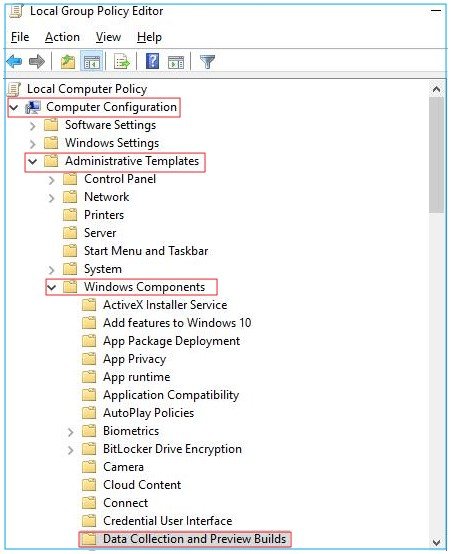
Disabling Windows Compatibility Telemetry through Group Policy Editor
- The first thing that you have to do is to press Windows key + R and then you have to type gpedit.msc and then click on OK.

- In this step, you have to go to Computer Configuration and then access Administrative Templates. After that, you need to choose Windows Components and then click on Data Collection and Preview Builds.
- Here, you have to double click on Allow Telemetry.

- You have to select Disabled and then click on OK.
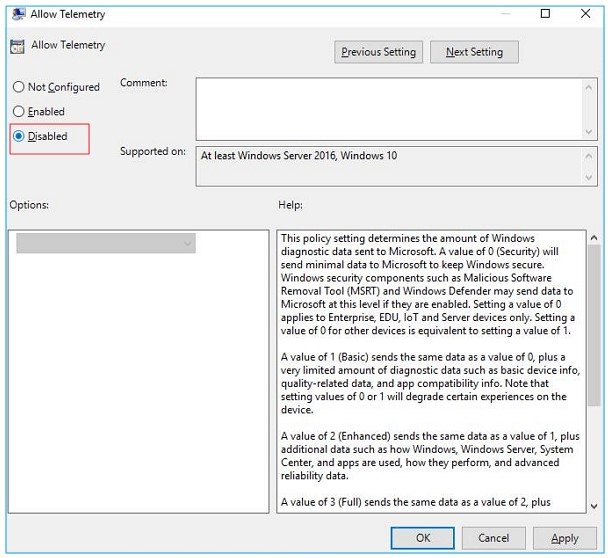
- Then, open Task Manager to make sure that it is working or not.
Using Registry Editor
- The first thing that you have to do is to press the Windows + R key and then you have to type regedit in the Run box. After that, click on OK.

- Here, you have to click on Yes as prompted by User Account Control.
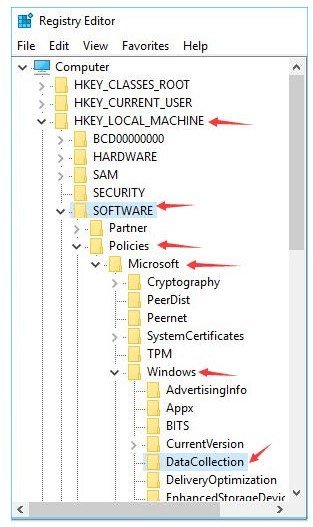
- And then, you must go to “HKEY_LOCAL_MACHINE > SOFTWARE > Policies > Microsoft > Windows > DataCollection“.
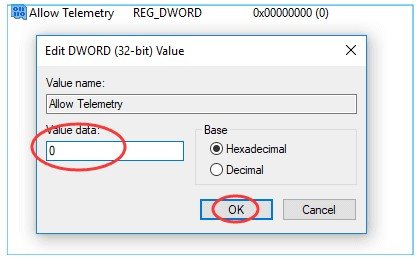
- In this step, you have to right click on DataCollection and then choose New. After that, select DWORD (32-bit) Value. You have to name the new value Allow Telemetry and then you have to double click on Allow Telemetry.

- Here, you have to set the Value data to 0 and then click on OK.
How to Fix Microsoft Compatibility Telemetry High Disk (CPU Usage) by Updating Windows 10
It is important to know that the Microsoft Compatibility Telemetry is related to the Windows 10 update. So, updating Windows 10 may be able to fix this issue.
- The first thing that you have to do is to click on the Start icon and then you have to go to the Settings.
- In this step, you have to go to the Update & Security Settings and then choose Windows Update.
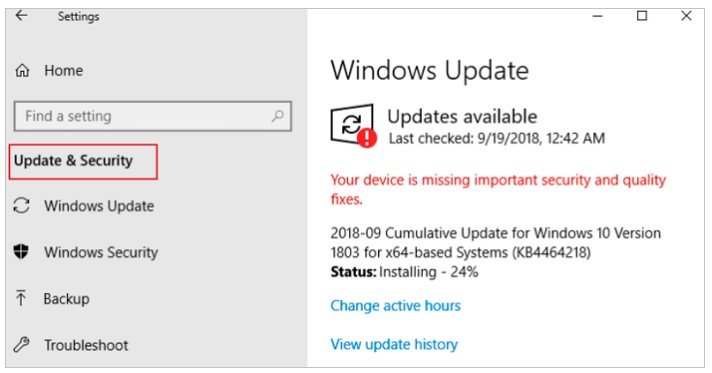
- You have to check for the latest update which is available and you have to install it on your Windows 10. After updating, you can restart your PC and see whether it can fix the issue.
How to Fix Microsoft Compatibility Telemetry High Disk (CPU Usage) by Restarting Your System
Restarting your system is a basic troubleshooting which can be done every time you find something wrong with your PC. Usually, it can fix any issues. To restart your system, you are able to follow the steps below.
- First, you have to click on the Start icon and then go to the Shut down or sign out. After that, choose Restart.
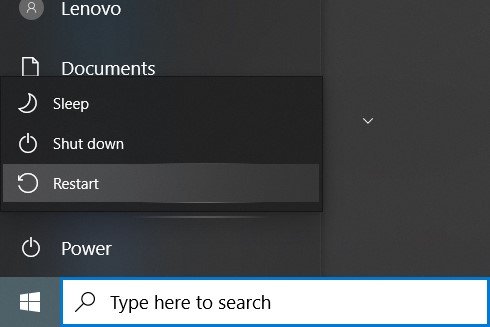
- You have to wait for your system to restart automatically and then check whether the issue still appears or not.
How to Fix Microsoft Compatibility Telemetry High Disk (CPU Usage) by Disabling The Microsoft Compatibility Appraiser
For your information, Microsoft Compatibility Appraiser can cause the high disk and lower the performance in your system. This service will scan the Windows 10/8 and 7 application files which are situated on the computer for accessing the compatibility with Windows 10 update. It can also consume CPU so it makes your Windows system have performance issues.
So, disabling the service may help you in fixing the issue. You are able to disable the service from the Task Scheduler. How to do that?
- The first thing that you have to do is to click on the Start button and then in the search box, you have to type Task Scheduler. After typing it, hit Enter.
- When you are on the TaskScheduler window, you have to go to this path: Task Scheduler Library\Microsoft\Windows\Application Experience.
- Next thing that you have to do is to search for Microsoft Compatibility Appraiser on the Application Experience folder.

- Then, you have to right click on it and then select Disable. Do not forget to confirm to complete the process.
How to Fix Microsoft Compatibility Telemetry High Disk (CPU Usage) by Deleting CompatTelRunner.exe
Deleting CompatTelRunner.exe is another method that you are able to use for fixing Microsoft CompatibilityTelemetry which causes high disk usage. How to apply this method?
- First, you have to press Windows + R keys and then when you are in the Run box, you have to type this: C:\Windows\System32. Then, press Enter.
- In this step, you have to find CompatTelRunner and then you have to right click on it and then choose Properties.
- Now, you have to skip to the Security Tab and when you are in the Properties, click on the Advanced button.
- Click on the Change button which monitors the Owner in Advanced Security Settings.
- And now, in the new window, you have to click the Advanced button.
- Here, you have to click on Find Now and then scroll down to select your account.
- You have to click on OK for saving changes.
- And now, you need to click on the Apply button on the Advanced Security Settings.
- In this step, you have to click on OK when a new window pops up.
- Next, open the Properties interface and then click on the Edit button for changing permissions.
- You have to highlight Administrators and under Allow you have to check the Full Control option.
- You have to click OK for saving changes and then when a warning window appears, you have to click on OK.
- Last thing that you have to do is to right click on CompatTelRunner.exe and then delete it.

AUTHOR BIO
On my daily job, I am a software engineer, programmer & computer technician. My passion is assembling PC hardware, studying Operating System and all things related to computers technology. I also love to make short films for YouTube as a producer. More at about me…


Leave a Reply