Do you want to snip and are looking for the free snipping tool to download on Mac, Chromebook, and Windows? You have come to the right place as it will inform you of a free snipping tool to download for Mac, Chromebook, and Windows.
Unlike Windows, Mac OS does not include a native snipping tool. Fortunately, you are able to snip on Mac using keyboard shortcuts. For those who want more advanced snipping tools, you will have to download a Macbook snipping tool. Here are some recommended free snipping tools for Macbook.
1. SnapNDrag

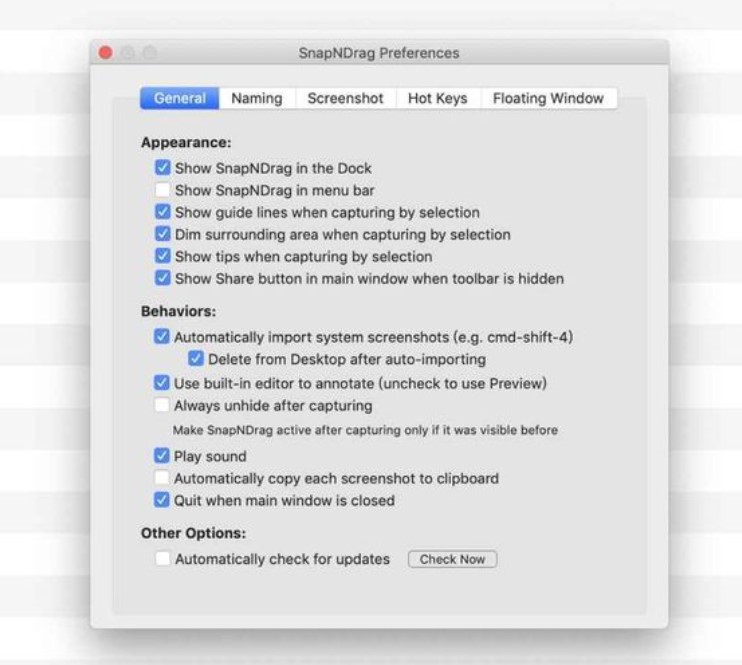
SnapNDrag is a useful snipping tool for MacBook that allows you to grab a snapshot of the full screen, a window, or a certain section of the screen without having to worry about the key combinations. It is available to download for free. Apart from that, there is also a pro version that costs $10. With the pro version, you are allowed to resize images, turn off ads, and assign global hotkeys. A few features included in the pro version are:
-
- Bath rename
- Adding notes to your screenshots
- Border and scaling
- Custom keyboard shortcuts
- A library for the screenshots
- Sharing the screenshots to Facebook, email, Twitter, and so on
- More than one output formats (JPEG, PNG, or TIFF)
If you use the screenshots for your work, then the pro version is perfect for you.
Advantages:
-
- Easy to use
- Free version available
Disadvantages:
-
- Limited features on the free version.
2. Lightshot

Lightshot is one of the best tools to capture screens. This one is also considered as one of the easiest to use. In case you are worried about how to use the snipping tool on Mac, then this one is your best option. All that should be done is to press the print screen button located on the keyboard and choose the area of interest. After that, the app will do the rest.
The screenshots can be edited by adding colors, text, shapes, and so on. It has a simple interface that you only interact with on the screen capture screen itself. The most interesting feature is you can capture, save, and upload the screenshots easily. Apparently, it is the only tool that allows you to take one screenshot after the other in quick succession. It is completely free and enables you to copy and save, print screenshots, upload images to Prntscr.com, and look for a similar image on Google.
Lightshot is definitely a great snipping tool for Mac. The tool can be used by someone with a basic knowledge of computers. Even though it does not have rich features, this one is still useful and convenient.
Advantages:
-
- It is free
- It is fast
- Lightweight and easy to use
- Ability to save to the cloud or the social media
Disadvantages:
-
- It does not have a separate editing screen with advanced tools.
- Does not have capture modes.
Snipping Tool is not available for Chrome OS, but you have some alternatives with similar functionality. The most popular one is called Grabilla. Grabilla is defined as a simple and fast screenshot capture app. With it, you can capture screen or record desktop actions video with voice comments and instantly upload it to the image hosting server so that you can share it later. The animated gifts can be captured up to ten seconds. The images, videos, and files are able to be uploaded directly to the site. Aside from that, a user account with captured history is also available. There is a Grabilla Chrome capture extension that you can use to capture the whole webpage with scroll event capture HTML.
Windows has its own Snipping Tool that can be used to capture a screenshot, or a snip, of the whole screen or a portion of the screen. The screenshot that has been captured will show up in the Mark up Window of the tool. From there, you may save the snip, copy and paste it, email it, or add notes.
Windows 10 has another app related to screenshot that you may want to try. The app is named Snip & Sketch. Since it is available in the Microsoft Store, it can update faster and more frequently. Unlike Screen Sketch, this one will be displayed on the taskbar and in the task switcher (Alt + tab), meaning it will be easier for you to multitask. On top of that, you can also set the window size and even support multiple windows.
If you want to quickly snip and share the screenshot, you can just press the Windows key + Shift + S in order to bring up the snipping tool bar that is able to be used to snip a rectangular, something a bit more freeform, or full screen and it will go directly to the clipboard. That is all that you need and you can take it from this stage.
However, if you want more, you can also annotate and share the screenshot. If you think the Windows key + Shift + S keyboard shortcut is too long to remember, here are three easy options for you:
-
- Click the pen tail button: For those who have a digital pen, you can go to Pen & Windows Ink Settings and find the Screen Snipping with an option or single click. This one will take you directly into the snipping experience.
- Press Print Screen: If you want to use this method, you will have to go to the Settings app and look for PrtScn. This one will take you to a page with a toggle switch saying that you can use the Print Screen key if you want to launch the screen snipping. Please turn on the toggle to start snipping with just a single key press.
- Press the quick action button in the Action Center named Screen snip. As soon as you upgrade, it should be there. In case it is not there, you are able to always enable it through Notifications & actions Settings.
AUTHOR BIO
On my daily job, I am a software engineer, programmer & computer technician. My passion is assembling PC hardware, studying Operating System and all things related to computers technology. I also love to make short films for YouTube as a producer. More at about me…


Leave a Reply