
If you see the error message saying that Windows resource protection could not perform the requested operation while you are performing sfc /scannow command, do not worry. By performing these below fixes in your Windows System will help you to battle against the error Windows resource protection found corrupt files in the device.
Fix 1: Run the SFC in the safe mode
- In order to run the SFC in the safe mode, you will need to press the Windows Key + R at the same time to open the Run dialogue box. When it opens, please input “msconfig” and press Enter or click OK to open the System Configuration.
- Tick the safe boot located under the Boot tab and click OK.

- Finally, click Restart when asked. You can try to run the sfc /scannow again to see if it works.
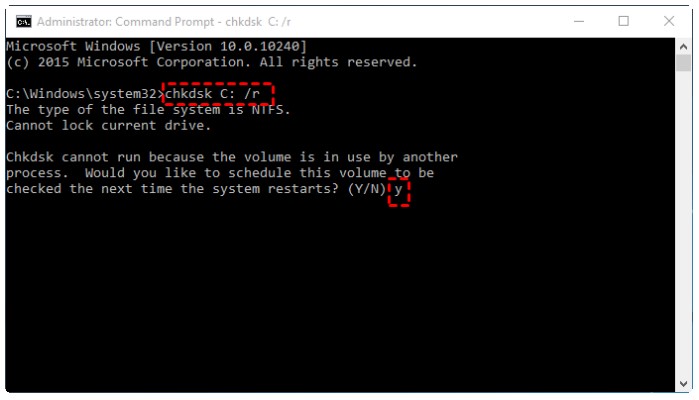
Fix 2: Run chkdsk to check the disk errors
If the issue is located on your hard drive, SFC would also fail. The thing called chkdsk is able to check the integrity of the hard disk and fix some different kinds of errors related to the file systems.
- Enter “cmd” in the search box from the Start. After that, right click on the Command Prompt to select Run as administrator.
- Enter “chkdsk C:/r” and hit Enter so that you can discover the bad sectors located on the drive and recover the readable information. You may want to change the C: with the letter of the drive where the Windows is located.
- You will be asked whether you would like to run the command before the next boot for the target drive is a boot disk. Please type “y” and press Enter.
- Then, type “exit” and press Enter to exit the Command Prompt
- In the end, you will need to restart the computer and chkdsk command will run before the operating system loads. You will have to run the sfc /scannow again if you want to check if the issue is fixed.
Fix 3: Modify the security descriptors on the winsxs folder
If the issue is still there even after running the chkdsk, it means the issue is not related to the disk failures. it is time for you to continue to check another possible cause. Apparently, the SFC utility cannot access the winsxs folder because there are some issues with the security descriptors of the folder.
- First of all, you need to run the Command as the administrator just like the one in Fix 2.
- Then, input ICACLS C:\Windows\winsxs” and press Enter to solve the issue with the security descriptors of the Winsxs folder.
- In the next step, type “exit” and press Enter so that the Command Prompt will be exited.

- Lastly, restart the computer and run sfc /scannow to see if the error is still there.
Fix 4: Reinstall the system
- Firstly, go to Microsoft Media Creation Tool window and choose the Download tool now option.
- Click Agree to accept the license agreement.
- Please keep the default which is to Update your PC and then click Next.
- Follow the rest of the process.
Fix 5: Run DISM commands
- Dism /Online /Cleanup-Image /CheckHealth
- Dism /Online /Cleanup-Image /ScanHealth
- Dism /Online /Cleanup-Image /RestoreHealth
This method will take some time so please wait until it reaches 100%. After the process is complete, please restart the computer and check if the issue is resolved.
Fix 6: Repair install Windows
Before trying this fix, keep in mind that this guide is for Windows 10. If you want to use it for Windows 7, the steps are different.
- Firstly, log in to an administrator account in Windows 10.
- Then, disable or uninstall any third party antivirus or security program installed on your computer in order to prevent it from interfering with the upgrade to Windows 10. It is able to be reinstalled after the Windows 10 has finished installing.
- Next, download the newest Windows 10 installation ISO file.
- Do not forget to double click to mount the ISO file. Please double click at the root directory to run the setup.exe file.
- When you see the Windows 10 Setup window on the screen, you will need to choose Download and install updates and click Next.
- Choose Accept when you are on the License terms page.
- Doing so will make the Windows 10 Setup check for any available updates.
- You will be able to see a recap of what you have selected and the thing that will be kept through the update when Windows 10 is ready to install. The one that is chosen by default is Keep personal files and apps. If you want, you are able to change the option by clicking Change what to keep.

- When everything is ready, please click the Install button in order to start the repair install of Windows 10. The last thing is to run the sfc /scannow and then check if it works.
It might take a while to install the Windows 10 and the computer will restart a few times. Please do not turn off your computer. Once the process of the installation is done, you will have to go through the easy out of box experience to finish setting up Windows 10 and then you will see something familiar on your desktop and each new feature included with the Windows 10.
SFC or System File Checker is defined as the utility in Windows. This one allows you to scan for and restore corruptions in Windows system files. However, the error message Windows Resource Protection could not perform the requested operation might appear when you are running the sfc /scannow command. This issue usually happens when the verification phase of the system scan reaches 19%, 27%, and so on. In some cases, people even find the Windows Resource Protection could not perform in Windows 10, Windows 8, or Windows 7 before the process of scanning starts.

AUTHOR BIO
On my daily job, I am a software engineer, programmer & computer technician. My passion is assembling PC hardware, studying Operating System and all things related to computers technology. I also love to make short films for YouTube as a producer. More at about me…


Leave a Reply