
The game known as Monster Hunter Rise has a lot of quests. One of the very first quests that is needed to be completed by the player like you is called Roly-Poly Lanterns. Here are the details of this quest:
- Level: 1
- Locale: Shrine ruins
- Type: Village Quest (Key Quest)
- Time limit: 50 mins
- Reward money: 240
- Objective: Deliver 5 Firelanterns
- Other conditions: Fail quest if reward hits 0 or time expires.
Monsters:
- Kelbi
- Bullfango
- Gajau
- Gargwa
- Izuchi
- Wroggi
- Jagras
- Bombadgy
Target rewards:
- Blue mushroom: ★ (x2) drop rate
- Honey: ★ (x2) drop rate
- Latchberry: ★ (x3) drop rate
- Herb: ★ (x3) drop rate
- Ivy: ★½ (x2) drop rate
- Antidote herb: ★½ (x3) drop rate
- Nulberry: ½ drop rate
Quest rewards:
- Blue mushroom: ★★ drop rate
- Herb: ★★ (x2) drop rate
- Honey: ★½ drop rate
- Parashroom: ★½ drop rate
- Iron ore: ½ drop rate
- Bitterbug: ½ drop rate
- Twisted remains: ½ drop rate

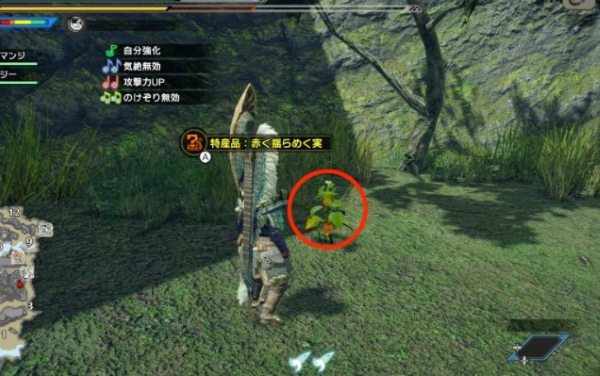
A quest called roly-Poly Lanterns requires you visit the Shrine Ruins and to find a total of eight Firelanterns. What are Firelanterns? Before going to get the Firelanterns, it is better for you to know what the Firelanterns look like. Firelanterns are the kinds of plants with small size. They are green and have multiple red flowers on them.
While it sounds easy to go to the Shrine Ruins and find Firelanterns, there are a lot of sources for Firelanterns that are spread all over the map. There might be some issues while trying to collect them, that’s why reading this guide is important to be able to successfully gather all of them.
First of all, it should be noted that Firelanterns are earned by interacting with Shimmering Red Berry plants which 10 of them are found in the Shrine Ruins. If you are on the Roly-Poly Lanterns quest, you should be able to see the green dots on the map that mark the locations of these plants. With the help of the map, it should be easy for you to navigate to them. Here is the guide to follow to be able to find these Shimmering Red Berries or Firelanterns:
Firelanterns at Section 1

In order to find the Firelantern at Section 1, the first thing that you need to do is to go left from the starting area camp. Next, use a Great Wirebug to be able to jump up and climb the cliff. Afterward, go a bit north and then drop down the cliff to find a Red Shimmer Berry. Feel free to pick up the Firelanterns.
Firelanterns at Section 2

After securing the Firelantern at Section 1, go to Area 1 and go to the location near the edge of the area. It should be easy for you to find the one that is on the ground.
Firelanterns at Section 3
After getting the Firelantern at Section 2, the next thing that you have to do is to go to Area 3. In this area, you will be able to see a vine that you are able to climb. When you reach the top, please move forward a bit and then turn right at the end to find the berry.
Firelanterns at Section 4

Once you are done getting the Firelantern Section 3, continue your way to get to area 9. In this location, you can use the Wirebug to climb up the cliff. Since the last 3 Firelanters that are included in the list are found on the higher elevations like this, you are suggested to use a Wirebug to reach the top.
Firelanterns at Section 5

From Section 4, you will have to drop down. Then, it is time for you to climb up the cliff in front of you. Upon reaching the cliff, you will be able to find the Firelantern close to the area.
Firelanterns at Section 6

You will need to climb down from the north side of Section 5. It is better for you to use the Wirebug in order to scale the cliff. By following the steps, you will be able to see a wall that has a vine on it. Please climb up this and then check the left side to be able to find the Red Shimmering Berry.
Once again, remember that the Firelanterns or Shimmering Red Berries are able to be found at several locations, such as:
- Among the cliffs close to the camp in sector 1
- By the edge of the map south east in sector 1
- Close to the Felyne camp on the higher portions of sector 7
- By the camp in sector 10
- Close to the Giant Wirebug in sector 9 toward sector 12
- Close to the Wyvern’s Nest in sector 11
- At a high point in sector 13
In case you fail to see the green dots that mark the Shimmering Red Berries, keep calm as there is an alternate way for you to be able to determine your position. In this case, you will have to pull up the detailed map of Shrine Ruins and then highlight Shimmering Red Berry that is located under the Special Items tab.
If you find it hard to follow the guide to find the Shimmering Red Berries or Firelanters above, you are recommended to watch a tutorial video shared by Gamepillar on Youtube. Please click on this link to be able to be taken to the video:
It should be easy for you to find these locations by following the tutorial video. If you have something to ask, you can leave a comment on the comment section under the video and hope for someone to help you with your question.
After collecting a total of eight Firelanterns, you should be informed that you have successfully completed the Roly-Poly Lanterns quest and you should be sent back to Kamura Village. While the description of the quest says that these Firelanterns have to be delivered to complete the quest, collecting them is enough to complete it.

AUTHOR BIO
On my daily job, I am a software engineer, programmer & computer technician. My passion is assembling PC hardware, studying Operating System and all things related to computers technology. I also love to make short films for YouTube as a producer. More at about me…


Leave a Reply