
In Animal Crossing New Horizon, you are able to build bridges and inclines. However, there are some requirements for building them. Some players may wonder about how close they are able to build an incline and a bridge.
On the Board section in the GameFAQs site, there is also a question about how close an incline and a bridge can be and then a user named Mirage-Mew2 answered that it is around 2 or 4 squared wide. I do not know whether it is true or not, but you are able to try it in the game to prove whether it is true or not or you are able to ask other players in other forums or ask your friends who also play the game. Alternatively, you are also able to find other sources which also discusses about it.

Inclines in ACNH
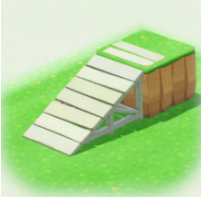
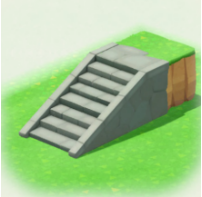
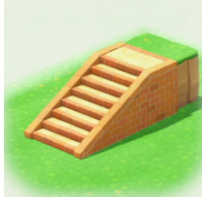
There are 8 types of inclines in Animal Crossing New Horizons where they are composed of ramps and staircases. Those are listed below.
- Natural Ramp

The price is 98,000 Bells. - Blue-Plank Ramp
You are able to buy it for 128,000 Bells. - White-Plank Ramp
It can be bought for 128,000 Bells. - Log Staircase
You are able to buy it for 168,000 Bells. - Stone Staircase
You are able to buy it for 168,000 Bells. - Brick Staircase
The price is 198,000 Bells. - Blue Steel Staircase
You are able to buy it for 228,000 Bells. - Red Steel Staircase
You are able to buy it for 228,000 Bells.
- Natural Ramp


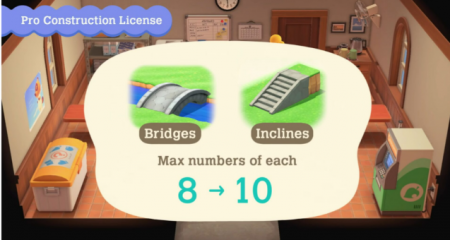
On your island, there are only able to be a maximum of 8 inclines. Do you want to move an incline? If you want to move it, you have to destroy it first and then build another one.
Now, how do we build an incline in ACNH? You are able to follow the steps below according to the Game8.
- To build an incline, the first thing that you have to do is to talk to Tom Nook about infrastructure and then you have to choose about bridges/inclines. It is important for you to note that after upgrading Resident Services, you will have access to infrastructural changes to the island by saying “Let’s talk about infrastructure”. You also need to note that you are only able to have one construction project at a time.
- After that, you need to choose the type of incline that you want to build.
- The next thing that you have to do is to use the incline marker kit beside a cliff. Have you been using the Island Designer app to terraform the cliffs? If you have, you need to know that you need 2×1 spaces of a cliff above and 2×3 spaces on the ground before an incline is able to be built in that area.
- Then, after you put down the Incline Marker, in front of the planned location, a Gyroid will be set to accept donations and you have to give Bells to progress construction. After the full amount has been paid, then the incline will be built and will be ready to use the next day. Are there any other users who live on the island? If yes, you are able to ask for donations. You are also able to ask for donations.
It is important for you to note that you are able to cancel incline construction. If you have received the Incline Marker Kit, you are able to cancel the construction anytime where it can be done by talking to Tom Nook at the Resident Services. However, you also need to know that Bells that have been donated will not be returned which means that it will be gone.
All types of inclines in ACNH have the same size where they are 2×4 spaces. The size is fixed and it means that you have to be careful when you are placing them near buildings that have a different width.
As also explained on the Game8, there are some important rules and requirements about building incline.
- 2×1 spaces on the cliff and 2×3 spaces on the land below are needed.
- You are not able to build inclines diagonally.
- You are not able to build inclines directly next to each other.
- You are not able to build inclines when the entry or exit is facing water. At least, there should be 1 space free around the incline.
How about destroying an incline? You are able to destroy an incline and it can be done by talking to Tom Nook about infrastructure. If you destroy an incline, you have to spend 10,000 Bells for doing it. If you have paid for it, then the incline will be gone the next day.
Bridges in ACNH
In ACNH, there are 8 types of bridges, the same as inclines. Those are listed below.
- Log Bridge
The price is 98,000. - Suspension Bridge
The price is 129,000. - Stone Bridge
The price is 168,000. - Wooden Bridge
The price is 168,000. - Brick Bridge
The price is 198,000. - Iron Bridge
The price is 228,000. - Red Zen Bridge
You can buy it for 228,000. - Zen Bridge
It can be bought for 228,000.
- Log Bridge


How to build a Bridge in ACNH? According to the Game8, here are the steps to build a bridge (Infrastructure Project) in ACNH.
- First, you have to talk to Tom Nook about infrastructure and you have to choose About Bridges/Inclines.
- After that, you need to choose the type of bridge.
- Now, you have to use the bridge marker kit beside the water.
- Then, the bridge will be built the next day after you reach your goal.
If you want to build a bridge for the first time, the steps are explained below according to Game8.
- First, you have to open Nook’s Cranny.
- Then, you need to get the Bridge Construction Kit recipe from Tom Nook.
- Now, you have to craft the Bridge Construction Kit.
- After that, you need to place the Bridge over a river.
- At last, you need to wait for the next day.
Same as inclines, the bridge also has rules and requirements when building it.
- It will take up 4 spaces in width for a bridge and you are only permitted to build bridges over water which is 3-4 spaces wide.
- The land on both sides of the bridge must have 4×1 spaces free and they have the same size.
- You are not able to build a bridge if there is a river or cliff nearby.
- You cannot build bridges directly next to each other.
- You are able to build bridges diagonally.

AUTHOR BIO
On my daily job, I am a software engineer, programmer & computer technician. My passion is assembling PC hardware, studying Operating System and all things related to computers technology. I also love to make short films for YouTube as a producer. More at about me…


Leave a Reply