
If you are playing a tabletop game on Roll20, sometime you may not see the map as the lighting is darker.
We guess that the darkness on the game map will make it difficult for you to play the game even though you master the game. If it happens, the best solution for you is to use Dynamic Lighting.
Do you already know what it is? However, the Dynamic Lighting is a great feature that you can find on Roll20. If you mostly play any games on Roll20, we think that you should master how to use the Dynamic Lighting features and start to set it on.
How to Use Dynamic Lighting Feature on Roll20?
Dynamic Lighting is a gorgeous-exclusive feature for Plus and Pro subscribers. This is a paid-advanced map lighting tool which is currently available for subscribers. That’s because the Dynamic Lighting is not a free feature provided on Roll20, you certainly must have either a Plus or a Pro Account subscription.
The range price of the subscriptions are roughly $5 to $10 a month which come with a ton of other extras included. The Plus account for Dynamic Lighting is actually worth $5 a month. Which makes this tool very exclusive is because it greatly calculates the line of sight on the fly as tokens are moved across the tabletop.
To use the Dynamic Lighting on the game map, you surely have to set it before. It means you should follow some steps that lead you to add the Dynamic Lighting and the use it on the game map.
Here’s how to use the Dynamic Lighting on Roll20?
Activate the Dynamic Lighting

Before you begin adding the Dynamic Lighting to the map, you have to activate it. You have to open the Page Settings and then check the checkbox to activate the Dynamic Lighting. For the first option, make sure the Enabled option is selected. The other option is to add the functionality to the Dynamic Lighting system.
Here, you’re able to use Fog of War in combination with Dynamic Lighting. You also need to consider checking the option Only Update on Drop. If this option is selected, the tabletop only redraws the Dynamic Lighting after a token has been taken and put elsewhere on the map. However, it can decrease the render burden for users running on old computers.
Set Dynamic Lighting Layer

To add the Dynamic Lighting to the map, you have to set the Dynamic Lighting layer before. When you are on the Dynamic Lighting layer section, you are able to use all of the drawing tools which are available to make the shapes and the liners to draw walls, doors, columns and more. In drawing those objects, you can also use the color to differentiate the types of light obstruction.
To draw outlines of all the walls and other pieces of the mao, you can use the drawing tools at all. The best option for you is to use the polygon/ line tool as its performance actually is associated with using it. Besides, the Freehand Tool is disabled while you are on the Dynamic Lighting layer.
To note, any tokens or drawings added to the Dynamic Lighting will be invisible whenever the layer is not chosen.
Add the Light
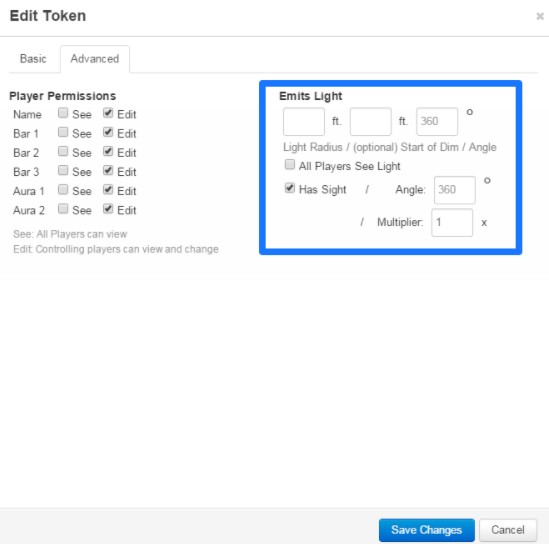
Once you have drawn the Dynamic Lighting Layer, you can then add the light to your Page. Need to know, the light will be emitted through the tokens. Here, you can create a token and put it on the map. You can double-click on the token and choose the Advanced tab. By clicking on it, you will find the Emits Light option.
The option will allow you to enter a light radius amount. It also will give you a checkbox for All Players See Light. Well, only the player who can see that token’s light emission are those who have given permission to that token when the checkbox is left unchecked.
In default, the light will start to dim about 5 feet before the chosen maximum radius. Its effect can be modified if you are using the “Start of Dim” value option in the “Advanced” tab. You can also create the dimmed area larger by setting the start of dim value to be much smaller than the radius.
Moreover, you can also create the edge of the light a “hard” transition, you can make the “start of dim” value larger than the light radius value. You are able to create dim light with no bright source. It’s useful to create any effects where the light is coming from under a door or via shutters or curtains. You can simply set the start of dim value to -5.
To prevent from snapping to the grid, you can hold down the alt key while moving the token.
Enable the Line of Sight
We think that you will need to enable the line of sight on the map. However, the line of sight will restrict the players to only see the light on the field of vision for the tokens which they control. It means a light on the other side of a wall will not be visible to a player even if that’s a light which is visible to all players.

- Don’t miss: How to Make a Teleporter in Minecraft Easy
To enable the line of sight, you have to check the Line of Sight checkbox on the Page Settings. Or the player controls have Has Sight checked, if it’s not, the players will not see anything but darkness. In this way, GM can also highlight a token. Additionally, you can also hit the CTRL+L to see the scene restricted to the line of sight of the selected token.
Aside from the line of sight feature, you are able to customize the angle of the light and also the light of the sight of the token. So, you can determine for the player who should only have a 140 degree field of view instead of the default 360 degrees. To use it, you can use Angle settings on the Token Settings screen to change the angle of the light which is emitted or the angle of the line of sight for the token.

AUTHOR BIO
On my daily job, I am a software engineer, programmer & computer technician. My passion is assembling PC hardware, studying Operating System and all things related to computers technology. I also love to make short films for YouTube as a producer. More at about me…


Leave a Reply