Do you need to print PDF from iPhone? In the past, you had to hook up your printer to a computer to get the physical copy of documents, pictures, and so on. Now, there is a thing called AirPrint, the one that can be used to make your iPhone print something like PDF wirelessly over Wi-Fi.
Step 1: Connect to Wi-Fi
In order to use AirPrint, you need to connect both your printer and your iPhone to the same Wi-Fi network. Take note that there may be multiple networks available in an office setting and you may need to enable the AirPrint function depending on which one your printer is using. Please check your printer’s manual or the official website of the manufacturer to get the detailed instructions about how to turn on the function and connect to Wi-Fi.

Step 2: Choose the printer
Checking the connection between your iPhone and the printer can be done by opening an AirPrint supported app such as Safari, Evernote, or Mail. They mostly will feature a popular arrow that looks like a forward or reply email icon. All that you need to do is to tap the icon, choose Print, and the printer should show up as the selected device by default. Actually, you can also tap Select Printer at the top, allowing your iPhone to scan for nearby printers.
Step 3: Select the number of copies
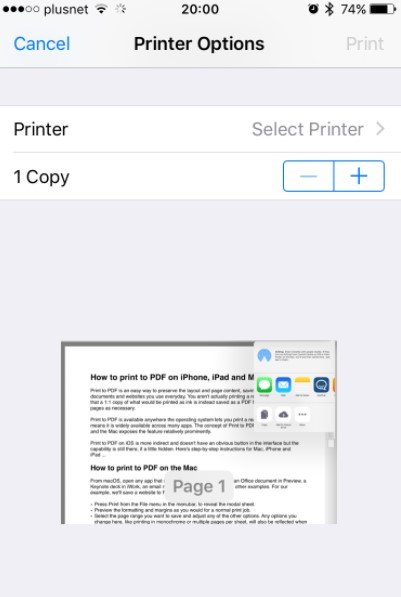
If you want to choose the number of copies that you want to print, please tap the addition and subtraction arrows to the right of Copy. At least one copy is mandatory, but you are allowed to print up a total of 99 pages at the same time if you want. Besides, you are also able to tap Options to reveal color options and which pages to print if there are multiple pages.
Step 4: Print
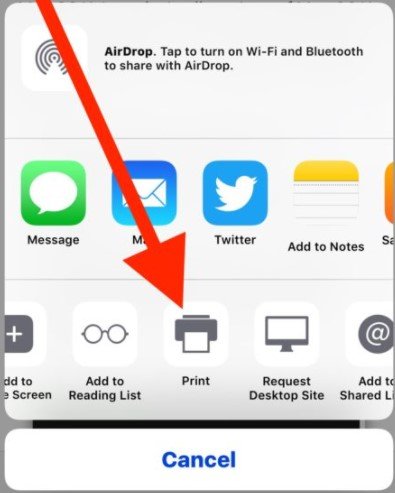
After choosing the printer and the number of pages you want, the last thing that you will need to do is to press the Print button located in the top right corner of the page. If you want to cancel your print job or check its status, you are able to do so by double tapping the Home button, selecting Print Center while in the App Switcher, and tapping Cancel Printing.
If you are using an iPad and you want to print the PDF, the steps for printing to PDF on iPad are similar to the one for iPhone. The main difference is finding the Print buttons in the first place as iPad and iPhone apps usually have very different interfaces. From that stage, the instructions are basically similar.
When you are in the AirPrint compatible app, the first thing that you will have to do is to open the Print UI, revealing the standard system sheet. Then, pinch outwards on the preview area. If you are not really familiar with a pinch out gesture, it means putting two fingers close together and then spreading them apart so that the preview will be expanded to fill the screen. In the full screen preview mode, please tap the screen once in order to reveal the toolbars. The next thing is to tap the Share button located in the toolbar at the top right of the screen. It will present the system share sheet with the export options corresponding to the apps that you have installed. If you want to save the PDF as a file in iCloud, you will need to select the Add to iCloud Drive button and it will save the copy of the PDF in the iCloud Drive folders, which then you are able to import into the other apps that you want.
If you want to print PDF on Mac, you will need to open any app that supports printing first. Feel free to choose from an Office document in Preview, an email message from Mail, a Keynote desk in iWork, or any other apps that you want. In this example, the website will be saved to PDF using Safari.
First of all, you should click the Print from the File menu in the menubar in order to open the modal sheet. Then, preview the formatting and margins as you would for the normal print job. In the next step, choose the page range that you want to save and adjust any of the other options. You can change anything here like printing in monochrome or multiple pages per sheet. Everything will also be reflected when you save it as PDF. After that, press the PDF button located in the lower left corner of the sheet to reveal a sub-menu of options. The second item in the menu called Save as PDF is the most direct Print to PDF. Then, choose this to select a location in the file system and macOS will input a rendered PDF there. There are some other menu options that offer some quick shortcuts if you want to include the PDF as an email attachment, send the PDF to a contact with iMessage, or straight to iCloud Drive.
In this modern era, sometimes carrying a physical copy of anything important is still considered to be a better option. Apple offers AirPrint technology that allows you to send print operations over Wi-Fi to supported printers, eliminating the need for unnecessary cables. After you have your printer properly set up, it is really easy to print anything that is displayed on your iPhone or iPad screen.
For those who are interested in AirPrint to print the PDF, please read the information above and follow every step so that you will know how to print the PDF from iPhone to printer with Wi-Fi. For more information about it, it is better for you to visit the official website of Apple. If you have some questions to ask, you are encouraged to reach out the customer service of Apple or visit the community of Apple where the ones that have the same interest in Apple gather.
AUTHOR BIO
On my daily job, I am a software engineer, programmer & computer technician. My passion is assembling PC hardware, studying Operating System and all things related to computers technology. I also love to make short films for YouTube as a producer. More at about me…












Leave a Reply