
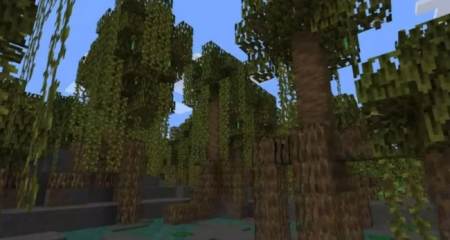
Shaders are the name of the feature that is usually used for several types of effects in Spectator Mode when you take the viewpoint of a mob. They can be disabled by switching the perspective to the third person view. They will not work on the computers that are not supported by OpenGL 2.1, as the GLSL was introduced in OpenGL 2.
Shaders are currently able to be found in the assets/Minecraft/shaders/ directory of Minecraft.jar. As for the file path of the currently active shader, it is shown on the debug screen.
It is important to know the difference between specific shaders that can be subtle. In order to notice the differences, it might be needed for you to observe a picture with the higher resolution by clicking on one of the pictures on this page: minecraft.gamepedia.com/Shaders.
In case the shaders option is not showing up, you will have to make sure to enable Optifine before launching.

For those who are using the 1.15, there is no Optifine available. That explains why the shaders are not showing up. Optifine refers to a mod with the ability to help you adjust Minecraft effectively. It works like a magic in making the game run more smoothly and use less resources. This mod enables you to run the resource or texture pack HD without installing more other mods.
Optifine is a perfect option for personal computers that want to run Minecraft more smoothly. It is a really excellent one for those who play the game with features like FPS boost, support HD textures, antialiasing, variable render distance, connected textures, and so on.

Features of Optifine
- FPS boost
- Support for Shaders, based on the Shaders mod by Karyonix
- Support for HD Textures
- Variable Render Distance
- Dynamic Lights
- Configurable Smooth Lighting
- Performance: VSync
- Smart Advanced OpenGL
- Fog Control
- Mipmaps
- Anisotropic Filtering
- Antialiasing
- Better Grass
- Better Snow
- Clear Water
- Custom Sky
- Random Mobs
- Connected Textures
- Natural Textures
- Faster Math
- FPS Control
- Chunk Loading Control
- Configurable Details
- Configurable Animations
- Fast Texturepack Switching
- Fullscreen Resolution
- Debug
- Time Control
- Autosave
Steps to install Optifine
- The first thing that should be done is to make sure you have already installed Minecraft Forge.
- Then, find the app named Minecraft in the folder.
- For the users of Windows, the app can be run from the Start menu, type %appdata% and click Run. If you use Mac, you can open the finder, hold down ALT, and click the Go and then Library, which can be found in the top menu bar.
- Once you have done everything, open the folder Application Support and find Minecraft.
- Next, place the mod that you have just downloaded (.jar file) into the Mods folder.
- In the end, you should see the mod is installed when you launch Minecraft and click the mods button.
If the shaders are still not showing up even after you do not use the Optifine 1.15, the issue might be due to the file. In case the downloaded shaders are not showing up in the list, most likely they are required to be extracted. In this case, you will need to extract the zip files. If it does not help, you are recommended to try downloading the other shaders from the other creators and check if the same issue happens.
Some Recommended Shaders
1. SEUS or Sonic Ether’s Unbelievable Shaders
Sonic Ether’s Unbelievable Shaders is the best choice for anyone who wants to experience something like they have entered a whole different game. This one is a modification of another well-loved shader pack and it will make your Minecraft world as good as you can expect. It offers soft natural lighting, procedurally generated clouds, rain that adds a glossy seen to each surface touched by it, and many more. The recent version of the shader gives the ray tracing effect, which looks really stunning in action.
There are some different versions of SEUS on offer, but you are encouraged to get the SEUS Renewed, the one that provides tons of options and very little impact on your PC.
2. Continuum Shaders
In the past, Continuum was the Sistine Chapel or Minecraft shaders, but now it is just the default for the realistic graphics mods. After installing this one, you will be able to see photo realistic lighting effects, true to life clouds, color gradients across the sky box, and shadows that adjust in shape and angle with the position of the sun. Everything is high quality.
3. KUDA Shader
The KUDA shader improves the natural lighting in Minecraft. It works like magic, especially with the ability to turn any rural scene into a masterpiece. This shader is so good at providing the soft and realistic one.
4. Naelego’s Cel Shaders
For those who are fans of comics or cartoons and are looking for the kind of shader, Naelego’s Cel Shaders is for you. The bold colors and crisp outlines are introduced to emulate the look of a classic comic or cartoon.
5. BSL
BSL shaders offer some of the best visuals that you can get in the game without having to break your rig. The lighting looks warm and welcoming, and the water also looks realistic without contrasting too much with the blocky environment. If you are after a slightly more realistic shader, this one is recommended.
6. Chocopic13’s Shaders
Chocopic13’s Minecraft shaders are amazing with clear and crisp graphics that can make beautiful water effects and glowing lighting. One of the most interesting things about this shader is the fact that there are a lot of versions.
7. Ebin
SEUS is the inspiration of Ebin, even though two of them look completely different. The most wonderful thing is that the clouds and foliage are impressively realistic, but there are also some light visual improvements.
8. ProjectLUMA
The true successor of KUDA is named ProjectLUMA. This one is re-written from scratch to offer the best possible visuals for as minimal a performance impact as possible. even though it is not really the same as KUDA, the result is stunning.

AUTHOR BIO
On my daily job, I am a software engineer, programmer & computer technician. My passion is assembling PC hardware, studying Operating System and all things related to computers technology. I also love to make short films for YouTube as a producer. More at about me…


Leave a Reply