
Now, Google Meet is one of the most popular online tools where you are able to meet with your friends or co-workers remotely. However, when you experience the “No Camera Found” error, of course it is frustrating. Do not worry, there are some methods to fix this Google Meet issue.
Fix Google Meet Issue
Method 1: Allow Google Meet To Access Your Camera
Before you attempt anything else in this tutorial, you need to check if Google Meet has the permissions to access your machine’s Camera and Microphone.
- If you have not signed in to your Google Meet, you have to first sign in to your Google accounts.
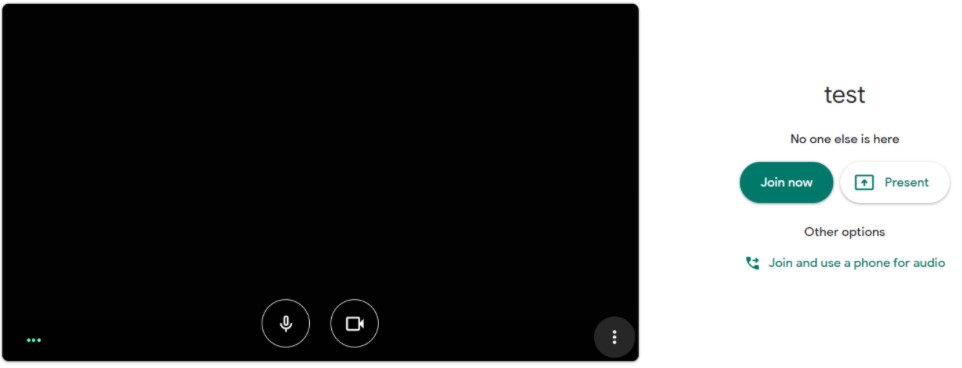
- After that, you are able to click on the Join or start meeting to join a meeting or start a meeting of your own. Please note that starting your own meeting will need you to have a G Suite account.
- Then, enter your meeting room name or the name for your new meeting, that you want to create.
- When you are in, you are going to see your camera window appear on the left. However, it may show as ‘No Camera Found’ or ‘Camera is off.’ You need to click on the little camera-like icon with a red ‘X’ icon right next to the ‘Bookmark this tab’ button which is located on the top left of your Chrome search browser. For note: the position of this icon may differ depending on which search browser you are using now.
- When you click on this little camera icon, you have to choose the option to ‘ Always allow https://meet.google.com to access your camera and microphone.’
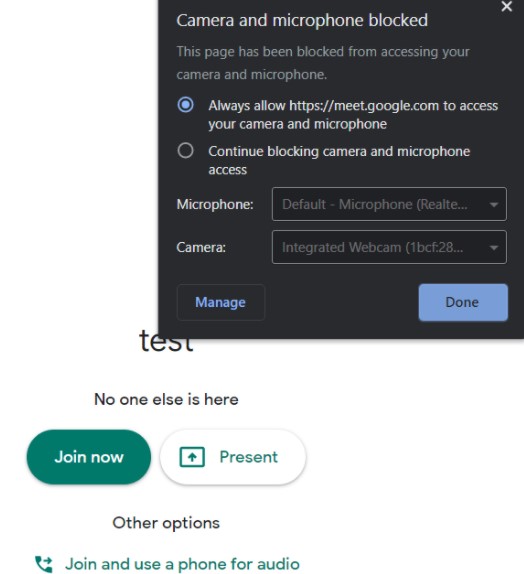
- Next, reload the page to view the change in permissions come into effect. You should see the webcam or camera working with Google Meet. The ‘Camera is off’ or ‘No Camera Found’ error message will no longer appear.
- To give a confirmation, whether it is indeed working, simply you are able to click on the More options button which is located on the bottom-right corner of your camera window.
- The next step that you have to do is to choose Settings.

- Please click on the Camera tab to know if it is using the correct webcam or camera you have on your machine.
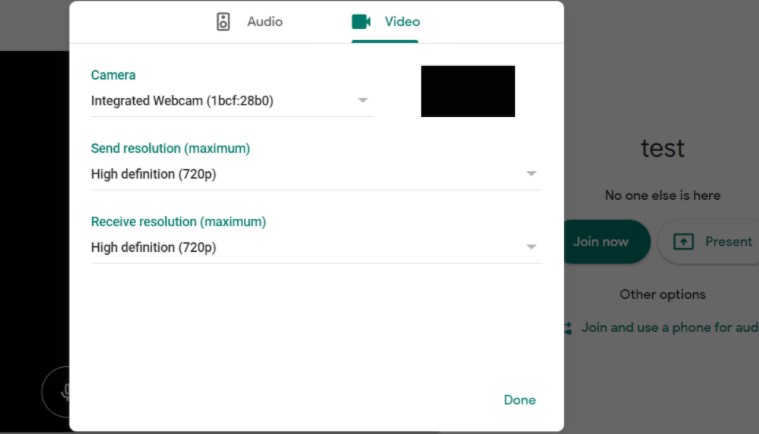
- There you go, now you will be able to use your camera with Google Meet for video calls and meetings.
Method 2: Check Your Camera
Another aspect is of the camera on your machine itself. It is probably that the camera is closed with a shutter, that is a feature available for a select number of PCs to stop prying eyes from spying on you. For this case, you have to ensure that your camera is in no way damaged or disconnected from your PC. This especially occurs if you are using third-party webcams. Another significant setting is the camera permissions on your PC or Mac. There is a setting in your machine that you are able to enable/restrict access to the inbuilt camera.
Here is how you can locate the setting and ensure that it is not disabled:
For Windows 10
- At the first step, you have to click on the Start button.
- After that, choose the Settings button.
- Then, from the list of settings, choose Privacy.
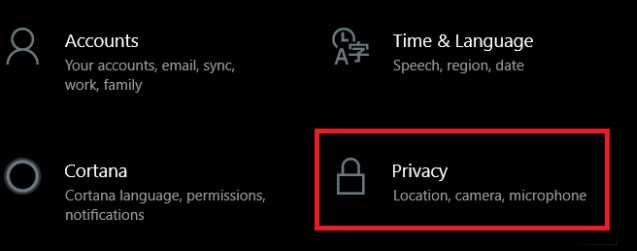
- From the left sidebar, under App Permissions, choose Camera.
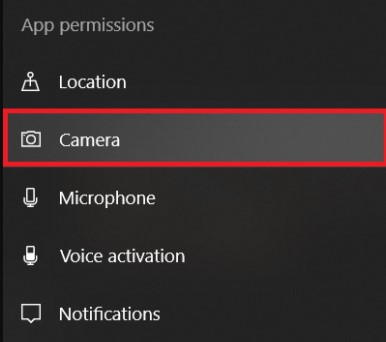
- Now under Allow access to the camera on this device heading, you have to click on the Change button. Please ensure that the Camera access for this device is turned On rather than Off.
Method 3: Use The Latest Version of Your Search Browser
Google Chrome, Microsoft Edge and other search browsers are updated via automatic updates in the background. But, at times, such automatic updates may fail and need manual intervention. To make sure that your search browser is up-to-date, you have to rest assured that the problem is not due to any bugs or technical issues which were with the older versions.
Here is how you can do to check for updates of your search browser:
For Google Chrome
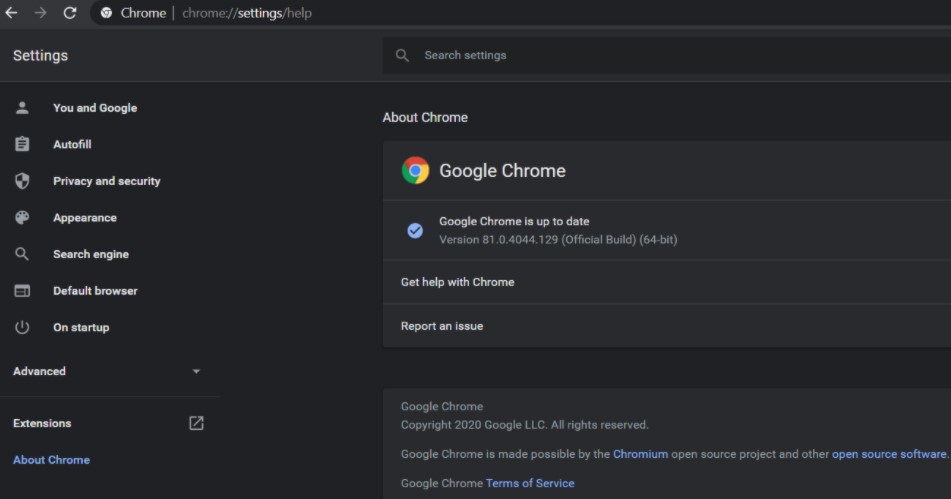
- You will be able to see if there are any updates by clicking the Menu -> Help -> About Google Chrome. In alternative, you are also able to type chrome://settings/help into the search bar and then press Enter.
- In the About Chrome page, automatically it will begin to check for the latest updates. It may take a few minutes. If there is an update to be installed, please download and install it.
Method 4: Disable Your VPN or Antivirus
Using a VPN is handy when attempting to route the internet connection in the region or locale of your choice. But, with as many advantages it brings, it may confuse services like Google Meet and cause trouble once connecting to your machine. If you are using one of VPN services such as ExpressVPN, NordVPN, or Surfshark, we suggest you disable it temporarily. After the VPN is disabled, simply refresh your search browser. Then retry to access Google Meet. The same applies to your antivirus as well as firewalls too. Please try to turn off the antivirus temporarily running on your PC or Mac. Some instances of antivirus include Malwarebytes, Microsoft Defender, Bitdefender, etc. For the firewall, also you will need to ensure that it is disabled too temporarily.
If you are on Windows 10 PC, here is how you can do to disable your firewall:
- Firstly, click on the Start button from the bottom left corner and then choose Settings.
- After that, choose Update & Security.
- Then, choose Windows Security from the left sidebar.
- Next, under Protection areas, to click on Firewall & network protection.
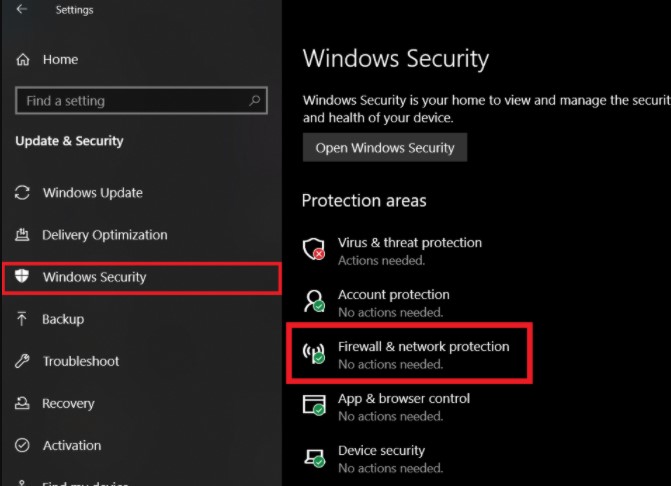
- Now ensure that under the Domain network, Private network and Public network options that the Firewall is turned off. To turn it off, simply you are able to click on each one and then toggle the switch off under Windows Defender Firewall.

AUTHOR BIO
On my daily job, I am a software engineer, programmer & computer technician. My passion is assembling PC hardware, studying Operating System and all things related to computers technology. I also love to make short films for YouTube as a producer. More at about me…


Leave a Reply