
One of the missions in Ransom Keep is to Sabotage Repair Bays in the area. Now, you may be wondering how you are able to get to Repair Bay in Ransom Keep. Do not worry, here we are going to show you how to get to the Repair Bay in Ransom Keep to sabotage them.
How to Get to The Repair Bay?
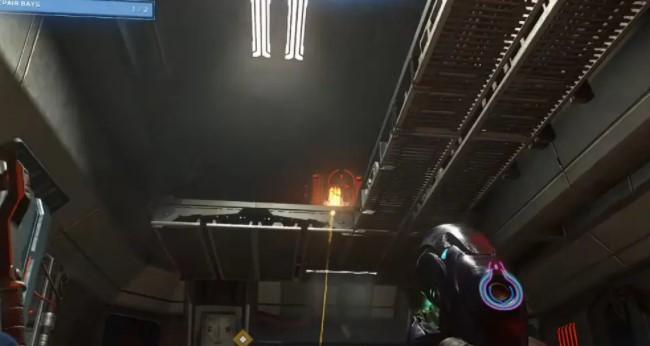
In the middle of Ransom Keep, you have to go inside the building near the tanks. At the entrance you are going to see a yellow barrier, preventing you from going further. What you must do is to look up to the upper level of the building. Then, you are going to see a Power Cell which you need to shoot with your gun. After destroying the Power Cell, the barrier is going to disappear and you are able to get to the repair bay. Also, you are able to see the connection between the barrier and the power cell when you use your Scan ability.
Sabotage Repair Bays at Ransom Keep
Now, you are able to use tanks to navigate the area and defeat opponents. After getting into the room, you are able to interact with the repair bay to sabotage it and complete the mission.
Your first task (aside from shooting the aliens) when you arrive is to raise and destroy four silos. After done, you are going to get the sabotage repair bays objective. The first repair bay is easy to sabotage. The second repair bay is blocked by an energy shield.
It is not obvious where the shield controls are. While facing the shield, you have to back away some paces and ping your AI Scan (down on the D-pad). The power cell that you have to destroy is above you. If you keep to the left side of the hall, then you are able to get an angle to shoot it from the ground. Otherwise, you have to use your Grappleshot to zip up to the walkway.
Sabotage Repair Bays at Forge of Teash
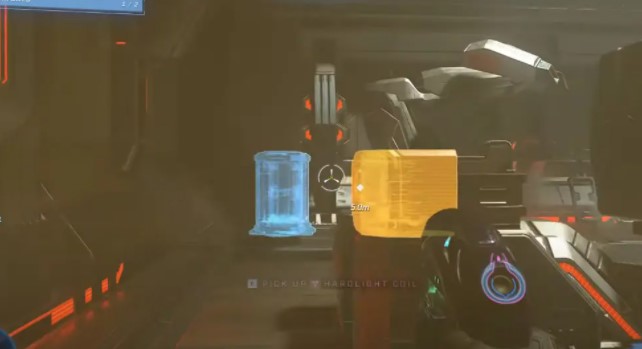
While the Silo control panels are outdoors and easy to activate after nearby opponents have been eliminated, the Repair Bays are buildings which must be entered to sabotage them. They are able to be identified by pressing down on the d-pad on controllers to scan the area. Any small yellow cube which appears will be the controls to sabotage a Repair Bay. But, the northernmost Repair Bay door at Forge of Teash is sealed. Scanning reveals a line leading to the door. To sabotage this northern repair bay, you have to go to the right of the building and enter a tunnel system. When in the tunnel, you are able to take the first left and follow the path to a Gravity Lift.
The lift will bring you inside the Repair Bay. Please scan to find the yellow cube. Then go to it and hold X on controllers to complete this section of the mission. Apparently, this is the hard part of completing the Forge of Teash, however there is another sealed bay later. Unfortunately, Repair Bay has a panel which can be shot at to the right of the entrance to gain entry. Also, the Silos must be destroyed. First, you need to scan for yellow control panels. After activated, they are going to reveal the Fuel Silos. Please change to a Plasma Grenade in Halo Infinite to make light work of them. After destroying all the Silos and sabotaging all the Repair Bays at Forge of Teash, there are Mjolnir Armor Lockers and Spartan Cores nearby in Halo Infinite which can be quickly found. The armor is a multiplayer collectible. While the Spartan Cores are used in the campaign to upgrade Master Chief’s equipment and shields.
UNSC Audio Logs at Ransom Keep
- UNSC Audio Log 1
The first UNSC Audio Log is located down a path near the southern cliff and by a destroyed warthog. Walking towards it will feel as if the player is leaving the area completely but the UNSC audio log is at the end of the path. The UNSC audio log is in front of the destroyed UNSC equipment. It will play automatically when the players interact with it. - UNSC Audio Log 2
The second UNSC Audio log is nearby but a bit more of a challenge to get. It is on top of the cliff which overlooks this outpost from the south. From the first UNSC audio log, the players have to go back to the entrance of the path. Once there, the players have to use Halo Infinite’s Grappleshot to get to this second UNSC audio log. Please aim at the cliffside with the overhead lights attached to it, and it will pull a player up to a resting point. From here, the players are able to use the grappling hook to finish the climb. At the top of the cliff, the audio log rests on several UNSC equipment.
- UNSC Audio Log 1
Banished Audio Logs at Ransom Keep
The Banished are the main antagonists in Halo Infinite. Their audio logs add in several extra context and background to the world.
- Banished Audio Log 1
The first Banished audio log is located near some stacked tank tracks in the corner of the walled-in section. This audio log is located on the ground, lying against this short tower of tank parts. - Banished Audio Log 2
The second Banished audio log is nearby, but inside the building the players have to enter to destroy one of the repairing portions of the base. It rests inside the entrance of this building and along the left wall when the players enter inside.
- Banished Audio Log 1
Spartan Core Location at Ransom Keep
Spartan Cores are a crucial piece of Halo Infinite. Fortunately, this one is easy to find. If players had captured this outpost, then they would have run past it because it rests right near to the southern fuel silo they had to destroy. This Spartan Core is near the southern-most section of Ransom Keep. It is located among a pile of UNSC supplies.

AUTHOR BIO
On my daily job, I am a software engineer, programmer & computer technician. My passion is assembling PC hardware, studying Operating System and all things related to computers technology. I also love to make short films for YouTube as a producer. More at about me…


Leave a Reply