
Taking photos of stars, or astrophotography, is very interesting for many photographers. So, how do I set up a DSLR to take photos of the stars? This article can be a useful guide for you because it explains everything you need to know about this type of photography. Let’s dive in!
Why Is Photographing Stars So Fascinating?
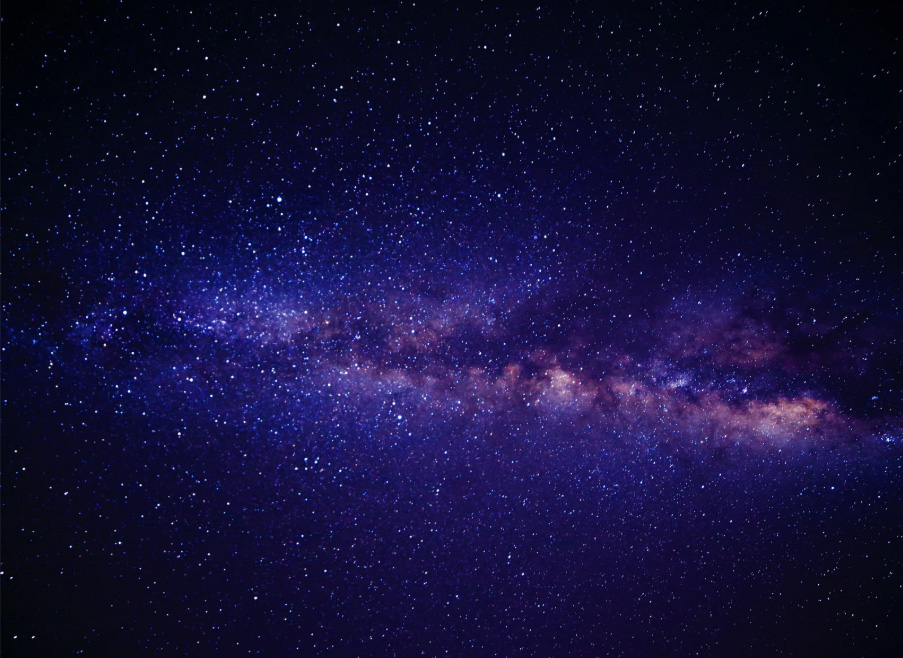
Photographing stars, or astrophotography, is a hobby for many people. This type of photography is so interesting because it involves unique aesthetics and techniques. Astrophotography is not only about stars, but also other celestial objects, including the starless night sky and planets.
If you want to photograph stars, you need skill, luck, and knowledge of camera features. If the sky is cloudy at night, it will be difficult for you to photograph stars. Those who want to be experts in astrophotography need to understand how the atmosphere works.
Don’t worry, you don’t need to be a meteorologist. Certain preparations and photography techniques are best for photographing parts of the galaxy. But it would be even better if you understand a little about the movement of stars, moon phases, and so on.
This is necessary so that you can photograph stars at the best time. Astrophotography is different from other types of photography because it requires a scientific approach. It also requires creativity in trying out different settings and angles to get different results.
With astrophotography, we can capture the magic of the night sky that cannot be seen with the naked eye. You can easily see the beauty of the stars in digital photos that can be saved and sent anywhere. Astrophotography also makes us more familiar with the universe that we often ignore.
Taking photos of stars at night is also different from other moments because it is more peaceful and quiet. This sensation is difficult to describe in words. Every time you take a picture, you can admire the aesthetics of space in silence.
How to Take Pictures of Stars at Night? – Ultimate Guide
How do I set up a DSLR to take photos of the stars? Is it difficult? Depending on how well you understand camera settings at night and sky conditions, you can get amazing photos. Photographing stars can be a hobby or a professional project.
Even if it’s just for your personal collection, you still have to do your best in taking pictures of stars. Is this your first time photographing stars at night? Don’t worry, because here is a complete guide to getting amazing star photos.
As a nightscape photographer, I need precise settings and several experiments to get the photos I want. The ultimate equipment is a DSLR camera. This type of camera is ideal for capturing objects in low light.
So, how do I set up a DSLR to take photos of the stars? I will explain the steps for star photography in detail so you can follow along:
Essential Equipment Preparation: DSLR, Remote Shutter, Tripod, etc.
Start by preparing a DSLR camera for stars, a tripod, a large aperture lens, and a remote shutter. Prepare an f/2.8 lens, which is often recommended for night photography, but a larger aperture is also okay. Check your memory card to see if you have enough storage, and it’s better if you bring a spare battery.
Finding the Best Location for Star Photography
How to take pictures of night sky? Not all locations are ideal for capturing night photos, especially those that are too well-lit. Sources of light at night can come from passing vehicles, lights from buildings, and so on. Try to find a location in a rural area or one that is far enough from the hustle and bustle of the city.
For star photography, it’s better if the sky is darker. Why? You can see the stars more clearly if the sky is darker, especially in the photos.
Initial Settings on Your Camera
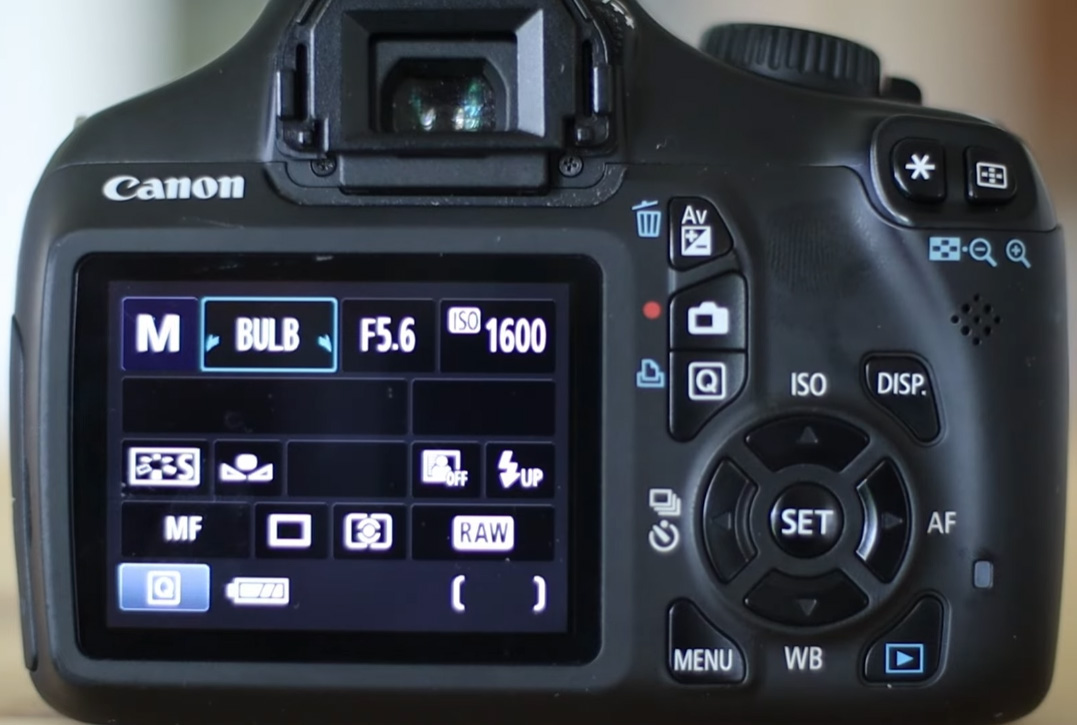
How do I set up a DSLR to take photos of the stars? If you want to use a DSLR to photograph stars, use M or manual mode so you can adjust the settings more flexibly. At the very least, you need to adjust the aperture, ISO, and shutter speed to suit astrophotography. Here is the best astrophotography setup for beginners:
– Low Shutter Speed
Set a slow shutter speed on your DSLR. Shutter speed affects how quickly the camera opens and closes the sensor, which is crucial for astrophotography. You need a shutter speed of 30 seconds or longer.
DSLRs can take longer to process less light at night. You can use 20-30 seconds as a benchmark for shutter speed settings. Sometimes photographers set the shutter speed too long, causing the stars to appear blurry or streaky.
Optimizing shutter speed also depends on tracking settings and tripods. As astrophotography is closely related to science, we need to adjust to the movement of stars or the Earth’s rotation.
– High ISO
Set the ISO on your DSLR as high as possible, which may vary between cameras. Star photography requires between 1600 and 3200 ISO to ensure optimal photography even in minimal light. A high ISO can capture enough light while avoiding noise, but adjust it flexibly to the most optimal conditions.
You may think about setting a longer shutter speed to compensate for the ISO, but this can sometimes cause star trails or star lines. It is better to set a higher ISO to avoid this, but don’t go too high. An ISO of 6400 or higher can affect shadow detail, sharpness, and noise.
– Minimum Aperture
Set the aperture on your DSLR to f/2.8 or lower to capture more light. This aperture is also ideal for beginner photographers, but you can experiment with f/2 or f/1.4 to gain more insight.
What if the aperture is too narrow, like f/4 or higher? The result will have a lot of noise and reduce star detail. You can try it yourself to see how different the results are. So, those are the basic DSLR settings you need to know for astrophotography.
Set Up Your Tripod
You must use a tripod to photograph stars. Choose a tripod made of sturdy material so that it can hold the DSLR steady without any shaking. Camera equipment stores offer a wide range of tripods, from inexpensive to premium models.
First, you should choose a tripod with a minimum load capacity of 5-10 kg or one that matches the weight of your DSLR. Avoid cheap tripods because they can cause shaking, which can greatly affect the quality of your star photos.
Furthermore, even with a good tripod, the camera can still shake slightly if you touch it. Prepare a remote shutter so you can take photos without touching the camera at all.
Aim the Camera Focus at the Stars
How do I set up a DSLR to take photos of the stars? Should I use autofocus or manual focus? The wise choice is to use manual focus because autofocus is not optimal in low-light conditions. If you use autofocus, the stars may appear less sharp or blurred.
How to take astrophotography photos? Set the DSLR focus to infinity as a starting point. Use live view on your camera to check the sharpness through zoom, and you can take several samples. The expected result is that the stars become sharp, round dots.
When pointing the camera at the sky, try to find the brightest star first. Point to dimmer stars to find out the difference. Always remember not to let city lights shine on your photography target.
If you have trouble finding the target star, you can use an app such as SkySafari or another app with the same function. Once you have pointed the camera at the star, use the lock feature on your tripod. Do you usually use image stabilization? Try turning it off to avoid blurring.
You can also try the bulb mode on your DSLR. This mode allows the camera to keep the shutter open for a long duration to get more detailed and clearer images. Try using bulb mode for 20 seconds and then gradually increase the duration.
The Experiment of Star Photography
How do I set up a DSLR to take photos of the stars? Astrophotography is about experimentation, where you can be creative with various settings. Each photographer has their own style and goals. Experiment until you get the results you want. One thing you can try is the star trail effect.
You can achieve this effect by leaving the camera shutter open for several minutes. You will see the stars moving with magical trails. To get better details, you can repeat the capture several times in a short period of time and use the Lightroom app or similar apps.
Combine several photos by stacking them to get a more detailed version of the stars. It’s okay to experiment with various camera settings. Even if the results are poor, it’s okay because you can learn new things.
Take advantage of the opportunity while you’re on location to try new things. You might get a new masterpiece from the beauty of the night. Consider taking photos of stars with elements like trees, tall grass, buildings, or whatever else.
What Are the Essential Tips to Enhance Astrophotography?
How do I set up a DSLR to take photos of the stars? For some star photography processes, you need to remember some essential tips. For beginners, astrophotography may be complicated and challenging. Therefore, you should at least know the following tips to enhance your star photography:
Predict the Weather
If there is an app you can rely on for weather predictions, use it before your photo session. It’s better to go when the wind isn’t strong, and the sky is clear with high transparency. Since a darker sky is better, come late at night from 9 p.m. to 2 a.m.
Use a Planetarium App

Another recommended app is a planetarium app like Stellarium, StarWalk, and so on. You can easily understand the position of the stars and help determine the best time for star photography.
Simply point your smartphone at the sky, and the app will identify the stars. This app is very helpful for identifying the brightest to the dimmest stars.
Consider Extra Composition
You can be creative with your photo composition when shooting stars. Look around you for elements that can enhance the composition. Getting a good composition from a magnificent landscape is fine, but don’t hesitate to experiment.
You can increase the depth and dimension by perfecting the composition. Every photo composition you try has its own story and is never wrong. Add objects such as camping tents, large trees, abandoned buildings, and the like, but don’t let them dominate the shot.
These objects are only complementary, and the main focus remains on the beauty of the stars in the night sky. If you like storytelling in nature photography, try experimenting with photo composition.
But if you find it too difficult to combine elements, get help from editing software. You can combine photos into a single image easily and flexibly, even if it’s not as natural as doing it manually.
Keep Trying, Don’t Give Up
Especially for those who are new to astrophotography, the initial results often don’t meet expectations. Star photography requires patience, even for professional photographers. Natural conditions can change, and the sky may not be at its best when you arrive.
Sometimes you have to postpone your visit or wait a few minutes to get the perfect shot. How do I set up a DSLR to take photos of the stars? Don’t give up after one or two mistakes; keep experimenting with your DSLR settings. If you’re patient enough, you can get unexpected results and valuable lessons as a bonus.
Check the Ambient Light Around You
Look around you to see if there is any ambient light, because even if you think it’s not much, it can have a significant effect. You should avoid lighting from any source as much as possible so that the sky appears darker. If the sky is darker, the camera can capture the stars more clearly.
If there is still light from nearby houses or passing vehicles, it is better to stay away from that area. You can go to higher ground to avoid ambient light. You don’t need to worry, even if it is very dark, because DSLR settings can handle that.
Use a Wide-Angle Lens
How do I set up a DSLR to take photos of the stars? Make sure your DSLR has a wide lens installed. The main function of a wide lens is to make the object in the photo appear smaller than it actually is. Wide lenses are often used to capture large areas, such as night sky panoramas.
You can also use a fisheye lens or a wide lens for creative portraits, journalism, and even architecture. There is only one drawback to fisheye lenses, which is distortion in the photos. A shorter focal length on the camera can widen the angle of view, but is also more prone to distortion.
You need to check each photo taken with a wide-angle lens. If the results are too distorted, you can fix them with editing software. Wide-angle lens users need to experiment often to test the focus limits. For your first shots, you can capture stars that are farther away but brighter.
Activate the Timer If There Is No Remote Shutter
Use a remote shutter on your camera. One of the essential pieces of equipment for astrophotography is a remote shutter, but you may not have one or may have forgotten to bring it.
If you don’t have a remote shutter with you at the location, you can use the timer feature. This way, the camera will not move at all during capture.
Learn the Basics of Astrophotography
Before setting up the technical aspects of a DSLR, you need to learn the basics of astrophotography first. For professional photographers, this may not be a problem because they are already experienced in shooting in low light and for wide landscapes.
But for beginners, you need to at least have a basic understanding of astrophotography and how to using a beginner DSLR astrophotography. One of the basic concepts of astrophotography is long exposure. This is a photography technique to enhance photo details by collecting light over a long period of time. Long exposure in astrophotography requires a slow shutter speed because the light at night is so dim.
Another basic concept is star trails, which can be either the goal of astrophotography or a failure. Depending on the desired outcome of the session, star trails can produce unique and stunning results. This astrophotography technique captures the trails of stars to produce circular results due to the movement of the stars.
As we know, the Earth is constantly rotating, so stars do not remain in a specific point. Learn other basics as well, such as determining the best time, how do I set up a DSLR to take photos of the stars, and additional equipment.
Be Yourself as a Photographer
You don’t need to follow the specific results of other astrophotography works. Photographing night sky with DSLR has its own uniqueness and creativity. The results of photos between individuals can be different, and there is no such thing as a complete failure in astrophotography.
Even if you get results that don’t meet your expectations, you can still gain new insights. Try techniques you haven’t tried before. Sometimes you need to try different photography styles to explore techniques that you may end up liking.
How do I set up a DSLR to take photos of the stars? There are no exact settings for astrophotography. Although there are recommended settings, you can be creative within that range. Try shooting with different shutter speeds or apertures to understand the differences in the results.
Join an Astrophotography Community
You can find astrophotography communities online, especially those based in your location. If you join a local photography community, it will be easier for you to get together for joint sessions. Community members can share their astrophotography experiences with each other, which will ultimately broaden their knowledge.
How do I set up a DSLR to take photos of the stars? You can get the answer from the relevant community. Also, get tips and tricks from those who are more experienced or are professional photographers. Even if you are a beginner, don’t hesitate to join a community like this.
Beginners are even more encouraged to join because they can gain insights more quickly than if they were to learn all the DSLR camera settings for astrophotography on their own. Join a community that often holds regular activities together, especially joint photography sessions. From a community of photographers, you can also continue to develop your motivation, which is often lost when you don’t have a partner.
Photography Sessions in New Locations
To avoid boredom in astrophotography, it’s better to explore new locations. You can get a different perspective on the night sky from different types of locations. If you’ve previously photographed stars in a field, try the coast, mountain slopes, or hills.
You don’t need to go to extreme locations because astrophotography is about how we cleverly find the right angle in favorable weather conditions. Different locations can also provide a different atmosphere. You can gain extra experience while improving your photography skills.
So, that’s all about how do I set up a DSLR to take photos of the stars. Hope this is helpful for you.
Frequently Asked Questions
What does astrophotography mean?
This is the technique of photographing celestial objects at night. Astrophotography can capture images of the sky that are difficult to see directly with the human eye.
Is a DSLR ideal for astrophotography?
Yes, a tripod and a DSLR are the best combination of photography equipment for astrophotography. Many photographers have successfully captured images of galaxies with their DSLRs.
What are the results of photos taken with an f/2.8 aperture?
You can set f/2.8 on your camera to allow more light, especially in low-light conditions. This aperture setting also creates a more stunning blur effect.
Why do many people use DSLRs for astrophotography rather than other cameras?
DSLR users can change their lenses, making it easy to adjust to astrophotography specifications. Meanwhile, cell phone cameras and point-and-shoot cameras cannot do this, so they have limited performance.
How should I set the ISO when photographing stars?
How do I set up a DSLR to take photos of the stars? Set the ISO on your DSLR to 800 or 1600, but it can be higher depending on specific conditions. Set up your tripod to avoid blur.

AUTHOR BIO
On my daily job, I am a software engineer, programmer & computer technician. My passion is assembling PC hardware, studying Operating System and all things related to computers technology. I also love to make short films for YouTube as a producer. More at about me…


Leave a Reply