Virtual Background feature offered by Zoom is really good if you have a messy room. The case is different when you are going to have a meeting but you are currently in a fancy room. In this case, Virtual Background might be not needed and you might want to show up your place. Then, how to turn off the Virtual Background feature in Zoom?
The methods to turn off Virtual Background in Zoom depend on the device that you are using. Here are the details to do so for Windows, Mac, iOS, and Linux. Please follow the steps well so that you will be able to make the feature disabled. Try to seek help if you need assistance.
Windows and Mac
- First and foremost, sign in to the Zoom desktop client.
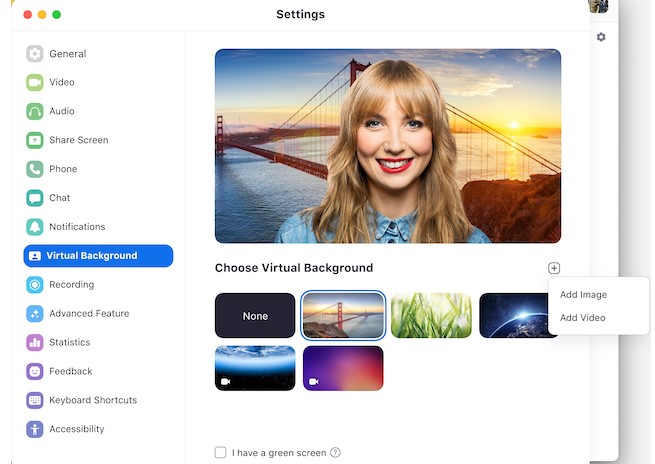
- Then, click your profile picture then click Settings.

- The next thing is to choose Virtual Background.

- To make the feature disabled, please choose the option None instead of choosing the image for the virtual background.
iOS
- Firstly, sign in too the mobile app named Zoom.
- When you are in a Zoom meeting, please tap More in the controls.
- Next, tap Virtual Background.

- Instead of choosing the background that you want, you will have to open the virtual background options again and choose the options None so the feature can be disabled.
Linux
- The first thing that you will have to do is to sign in to Zoom desktop client.
- After that, click Settings.
- In Settings, you will need to click Virtual Background.
- If you want to disable the Virtual Background, you can just select the option None instead of choosing the image for the virtual background.
If one day you change your mind and you want enable the Virtual Background Zoom, these followings are the information for you.
Steps to enable the Virtual Background feature for all users in the account:
- Log in to the Zoom web portal as an admin with permission so that you can edit the account settings.
- When you are in the navigation menu, find Account Management, click it, and then find Account Settings and click it.
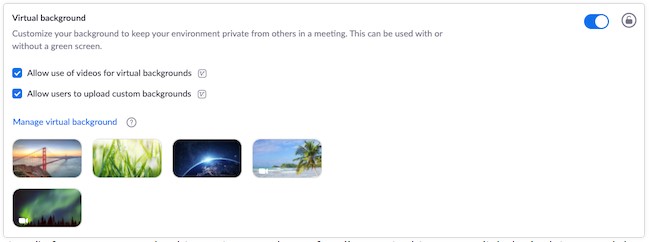
- In the Meeting tab, you should navigate to the Virtual Background option that can be found under the in Meeting (Advanced) section and verify that the settings i enabled. Do not forget to toggle to enable it if the setting is disabled. If you see a verification dialog, please select Turn On to verify the change.

- For those who want to make this setting applied to all users in your account, all that should be done is to click the lock icon and then click Lock in order to confirm the settings.
- You can check Allow use of videos for virtual background if you want to grant your users access to video virtual backgrounds. Do not forget to click Save to confirm the change.
- You might also want to check Allow users to upload custom backgrounds if you want to grant your users access so that they can upload their own virtual backgrounds in addition to the backgrounds that are currently uploaded. Once again, remember to click save to confirm the change.
- The Manage virtual background is also able to be clicked if you want too upload default background images available for users.
Keep in mind that users have to get client/app version 5.1.1 or higher to see the background images that you upload.
Steps to enable the Virtual Background feature for all members of a certain group:
- Log in to the Zoom web portal as an admin who have permission to edit the user groups.
- The User Management should be clicked in the navigation menu, and then the Group Management.
- Two other things to be clicked are the name of the group and the Meeting tab to access Settings.
- When you are in the Meeting tab, please navigate to the Virtual Background option and verify that the setting is enabled. In case it is disabled, you can click the Status toggle to make it enabled. Please select Turn On to verify the change if there is a verification dialog shown. If the setting is gray out, it means it has been locked at the Account level and has to be changed at that level.

- For anyone who want to make the settings applied for all users in the group, you can just click the lock icon and then click the Lock to confirm the setting.
- If you want to grant your users access to video virtual background, please check Allow use of videos for virtual background and then Save to make a change.
- In case you want to grant your users access to upload their own virtual backgrounds in addition to the backgrounds that are currently uploaded, checking Allow users to upload custom backgrounds and then clicking Save are needed to save a change.
- It is also possible too upload default background images available for users by clicking Manage virtual background.
Before trying it, take note that users have to get client/app version 5.1.1 or higher to see the background images that you upload.
Steps to enable the Virtual Background feature for your own use:
- At first, sign in to the Zoom web portal.
- You will have to click Settings in the navigation menu.
- Lastly, navigate to the Virtual Background option in the Meeting tab which is located below the In Meeting (Advanced) section and verify that the settings is enabled. As stated before, you will have to click the status toggle if it is disabled so that you can enable it. also, pick Turn On to verify the change when you see a verification dialog popping up. The gray option indicates that it has been locked at either the group or account level and you should reach out the Zoom administrator.
AUTHOR BIO
On my daily job, I am a software engineer, programmer & computer technician. My passion is assembling PC hardware, studying Operating System and all things related to computers technology. I also love to make short films for YouTube as a producer. More at about me…


Leave a Reply