
In Genshin Impact 2.0, you will need to complete a challenging world quest called Sacrificial Offering that is full of puzzles to solve. To get its puzzle solving, you should complete all of the tasks that the Sacrificial Offering quest offers during your travel in Inazuma.
Sacrificial Offering quest consists of some stages that you have to complete. In the eighth stage, you must find a barrier, once investigating the abandoned shrine. Sure, to get the barrier, you will need a key called Rust-Worn Key to enter the cave where the barrier is located. So, how to find Rust-Worn Key to get barrier in Sacrificial Offering world quest?
Finding Rust-Worn Key to Get Barrier, Here’s How!
In order to enter the cavern where the barrier is located, you will need a Rust-Worn key. This key can be found behind a Thunder Barrier near the torii shrine in the Konda Village. To get the Rust-Worn key, you need to join ‘A Strange Story in Konda’ world quest.
You can begin this quest by interacting with a Kitsune Mask woman in front of a fox statue north of Konda Village. You can pass the quest until you receive the task ‘Head over to the designated area recorded in the notebook’.

Afterwards, you have to defeat the enemies that are surrounding the location to pick out the Old Key. Keep in mind, the Old Key is different from Rust-Worn Key. Well, you can use the Old Key to unlock a well behind the Village Chief’s in Konda Village.
Now, you can discover the new area until you reach the bottom of the well. Here, you should locate a room that contains the key. As a clue, a room is located at the back of the well behind a gate.
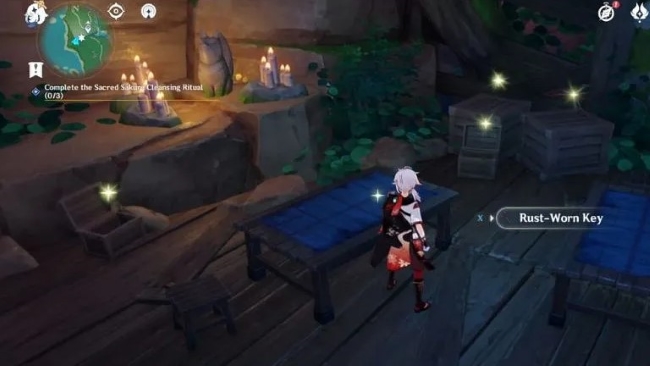
You will then see a lot of treasure in the room such as a Luxurious Chest and another Quest Item called ‘Old Stone Slate’. Finally, the Rust-Worn Key can be found at the top of a table in front of candles.
In addition to entering the cavern to find the barrier, the Rust-Worn Key can also be used to unlock an Electroculus gate that is located on the west side of Chinju Forest. Well, you can locate an Electroculus and a shrine to continue completing for ‘A Strange Story in Konda’ world quest.

Congratulations! You successfully find the Rust-Worn Key to enter the cave in order to get a barrier.
How to Use Rust-Worn Key in Sacrificial Offering Quest?
You already know that the Rust-Worn Key can be found when completing the ‘A Strange Story in Konda’ world quest. After completing this world quest, you may need to complete one of the ‘Sacrificial Offering’ world quests that requires the Rust-Worn Key.
The Rust-Worn Key in the ‘Sacrificial Offering’ world quests is needed to enter the cavern in order to find the barrier. As we know, the barrier can be found in a cave north of a small lake that is located south of Grand Narukami Shrine.
How to get a barrier? To locate the barrier, you need to enter the cave. The barrier is located on the ground level beneath the abandoned shrine. Make sure to drop down to the pond. At least, there are two entrances to the cave, they are:
- The first entrance has a locked gate with an Electroculuss behind it. Sure, to unlock this gate, it will require a Rust-Worn Key.
- The second entrance gate can be found to the west of the locked gate where it has Electro Crystalflies that fly near the entrance.
Moreover, the Rust-Worn Key will give you an access into the locked cavern where you will be encountered with a puzzle just like the first one in Konda Village well. Not only in the first one that progressed from numbers 1-5, this barrier puzzly only uses 1-3.
In the starter point at which you have the Pray feature has been set at 1. Then, the submerged point directly beneath the barrier has to be set to 2. Last, the three remaining points surrounding the barrier must be set to 3.
Once putting those objects in the right sequence, you can return to the starter point and Pray. However, it will trigger a hard battle with another phantom warrior. After that, shrine maiden Kazari will create another appearance and eventually grant some answers, alongside even more questions.
Finally, you successfully find the barrier in the Sacrificial Offering world quest with the help of the Rust-Worn Key to enter the cave where the barrier is located.
All Stages in the ‘Sacrificial Offering’ Quest
There’s a total of ten stages that you should pass to complete the Sacrificial Offering world quest. Here are for all stages in the Sacrificial Offering quest:
- Stage 1: Head to the abandoned shrine that is located northeast of Konda Village.
- Stage 2: Do the investigation at the abandoned shrine. Here, you will need to interact with the large Sky Kitsune Statue to the east.
- Stage 3: Find some Mysterious Shadows scattered around the area. When you speak to them, it will cause them to disappear and reform at a trio of Fox Statues.
- Stage 4: Go to the Grand Narukami Shrine to do an investigation. You must also speak with Inagi Hotomi to get Memento Lens. After you get the Memento Lens, you can use it to get information by looking at small Fox Statues through the lens. However, this is such an important part of progressing the quest.
- Stage 5: Go back to the abandoned shrine. In this stage, you can use the Memento Lens to do investigation.
- Stage 6: Read the sacred words in front of the Sky Kitsune Statue
- Stage 7: Get the ward
- Stage 8: Find the barriers that are located in a cave north of a small lake, south of Grand Narukami Shrine.
- Stage 9: You need to destroy the barrier. Here, you also need to adjust the Electro lanterns with the corresponding number of petals to create the pattern that is given by the shrine emblem. In this stage, you also have to defeat the Mysterious Samurai.
- Stage 10: Last, you need to speak with Kazari, an NPC in Inazuma.

AUTHOR BIO
On my daily job, I am a software engineer, programmer & computer technician. My passion is assembling PC hardware, studying Operating System and all things related to computers technology. I also love to make short films for YouTube as a producer. More at about me…


Leave a Reply