
Wordfence is a free plugin that you are able to install on your Worpress site to protects it from the hackers. If your site does get hacked and the hacker manages to install malware, then Wordfence can helps you to remove the malware from your site and get it working normally again.
Here are the best settings for Wordfence that you have to know:
Setting Wordfence Options
After you have installed and activated Wordfence, please head on over to the Options page by selecting Wordfence -> All Options from the left-hand menu in the WordPress admin. Most of the options are set to nice good defaults, so you do not need to touch them. But, there are a few options in that page which you need to ensure you have set:
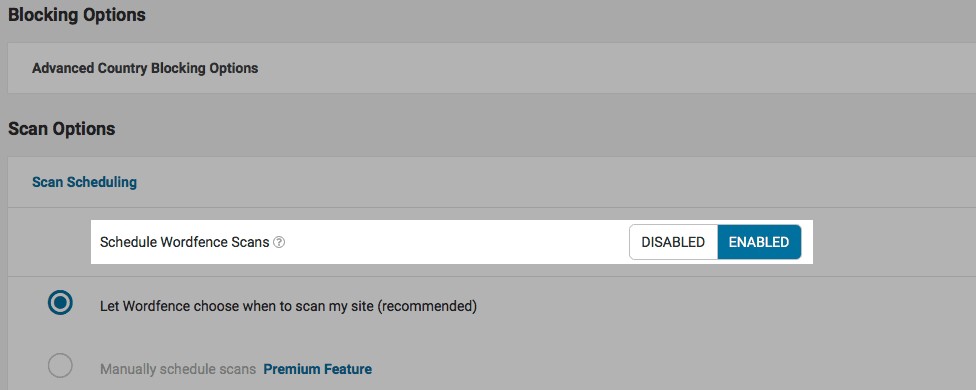
- Scan Options -> Scan Scheduling -> Schedule Wordfence Scans. Actually, this should be set by default with the enabled button highlighted. It will makes Wordfence scan your website for hacks and malware once per day.
- Wordfence Global Options -> General Wordfence Options -> Update Wordfence automatically once a new version is released. Automatically, this setting will updates the Wordfence plugin every time a new version becomes available. It is a good idea to check this checkbox to keep your website as secure as possible. If it causes any issues, please uncheck it again and remember to update your Wordfence regularly.
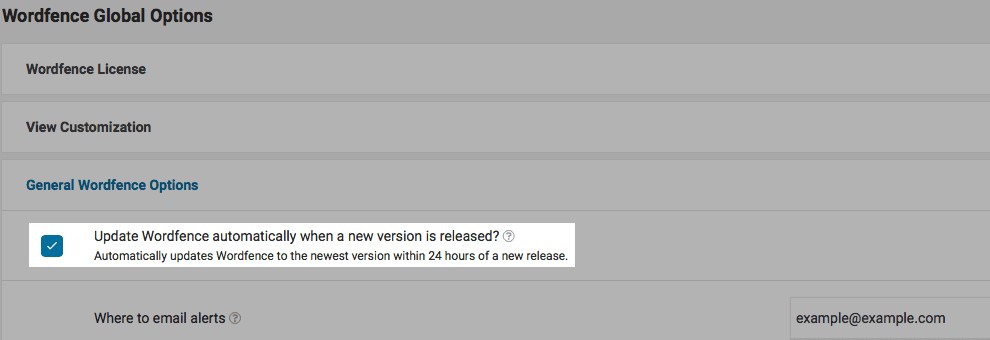
- Wordfence Global Options -> General Wordfence Options -> Where to email alerts: Ensure that you enter your email address here, so that Wordfence will can email you if it finds that your site’s been hacked.

After you have checked those options, do not forget to click the SAVE CHANGES button at the top of the page to save your settings.
Running Your First Scan
The next thing that you will need to do is run a Wordfence scan to check if your website’s been hacked. To do this:
- Please select Wordfence -> Scan from the left-hand menu in the WordPress admin.
Visit the Scan, Firewall, or Dashboard pages, a popup appears, offering you a mini-tour of that page’s features and functions. Just click the Next button in the popup to take the tour, or click the little close button to close the popup.
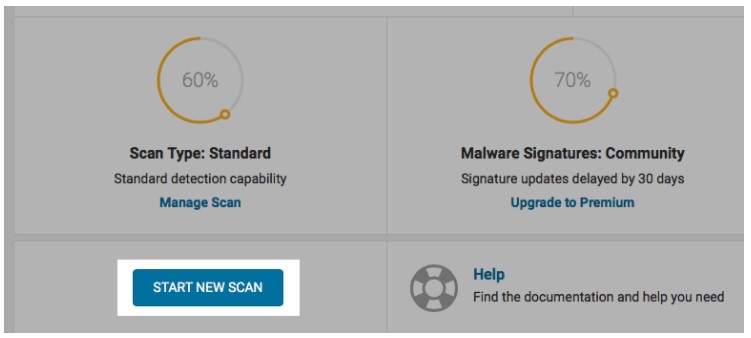
- After that, click the START NEW SCAN button on the left side of the page to begin the first scan of your website.
- Depending on the size of your website, the scan takes anywhere from a few seconds to several minutes to complete. While it’s scanning, you are going to see a progress bar appear, along with a status message showing you what Wordfence is currently scanning.
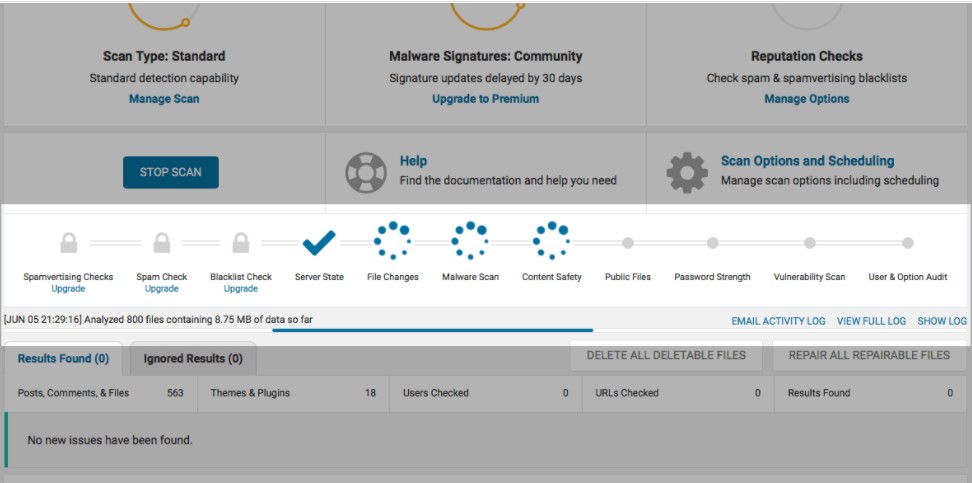
- Finally, you are going to see the text Scan Complete appear in the status line. Just scroll down the page until you are able to view the Results Found tab. This will shows you any issues that Wordfence found during the scan.
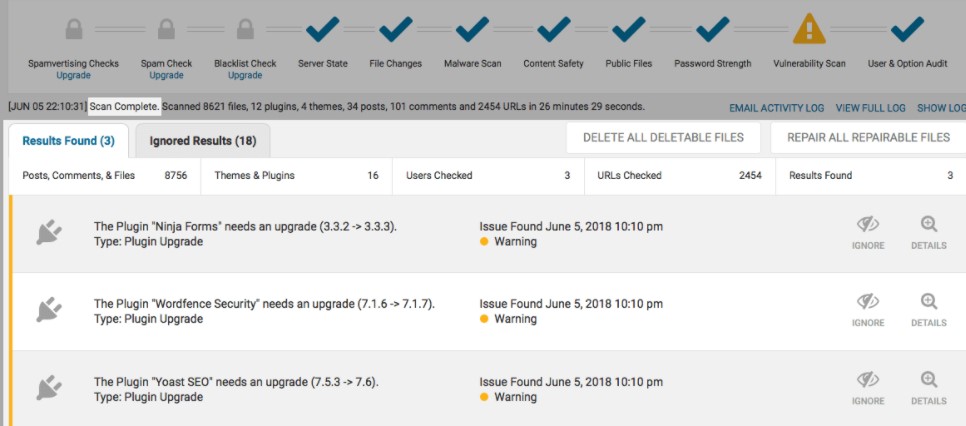
This lists any issues that Wordfence uncovered. We hope this tab is empty, but you may see some minor problems such as plugins and themes which need updating. For each problem, you are able to click the DETAILS button on the right-hand side of the problem to get more info on the issue. If a plugin or theme requires updating, you are able to click the link ‘Click here to update now’ to update it immediately. Also, you are able to select Dashboard -> Updates from the left-hand admin menu to update all of your plugins and themes at once.
Setting Up The Wordfence Firewall
You have to note that Wordfence’s Web Application Firewall blocks the hackers before they are able to perform damage to your WordPress website. It is turned on automatically once you install Wordfence, however to start with it only runs as a WordPress plugin, that does not offer the best level of protection. Wordfence says this Basic WordPress Protection. To create the firewall more secure, you need to set it so it runs before WordPress or any other PHP files have had a chance to run. This way, it will be able to block hack attempts at the earliest possible point.
To turn on Extended Protection, you are able to follow these steps below:
- At the first step, you have to select Wordfence -> Firewall from the left-hand menu in the WordPress admin.
- After that, you are able to click the MANAGE FIREWALL button near the top of the page.

- On the Firewall Options page which appears, you are able to click the OPTIMIZE THE WORDFENCE FIREWALL button to begin setting up the firewall.

- Then, an “Optimize Wordfence Firewall” popup appears. There is a lot of techie text there, but you do not worry about it unless you have more than one WordPress running on your website. Simply, click the DOWNLOAD .HTACCESS button. This will downloads a backup file containing your current .htaccess server configuration file, in case anything goes wrong once Wordfence changes it. Next, click the CONTINUE button to optimize the firewall.

If all goes well, you are going to see an alert appear with the message “Nice work! The firewall is now optimized.” Easily, you are able to click the CLOSE button to continue.
Now, the Protection Level on the Firewall Options page should show Extended Protection. If you run into the issues, then Wordfence cannot make the necessary files on your servers to due to file permissions. Please try to do some Firewall Optimization Troubleshooting. Also, you are going to see that the firewall starts in Learning Mode. In this learning mode, the firewall analyses your website traffic for a while so that it will tell the difference between normal traffic and a hack attempt. After a week, automatically the firewall switches to Live Mode and starts protecting your website. While the firewall is in Learning Mode, it is a nice idea to do all the things you usually do such as publish pages and posts, moderate comments, tweak themes and plugin settings, and tweak widgets. This will gives the firewall a chance to see what normal activity on your website looks like.

AUTHOR BIO
On my daily job, I am a software engineer, programmer & computer technician. My passion is assembling PC hardware, studying Operating System and all things related to computers technology. I also love to make short films for YouTube as a producer. More at about me…


Leave a Reply