Roblox allows you to create your own avatar and designs to be more aesthetic with GFX. However, GFX is a gorgeous way to show off your creation in Roblox. You absolutely can generate high-quality images with GFX which will look far better than anything found in the game.
To create your GFX avatars, you will also need a Blender, a free and open-source graphics software which is commonly used to create animated films and games. Generally, most Roblox players take their favorite characters from the game and then import them into Blender.
Today, there are so many Roblox creators who always share their GFX avatars on their social platforms, such as YouTube, Instagram, Twitter, Discord and others. They also create a group for anyone who wants to use their GFX work.
So, if you need some references to create your own GFX avatars and designs, thankfully, this post will show you a list of GFX girl aesthetics that you can imitate to finally create in Roblox. We commonly find the Roblox GFX girl from YouTube and Pinterest.
References for Creating Your Own Aesthetic GFX Avatars
One of Roblox creators who commonly shares her works in creating her own GFX avatar is mxddsie that you can find on her YouTube channel here. She created her own GFX avatars for boys and girls.
Thanks to her extraordinary creativity, she became famous as a Roblox content creator who produced numerous GFX avatars of either boy or girl characters. Her YouTube channel has 262K subscribers with more than 100 videos.
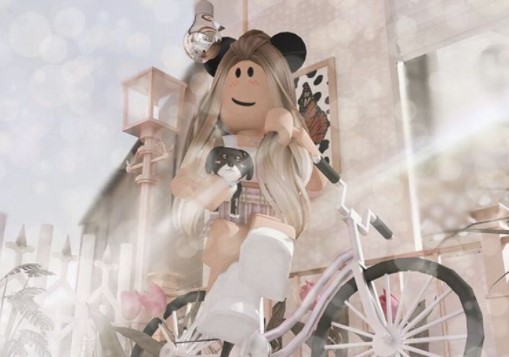
Here are some mxddsie’s works for Roblox GFX avatars that you can use as your reference:
As you can see from the list of pictures above, the Roblox avatars created with GFX have a more inviting and enchanting look, than the default avatars which are available in the game. We think that it’s highly recommended for you to create your own GFX avatar, than usual.
If you want to use or buy mxddsie’s GFX avatar, you can visit her profile in Roblox here. You can discover her profile and her creation to get the best one.
Another aesthetic GFX Roblox avatar creation can be found on one of the Pinterest accounts @Daffodil She collects numerous GFX Roblox avatars on her board. This Pinterest account has more than 1.5K followers. So, let’s check out the Daffodil collection for Roblox GFX avatar below!
Well, her collection of Roblox GFX avatars is massive and aesthetic and you finally get more references that you can apply when you have a plan creating your own Roblox GFX avatar.
How to Create Your Own Roblox GFX Avatar?
You may also need some tutorial on how to create a Roblox avatar with GFX. Here, you need to know that the biggest obstacle to creating a Roblox GFX is having a powerful computer which is capable of running Blender. The minimum system requirements that your computer must have including:
-
- 64-bit dual core 2Ghz CPU with SSE2 support
- 4 GB RAM
- 1280×768 display
- Mouse, trackpad or pen and tablet
- Graphics card with 1 GB RAM, OpenGL 3.3
- Less than 10 year old
As we’ve mentioned above, to create your GFX avatar, you will need a copy of Blender. You also need to install Roblox Studio, to export your Roblox models. However, importing models from Roblox is pretty easy, but you may get lost without clear instructions. If you need some clear instructions, you can follow step-by-step to access your Roblox avatar and items below!
-
- First, open Roblox Studio.
- Then, choose the baseplate template.
- Here, you need to expand the ‘View’ tab and open the Properties and Explorer boxes.
- To access the Roblox models, you need to click on the ‘Toolbox’.
- Go back to the ‘Home’ tab and click on the ‘Play’ button to load up your avatar.
- After your avatar has appeared on the screen, point to the Explorer Window and open the ‘Workspace’ menu.
- Then, right-click your avatar’s name from the Workspace menu and click on the ‘Press Selection’ button.
- After that, you need to save a file in a location which you can access from Blender.
That’s it! You can now import this into Blender. If you want to create your own backgrounds in Roblox Studio, you can find a suitable background to make the GFX more interesting and then create it using Toolbox. Alternatively, you’re able to download other creator’s backgrounds using the search feature.
Here’s how to create your GFX avatar in Blender!
-
- Open the Blender rig which is smoother than posing inside the studio.
- Choose the head of the rig you’re using.
- Then, go to the material tab in properties in the right bottom of your screen, it looks like a little ball.
- Click on the little circle beside the base color.
- Choose the ‘image texture’ from the list and then click the little folder icon.
- After that, navigate to the folder where you have saved the body of your character, not the hats.
- Once finding it, you need to click the item with the name in this format: [yourcharacterusername]“Tex.png”. you can now be ready to import your hats and move them, so they will fit exactly on the head.
- Switch to the rendered view quickly by pressing z and choose ‘rendered’.
- After you are in the rendered view, you can click if your hats are fully visible, but sometimes, they are not if that occurs. What you should do here is to choose the hats, and for each texture, you need to click the ‘delete’ button.
- Here, you have to create a new one of the same in it and then find the right texture. For example: Handle1Tex.png is
Import your Model
-
- In this step, you can import your models which serve as decoration, background and more. If you’ve created them, you can find the texture the same way as with importing the hats.
- You need to pose your model, choose one of the black boxes around the rig and choose the pose mode by going to the left bottom corner.
- You will find the transform tool on the left side of your screen. It’s better for you to use primarily rotate and move. It can pose your rig.
- After your rig is posed, you can then move it to the right position in your surroundings and then move to your render settings.
Render settings
-
- You can go to the icon above in your properties. Then, you can customize things there just like, how many resolutions you need, how many pixels you need per inch, more.
- Then, you can choose the background color which will affect how light your scene is in general.
- You can now press shift+a and add in a light. Here, you can add a sun that will shine everything from a specific angle. If you want to add a working lamp, you can move to the material tab, add a material and choose ‘Emission’ from the list. After that, you’re able to customize the strength and color.
- If you want, you can add a camera object by pressing Shift+a>camera.
- Many creators use the best setup looked at from the perspective of time and quality. In the tab of film, you can use 1.00 exposure if you do not have any background. Then, in performance, you can use 16/16 sized tiles or 32/32 if you have a great GPU.
- Last, you need to press F12 to render.
Okay, that’s your way to create Roblox GFX avatars.
AUTHOR BIO
On my daily job, I am a software engineer, programmer & computer technician. My passion is assembling PC hardware, studying Operating System and all things related to computers technology. I also love to make short films for YouTube as a producer. More at about me…








Leave a Reply