
In this page, you will be informed how to print screen on a Mac running Windows or Windows with a Mac keyboard. For those who are running Windows 10 on a Mac through Bootcamp or Parallels, then you are able to print screen on Mac by following these following steps.
- Function (fn) + Shift + F11: This key combination can be pressed if you want to take a Mac print screen of the whole screen.
- Option (alt) + Function (fn) + Shift + F11: This key combination can be pressed if you want to take a Mac print screen of the front most window.
After you have taken the screenshot, you will need to open Paint, Microsoft Word, or any other apps and do the paste action in order to paste the screen in the document. Please take a note that on the Touch Bar equipped MacBooks, the on screen F11 key will become visible when you press the fn key.
For everyone who is a long time user of Mac, you might be confused by the term “print screen Mac”. In fact, there is nothing to be confused as it is just another term used to call a screenshot on Mac.
Aside from the method to print screen on Mac running Windows or Windows with a Mac keyboard, you will also be informed some other ways to print screen on Mac and some different kinds of keyboards that you might be using, including the normal Mac keyboards, Touch Bar equipped Mac keyboards, and Windows keyboards that being used on Mac.
Print screening on Mac with normal keyboard
Print screen Mac function is really easy to do. Each screenshot taken by using this method is placed on the desktop by default.
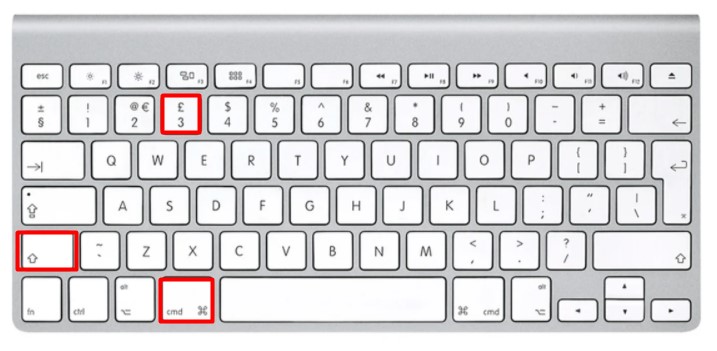
- Command + Shift + 3: This key combination can be used to take a screenshot of the entire screen if you have multiple monitors attached to your Mac. This step will take a screenshot on all of them.
- Command + shift + 4: This key combination can be used to take a screenshot of a specific portion of the screen. After pressing the key combination, then you will need to use the mouse or trackpad in order to choose the portion of the screen that you want to include in the screenshot.

- Command + shift + 5: This key combination can be used to take a screenshot of a specific screen. Once you have pressed all the keys you will get a camera cursor on the screen. Feel free to move the cursor to the screen that you want to take the screenshot of and then left click.

- Command + shift + 4 + Space bar: This key combination can be used to take a screenshot of a specific app or window. Keep in mind that the space bar should be pressed separately from the Command + Shift + 4. After that, click on the app or window that you want to take the screenshot of.

Print screening on Mac with Touch Bar keyboard
If you have a MacBook Pro that comes with a Touch Bar, then you have the special print screen Mac functions that makes it easier for you to print the screen on Mac. With the MacBook Pro that has a Touch Bar, you are able to take a screenshot simply by pressing the Command + Shift + 4 key combination. Your Mac will show the special screenshot buttons on the Touch Bar as soon as you press this key combination.
Then, you can tap on the first button in order to take the screenshot of the full screen or tap on the second one to choose the certain screen or the app on the screen for the screenshot. Apart from that, there is also the third button that allows you to choose the portion of the screen for the screenshot.
In addition, there is a special print screen option on Mac that is exclusively available on Touch Bar keyboard. This one allows you to select the location to store the screenshot. From the Touch Bar of the Mac, you can tap on the option named “Desktop” which is able to be found next to the “Save to” text and from the screen select the folder that you want to save the screenshot in.
Besides, you can also choose the Clipboard option if you want the next screenshot to only be saved to the clipboard. You are then able to paste the screenshot wherever you want. On top of that you can also directly save the screenshot in the Preview app, Messages app, and Mail app.
Print screening on Windows with Mac with keyboard
For those who have Pc running Windows 10 but you are using a Mac keyboard, then you are able to print screen on Windows with Mac keyboard using these following actions.
- Function (fn) + Shift + F11: This key combination can be used if you want to take a print screen of the whole screen.

- Option (alt) + Function (fn) + shift + F11: This key combination can be used if you want to take a print screen of the front most window.

Once you have taken the screenshot, you will have to open Microsoft Word or Paint and do the paste action in order to paste the print screen in the document.
The term “print screen” is normally used in the Windows environment in order to describe and give the power for you to capture the content that you are able to see on the screen. On the Windows compatible keyboards, in particular, you will be able to see that Print Screen is an actual button. On Mac, there is no button named that way. Fortunately, there is a series of keystrokes that you are able to perform if you want to print screen. Basically, they have the same function as Print Screen of Windows. Instead of “print screen”, you might hear the term “capture” or “screenshot” on Mac.

AUTHOR BIO
On my daily job, I am a software engineer, programmer & computer technician. My passion is assembling PC hardware, studying Operating System and all things related to computers technology. I also love to make short films for YouTube as a producer. More at about me…


Leave a Reply