
You may not want to access the Earthlink webmail on your browser. It doesn’t matter as you can use a smartphone or tablets as an alternative to access your Earthlink webmail. In order to access the Earthlink webmail on a smartphone or tablet, you surely have the right settings due to each program having different settings.
Thankfully, this post will guide you how to set up your Earthlink webmail with ease. However, the settings on Earthlink webmail primarily consists of two different email servers settings. So, settings will allow you to adjust your Earthlink account on your device or outlook without much hassle.
You can set up your Earthlink webmail settings through Earthlink SMTP settings and Earthlink IMAP settings as well as email settings for Android, Mac and iOS. To ease you setting up your Earthlink webmail, each setting will be explained below! Here you go!
Earthlink IMAP Settings
Here’s how to apply the Earthlink IMAP settings to use the incoming email services with ease!
- Firstly, you need to log into your EarthLink email account that you have registered first.
- Then, click on the settings located in the upper left corner.
- You can then choose accounts.
- Here, select the IMAP from the drop-down menu.
- After that, enter ‘imap.earthlink.net’ in the ‘Incoming Mail Server’ option,
- You should enter ‘143’ in the ‘Incoming Port Number’.
- Then, ‘Smtpauth.earthlink.net’ must be entered as ‘Outgoing Mail Server’
- You should enter ‘587’ as the Outgoing Port Number.

- Click on the ‘Accept’ button.
Now, you have already set up your Earthlink webmail account using IMAP.
Earthlink SMTP Settings
Here’s how to set the Earthlink SMTP for using the outgoing email services without any problem!
- Firstly, you need to click on the ‘Mail’ icon.
- Then, go to the ‘Accounts’ section.
- Here, you need to enter your EarthLink email ID.
- Enter the full email address in the username section.
- Then, you should also enter your email password when prompted for the same.
- You can enter ‘smtpauth.earthlink.net’ in the server hostname.
- Then, ‘587’ should be entered in the port value.

- Then, the SSL/TLS certificate should be ‘Yes’.
- You can then run the test if test settings are enabled.
- You then have enabled the SMTP auth Earthlink net settings if everything checks out.
That’s it! you successfully set up your Earthlink webmail account using IMAP.
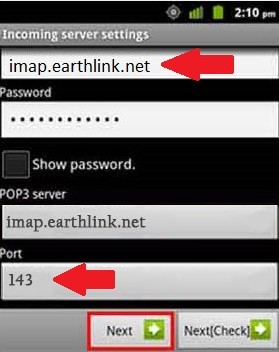
Earthlink Email Settings on Android
If you need the guide of how to set up the Earthlink webmail on Android, this post will also guide you to do it. Here’s how to set up Earthlink webmail on Android!
- You should go to your email app.
- Then, select ‘Settings’.
- After that,click on ‘Add new mail’.
- Choose your EarthLink account and choose the POP3.
- You can then enter your email address and password.
- Choose ‘Manual Set Up’.
Enter the following details in the Incoming Settings screen;
- Your Full Username
- The password of your email id
- Pop.earthlink.net should be entered in the Incoming server
- Port Value should be 995
- Security type should be SSL
- After that, click on the ‘Next’ section.
For outgoing settings enter the following:
- ‘Smtpauth Earthlink net’ settings must be entered in ‘Outgoing Server’
- The value should be 587
- Enter ‘Yes’ for ‘Authorisation required’
- Click on the ‘Next’ button.
- Then, enter your preference.
- Last, give your account a name.
That’s it! You successfully set up the Earthlink email settings for your Android account.
Earthlink Email Settings on iPad and iPhone
Here’s how to set up the Earthlink email settings on iPad and iPhone!
- First, you need to go to settings.
- Then, you will need to scroll down and select Mail, Contacts, and Calendars

- Choose the ‘Other’ option from the ‘Add’ account tab.

Enter the following information under the Add Mail Account tab:
- Enter your full name
- Enter your full email address
- Enter your mail password
- In the descriptions enter ‘EarthLink’

For ‘Incoming Mail Server’ setting, enter the following information:
- The hostname must be pop.earthlink.net
- Username must be your email address
- Your email password must be the default pass.

For ‘Outgoing Mail Server Settings’, enter the following:-
- The Hostname must be smtpauth.earthlink.net
- The Email must be the username
- Your email password must be used as the password

- After that, you can click on the ‘Save’ button and go to the next screen.
Enter the following information under the ‘Mail Server Settings’:
- SSL must be left as is
- Server port value must be 587
- Click on the ‘Save’ button.
- Last, restart your iPad and iPhone.
That’s it! You successfully set up the Earthlink email settings for iPhone and iPad.
Earthlink Email Settings for Outlook
The settings for Earthlink email are more or less similar for all the Outlook versions, so you can just go on the following steps to set up the Earthlink email settings for Outlook. Here’s how!
- First, you need to open Microsoft Outlook.
- Then, click on the ‘File’.

- Tap on the ‘Account Settings’.

- After that, you need to switch the settings to ‘ON’.
- Click on the Next button.
- Select ‘Internet email Address’ and enter your EarthLink email address and your name.
- Then, go to ‘Account Type’ and select POP3.

Enter the following information:
- The incoming email must be pop.earthlink.net.incoming
- Port Value must be 995
- Click on the ‘Save’ button.
- Enter your Login Information
- Then, click on the ‘Test account settings’
- Last, you have to set up your EarthLink email account with Outlook if everything checks out then.
That’s it! You successfully set up your Earthlink Email on Outlook.
Okay, those are multiple ways that you can perform to set up Earthlink webmail settings on certain devices. As you can see, each device will have different settings and different input information.
Moreover, if you get some issues related to Earthlink webmail settings and look for the solutions, you can contact Earthlink Support Service at https://support.earthlink.net/ or you can find what you need through Earthlink Help Desk that you can access here. There will be a lot of questions related to Earthlink issues that the users may encounter. So, find the question based on what you look for.

AUTHOR BIO
On my daily job, I am a software engineer, programmer & computer technician. My passion is assembling PC hardware, studying Operating System and all things related to computers technology. I also love to make short films for YouTube as a producer. More at about me…


Leave a Reply