
Macys Insite has a thing known as My Schedule Plus. In the thing called My Schedule Plus, each one has a chance to help themselves manage their schedule options and availability selections such as Schedule Option, Availability, Preferred Availability, and Temporary Availability. The explanation about My Schedule Plus is actually long. In this post, you will get to know about My Schedule Plus part time associate.
Accessing the Availability in In-Site
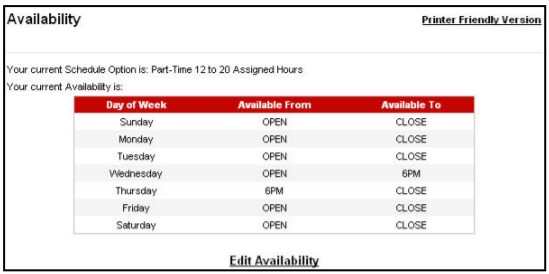
The current Schedule option is able to be viewed from the Availability window. From the same thing, you are also able to review your current Availability and access the Edit Availability option.
- The first thing that should be done is to log into In-Site.
- Then, choose My Schedule Plus from the left navigation menu.
- In the next step, expand Options/Availability from the My Schedule Plus menu.
- After that, choose the Availability option.
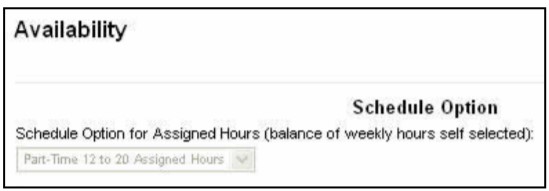
Schedule option:
- You need to expand Options/Availability from the My Schedule Plus Menu.
- Choose the Availability option. Doing so will make your current Schedule Option and Availability settings displayed on the screen.

- Choose Edit Availability to access the schedule options.
- It is time for you to verify the schedule option from the Availability window. Keep in mind that PT Option is a 12-20 hour, 4 days a week schedule. Another thing to keep in mind is that Schedule Option selection is identified during your initial enrollment into MSP. It is better for you to reach out to your manager if you have additional questions.

Availability:
The Edit Availability can be used if you want to update your availability selection for long term needs. Let’s say you want to volunteer every Thursday evening. In this case, you can block out this time period and the system will not assign a shift to you on Thursday evening.
- To do it, expand Options/Availability from the My Schedule Plus Menu.
- Next, choose the Availability option.

- The third step is to choose Edit Availability to display the Availability window.
- Then, choose the Shift Type for each day that you want. The options include: Any hours (Open to Close), Opening shift (Open to 6), Closing Shift (6 to Close), Other (Outside of hours listed), and Day off (All Day).
- If you want, you can also update Availability From and Available TO default settings with new timeframes.
- Lastly, click Save

It is said that the availability that you have is able to be identified during your initial enrollment into MSP. Aside from that, you will get a chance to adjust your availability twice a year, during the Open Enrollment Period.
Preferred Availability:
Preferred Availability is the one that is able to be used to choose preferences for shifts. Despite there is no guarantee, there is still a chance for your options to be considered and every effort to honor them will be made.
- First, expand Options/Availability from the My Schedule Plus Menu.
- Once it expands, choose the Preferred Availability option.

- You will have to choose Edit Preferred Availability to display the Preferred Availability window.
- Afterward, pick one of these followings: Any hours (Open to Close), Opening shift (Open to 6), Closing Shift (6 to Close), Other (Outside of hours listed), and Day off (All Day).
- Besides, you also have a chance to update Available From and Available To default settings with new timeframes.
- When everything is done, please click Save. Apparently, it is possible to change your preferences at any time.

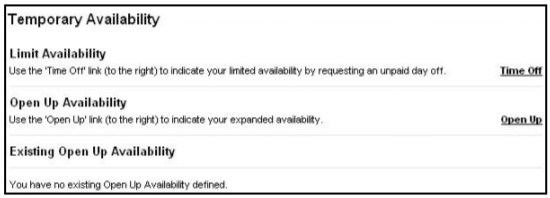
Temporary Availability:
You can use the Temporary Availability if you want to limit or expand your availability for a certain amount of time. For example, the availability that you currently have indicates that you are unavailable on Mondays before 6 PM. A month after that, you know that you will be available during this time and you want to be assigned more hours if it is possible.
- Go to the My Schedule Plus Menu and expand Options/Availability.
- After expanding Options/Availability, choose the Temporary Availability option. If there is any existing Open Up Availability, it will be displayed on the window.

- If you want to request an unpaid day off, you can just choose Time Off to temporarily limit your availability. Take note that this option may not apply to you based on your employee variation of location.
- Expanding your availability is easy. It can be done by choosing Open Up and the Open Up Availability window will be displayed.
- Choose the Applicable Week from the dropdown menu. Feel free to expand your availability up to three weeks in advance. For instance, if today is August 3, 2009, you can expand your availability for the week of August 23, 2009. For your information, the menu lists up to 26 weeks. It means if you have already added an expansion for a certain week, it will not show up in this list.
- Choose the Shift Type for each day that you want. The options are the same as mentioned above, which include Any hours (Open to Close), Opening shift (Open to 6), Closing Shift (6 to Close), Other (Outside of hours listed), and Day off (All Day).
- If needed, you can update Available From and Available To default settings with new timeframes.

- The last thing that you can do is to click Save.

Remember that this system validates your options with the work rules associated with your current employee status.
For more information about the My Schedule Plus, Part Time Associate, you are encouraged to contact your manager. Talking about the My Schedule Plus, you might also want to read the information tap here. This link features the information about My Schedule Plus selection window, My Schedule Plus weekly schedule management, My Schedule Plus unavailable days, and My Schedule Plus planning ahead. Even though you might not need all of it, you are still encouraged to read everything so that you will be able to understand the whole concept.

AUTHOR BIO
On my daily job, I am a software engineer, programmer & computer technician. My passion is assembling PC hardware, studying Operating System and all things related to computers technology. I also love to make short films for YouTube as a producer. More at about me…


Leave a Reply