
For WordPress website users, you’re likely familiar with the various features it offers. One of the most convenient features is XML-RPC, a file called xmlrpc.php located in your hosting’s root cPanel “yourdomainname.com/xmlrpc.php” This file allows you to access and manage your website remotely. However, in my experience, this file is highly vulnerable from a security perspective and I suggest disabling it.
Why are people rarely using the xmlrpc.php file these days? After investigating, I discovered that the file actually “clutter” my website, and some people frequently delete it. So, what exactly is WordPress XML-RPC? Let me explain in detail.
Read also: How to Secure Your Website from Hackers
What is XML-RPC?
XML-RPC is a PHP programming language module that enables data transmission using HTTP and XML as the transport and encoding mechanism.
XML-RPC in WordPress greatly assisted bloggers in posting articles when internet access wasn’t as fast and easy as it is today. To simplify posting, bloggers posted articles through the WordPress application offline, and when finished, uploaded them to the website using an XML-RPC connection.
The ability to post on mobile devices makes WordPress a popular platform used by many bloggers worldwide. Besides being a free platform, WordPress is also available as a CMS that can be installed on a private server or hosting, offering the flexibility of transferring data from one location to another.
Why XML-RPC Should Be Disabled?
Despite the functionality it offers, XML-RPC has a major security weakness. It can be exploited by hackers to launch malicious attacks on your website.
Due to security concerns, XML-RPC is disabled by default on some hosting services to minimize the risk of security attacks on websites built with WordPress. However, not all hosting providers do that and you’ll need to do it yourself.
How to Disable XML-RPC on WordPress
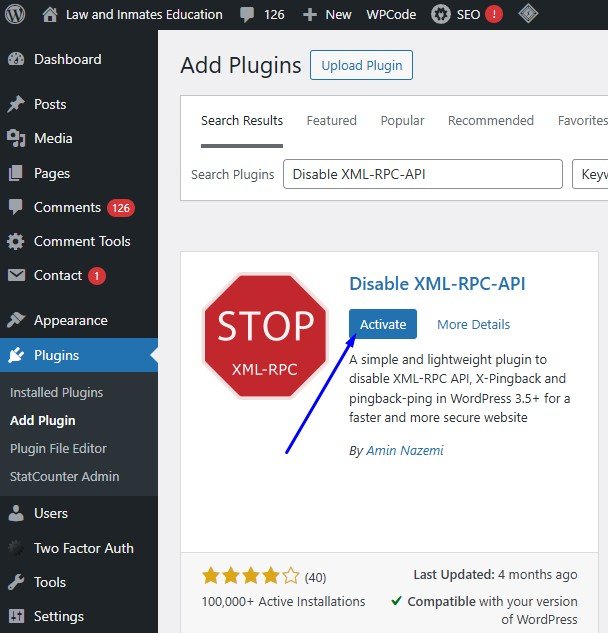
The method is very simple, you only need to Install then Activate a WordPress plugin called Disable XML-RPC-API from your WordPress admin dashboard.
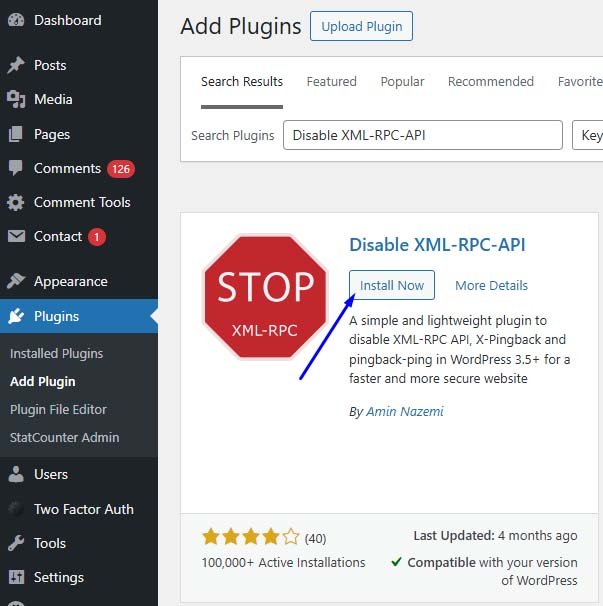
After you activate the Disable XML-RPC-API plugin, xmlrpc.php will be automatically disabled.
How to Re-Enable XML-RPC?
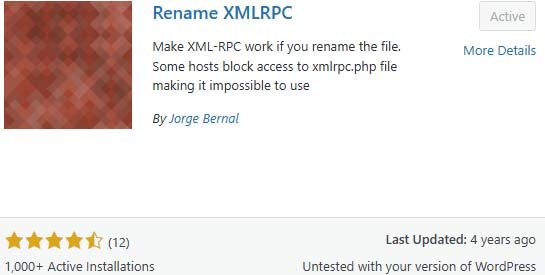
There are times when you need an XML-RPC connection for a very urgent matter. In the WordPress CMS, XML-RPC functionality can be enabled with the help of a plugin like Rename XMLRPC.
Below, we’ll explain how to enable XML-RPC in WordPress. However, we recommend not enabling this feature continuously due to the security issues mentioned above.
Step 1. Rename the xmlrpc.php file
The first step is to rename the xmlrpc.php file. This file can be found in the root directory of your website.
If you use cPanel hosting, you can log in to cPanel → File manager → public_html, then change the xmlrpc.php file to xmlrpc_wp.php, for example.
Step 2. Install Plugin Rename XMLRPC
Step 2. Install the XMLRPC Rename Plugin
After changing the file name, log in to your WordPress admin dashboard. Then, go to the Plugins menu to install the Rename XMLRPC Plugin.
2. Once installed, please go to Plugins > select the Plugin File Editor.
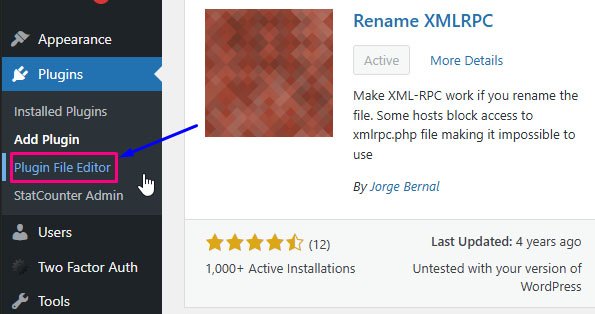
3. In the “Select plugin to edit” column, please select the Rename XMLRPC plugin first and click the Select button.

4. Then look for the line named $renamed_xml_rpc_filename to adjust the name of the xmlrpc.php file that you previously changed.
$renamed_xml_rpc_filename = 'xmlrpc_wp.php'; //CHANGE THIS poiting to the renamed file
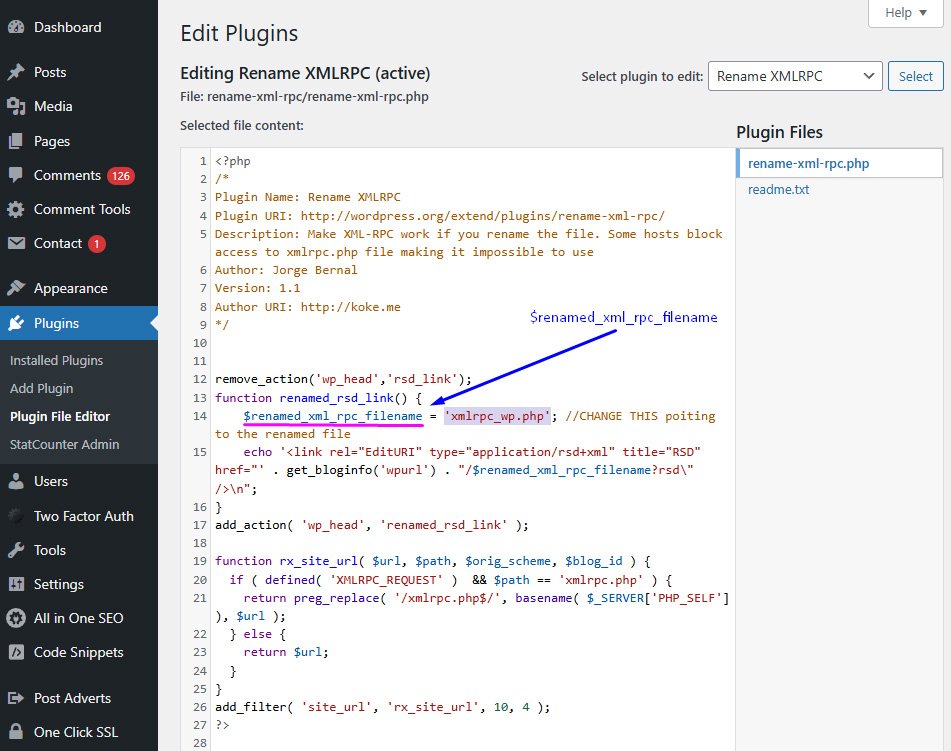
5. After that click save or Update File.
At this point, the xmlrpc feature in WordPress has been enabled. To verify that this function is working, we can use the WordPress XML-RPC Validation Service.
Check XML-RPC Status
There are at least two ways to check the XML-RPC status on a website: through the WordPress XML-RPC Validation Service and using a plugin. Here are the options you can choose from.
Option 1. WordPress XML-RPC Validation Service
Checking the XML-RPC status in WordPress can be done using the WordPress XML-RPC Validation Service tool. It’s very easy, simply enter your domain name in the search field.
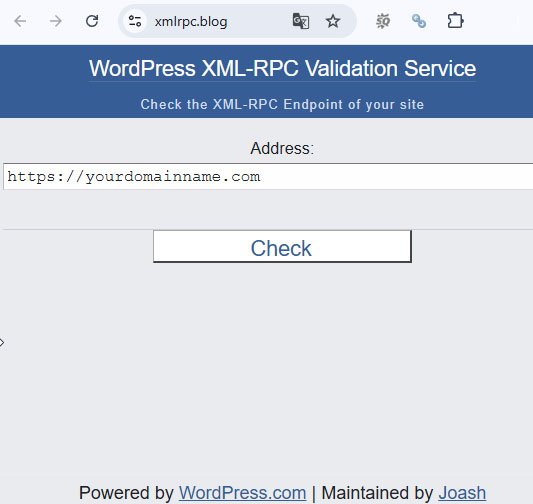
- If the check results in an error message, it indicates that XML-RPC is disabled in your WordPress.
- If the check results in a “Congratulations…” message, it indicates that XML-RPC is enabled in your WordPress.
So, pretty easy, right?
Option 2. Using the WPScan Plugin
Besides using the WordPress XML-RPC Validation Service, you can also check the XML-RPC status using a plugin called WPScan. Here are the steps:
- Log in to your WordPress dashboard.
- Click the Plugins menu → Add new → then search for the WPScan plugin.
- After that, install and activate the plugin.
- Once activated, go to WPScan → Report → scroll down to “XML-RPC Enabled” and click the Run button. If the following results appear, XML-RPC disabled.

However, if the results are as follows, it indicates that XML-RPC enabled or active.

Conclusion
XML-RPC offers a solution for remote access to WordPress websites via a mobile app, which can help you post articles more easily and flexibly. However, with the increasing ease and speed of internet access today, this feature is no longer relevant because you can post articles in real time and efficiently.
The potential security issues associated with XML-RPC should also be a primary consideration if you decide to enable it for specific purposes. If you don’t need a specific feature that requires XML-RPC, it’s highly recommended to disable it for the sake of overall website data security.

AUTHOR BIO
On my daily job, I am a software engineer, programmer & computer technician. My passion is assembling PC hardware, studying Operating System and all things related to computers technology. I also love to make short films for YouTube as a producer. More at about me…


Leave a Reply