When you come to this page, you may want to know some information about Roblox Donation Board Script. If so, you are at the right page. Here we are going to discuss it. Do not hesitate to read this text until the end.
About Roblox Donation Board
Some of you may now know what Roblox Donation Board is. For your information, Roblox Donation Board is used to donate to the game, or to buy 2x money. You will be able to donate to game:
-
- 10 R$
- 20 R$
- 50 R$
- 100 R$
- 200 R$
- 500 R$
- 1000 R$
- 2000 R$
- 5000 R$
How to Make a Roblox Donation Board?
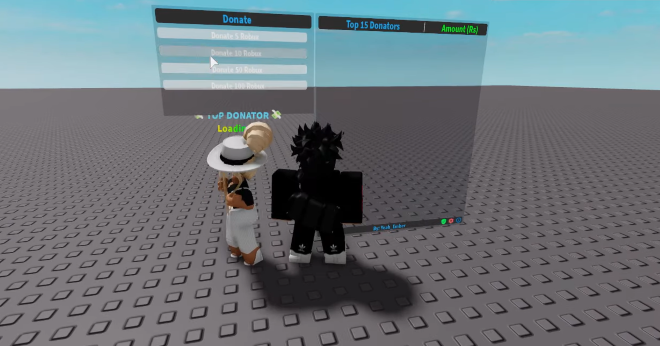
Now, we are going to share how to make a Roblox Donation board in your Roblox game so that other Roblox players can donate to you Robux.
Here are some steps to make Roblox donation board in your own game:
-
- At the first step, you have to click the three dots on the top right of your own game page, and press configure game.
- After that, you are able to press Developer Products on the left.
- The next step that you have to do is to choose “Create New.”
- Now, you are able to name it 5 Robux donations and make it cost 5 Robux. Actually, the image and description are not necessary.
- Please create a new Developer Product and call this one 10 Robux Donation and make it cost 10 Robux.
- In this step, you need to open Roblox Studio. Please open up the toolbox.
- You have to look for “Donation Board” in models.
- Make sure to get the one by Nitefal.
- Please open boards in the explorer and then delete README and DELETEME.
- You need to double click on Products.
- Please copy and paste your 5 Robux Donation Developer product ID.
- Then, copy and paste your 10 Robux Donation Developer product ID.
- Also, you are able to make different price donations. However, make sure to change product price = to the amount the donation costs.
- Now, you are able to make a 50 Robux Donation.
- Please copy the developer product ID and paste it into the script.
- You are able to do the same thing with a 100 Robux Donation.
- To add more donation options, simply you are able to drop a line first.
- Afterwards, you are able to copy and paste it.
- Please change product price = to what you want the new donation option to be.
- Do not forget to make a new developer product for that donation. For example, you want to be a 1000 Robux donation.
- Please copy and paste the developer product into your script on the product ID = area.
- You will be able to add as many donation options as you want. When you are done, simply you are able to close the script and test play in Roblox Studio.
- You may see that there are no donations available in Roblox Studio. But they are going to show up in the game.
- Please make sure to publish your own game to Roblox before you test the donation board in the game.
- You are able to go back to your own game and test play it.
- Now, there are many donation options. You are able to buy a 5 Robux donation to know what happens when someone buys a donation.
- After a little bit, the Roblox donation board should update.
- You are going to see your username is now at the top of the leaderboard with 5 Robux donations.
Making a Robux Donation GUI
Now, we are going to share a way to make a simple Robux donation GUI. Here is a great way to make a simple Robux donation GUI for your game. Just follow every step carefully.
-
- You are able to start off of the official site of Roblox.
- On the main page, you have to go to the Develop page.
- After that, you are able to press Places which is to the left of Crete New Game.
- The next step that you have to do is to press on Settings cog for the game you are making the GUI in. Do not forget to click Configure Place.
- On the left side, you are able to press on Developer Products.
- Now, you are able to click on Create New next to Developer Product.
- Please submit a name, description, price and a picture. For note: The picture and description are optional.
- You need to note that you will not earn the full price of the Developer Product. To finish the Developer Product, please press Create.
- In this step, you have to choose the ID of the Developer Product, right click and copy it. And press Save.
- Now, you are able to jump into Roblox Studio, press those three dots and then click Edit.
- Please insert a ScreenGui into StarterGui. Next, insert a TextButton (or ImageButton) into the ScreenGui.
- Afterwards, you need to customize the button. Now, it is time for the script. Please insert the LocalScript into the ScreenGui. Just right click and paste the ID which you copied earlier.
script.Parent.TextButton.MouseButton1Click: connect (function()
game.MarketplaceService: PromptProductPurchase (script.Parent.Parent.Parent, id)
end)
Once everything is done, you are able to test this in the real game server with filtering enabled. It must be working if you follow every step correctly. If you failed, you are able to re-try for the second time. If you need assistance, you are able to join the community of Roblox and then ask the members of the community to help you. In the same community, you will be able to throw the questions and discuss a topic with other Roblox players.
Also, there are videos on YouTube explaining about making the simple Robux donation GUI for the game. Thus, you are able to go to the platform and leave a comment. Before anything, it will be better for you to watch the video and understand the process to make a Robux donation GUI better. You are able to pause the video in the middle while following the steps.
AUTHOR BIO
On my daily job, I am a software engineer, programmer & computer technician. My passion is assembling PC hardware, studying Operating System and all things related to computers technology. I also love to make short films for YouTube as a producer. More at about me…








Leave a Reply