
When you stream a Spotify song or playlist to the end, it will auto-play similar songs and never stop. By default, this Autoplay feature will be turned on and you are going to get unlimited songs coming up on your queue. It is one of the nice functions on Spotify to explore songs you like and expand your music library. But if you do not like it, you are able to turn off Autoplay on Spotify. Well, now we are going to show you how to turn off/on Spotify Autoplay.
How to Turn Off AutoAdd Newplay on Spotify?
On Desktop

- At the first step, you have to open the “Spotify” app on your computer. It is a green icon with three black, horizontal bars. Also, you are able to sign in to your account, if you have not already done so.
- After that, you have to click on the V icon, at the top-right side of the app. A drop-down menu is going to show up.
- Now, you are able to select Settings from the list. This is going to open the Settings page.
- Please scroll down to the “Autoplay” section. And click on the green switch under the Autoplay header to turn off the Autoplay feature on Spotify.
On Mobile
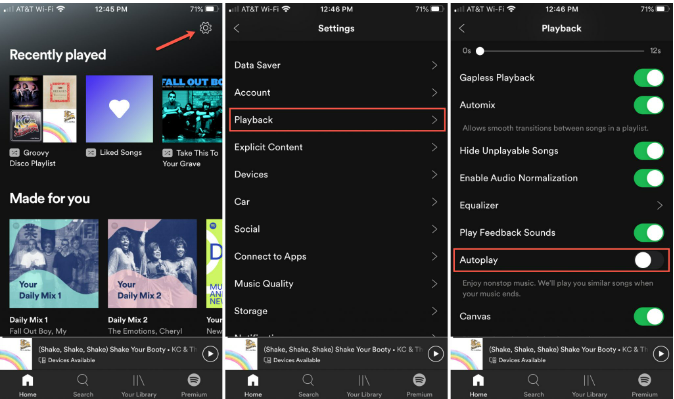
- At the first step, you have to launch the “Spotify” app on your device. Please tap the Spotify app icon that resembles three black, horizontal bars on a green background. Log into your account.
- After that, you are able to open the “Settings”. Please navigate to the Home tab and tap on the Settings icon, in the top-right corner.
- Now, you are able to locate the Autoplay title. You are going to see it in the “Playback” section.
- In this step, you are able to disable or enable the Autoplay feature. If you want to turn off the Autoplay feature, simply you are able to toggle the green switch right after the “Autoplay” option.
How to Turn On Autoplay on Spotify?
On Desktop
- At the first step, you have to open the “Spotify” app on your computer. It is a green icon with three black, horizontal bars. Also, you are able to sign in to your account, if you have not already done so.
- After that, you have to click on the V icon, at the top-right side of the app. A drop-down menu is going to show up.
- Now, you are able to select Settings from the list. This is going to open the Settings page.
- Please scroll down to the “Autoplay” section. If you want to enable the Autoplay feature, you are able to toggle the grey button.
On Mobile
- At the first step, you have to launch the “Spotify” app on your device. Please tap the Spotify app icon that resembles three black, horizontal bars on a green background. Log into your account.
- After that, you are able to open the “Settings”. Please navigate to the Home tab and tap on the Settings icon, in the top-right corner.
- Now, you are able to locate the Autoplay title. You are going to see it in the “Playback” section.
- In this step, you are able to disable or enable the Autoplay feature. As we know, to turn off the Autoplay feature, you are able to toggle the green switch right after the “Autoplay” option. But, just tap one more time to turn it on again.
Options You View on the Spotify Web Player
Apparently, there are many features of Spotify Web Player. These features include the ability to play music, access your libraries, search music, and even see and make new music playlists. Well, in this section, we are going to share the options you view on Spotify Web Player’s interface.
- Home
On the left sidebar, you are going to see Home option. Choosing this option can take you to Spotify Web Player’s main screen, where you are able to discover and play your music. The screen includes music recommendations, playlists, your recently played songs, and more. This is where you will be able to begin to explore this web-based player. - Search
To search for your favorite music, you will be able to choose Search on the left sidebar. This will open Spotify’s standard search page, where you will be able to type your search queries. On this screen, you have to choose the box at the top and type a song name. Then, you are going to view the search results for your query. On the same screen, you are also going to find some genre options to discover songs in them. - Your Library
This section is where you see your personalized content. If you choose this option, then you are going to see the playlists, artists, podcasts, and albums you follow. If these sections are empty, it is because you have not yet followed any item. To begin following someone, you are able to select one of the tabs. Then, select the Find button. - Create Playlist
For those who want to make a new playlist for your songs, you have an ability to select Create Playlist from the sidebar. Then, you are able to submit a name for your playlist and also add songs to it. This playlist will sync with your account. Thus, you are going to see it on all your devices where you use the same account. - Liked Songs
This section is where all your favorite songs are located. If you tap the heart icon for a song on Spotify, then the service will add that song to this list. For those who are new to Spotify and have not liked a song yet, you are able to select the Find Songs button to discover and add songs to this list. - Upgrade
You will be able to see an Upgrade button at the top of Spotify Web Player. Just choose this button if you want to upgrade your account. The button is going to open a new tab and then take you to the standard Spotify site, where you will be able to choose a new plan for your account. - Your Name
Right next to the Upgrade button, you will be able to see your account name. You are able to select this option to reveal various options for your account. - Music Player
When you play a music track, at the bottom of Spotify Web Player, you are going to see a mini-player. It is the player which you are able to use to control the playback of your Spotify music.
- Home

AUTHOR BIO
On my daily job, I am a software engineer, programmer & computer technician. My passion is assembling PC hardware, studying Operating System and all things related to computers technology. I also love to make short films for YouTube as a producer. More at about me…


Leave a Reply