Dell Command Update is a graphical user interface (GUI) tool which is easy to use. You are able to use it to update Dell client systems with the latest applications, driversm BIOS and firmware. What are the advantages of using Dell Command Update? You are able to see below.
The advantages of using Dell Command update include:
-
- It will simplify the system of management and the update process for Dell client systems.
- The GUI is easy to use and it can help you identify and apply appropriate drivers and updates for the systems.
- There are BIOS and firmware updates in addition to drives and applications.
Now, how to run Dell Command Updates? We provide you the information about it below.
Steps to Downlaod and Install Dell Command Update
Before you do it, it is important for you to ensure that you are logged in with administrator privileges for the client system on which you want to install Dell Command Update. To be able to download Dell Command Update, you are able to follow the steps below.
- The first thing that you have to do is to go to dell.com/support.

- There, you have to search for Dell Command | Update for Windows 10.
- After that, you have to download Sys-Man_Application_xxxxx_WN_y.y.y_A00.exe where ‘x’ is the software build and ‘y’ is the version number.
Now, how to install Dell Command Update? You are able to follow the steps below.
- The first thing that you have to do to install Dell Command update is to double click on the .EXE file which is downloaded from the Dell support site.
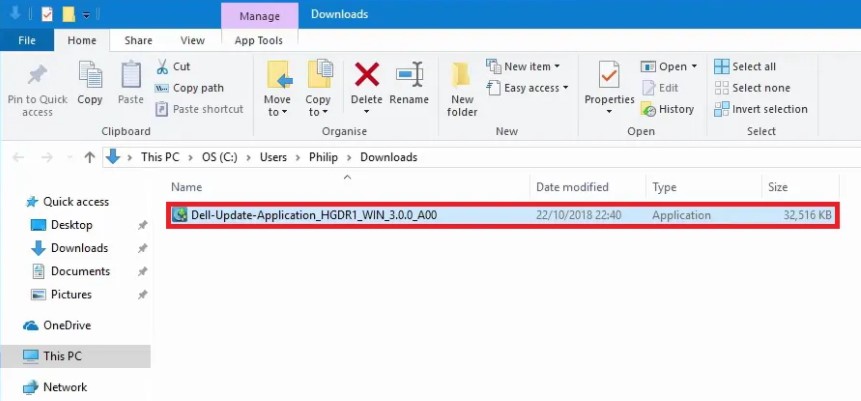
- And then, hit the Install option.

- When you are on the Welcome screen, you have to click on Next.
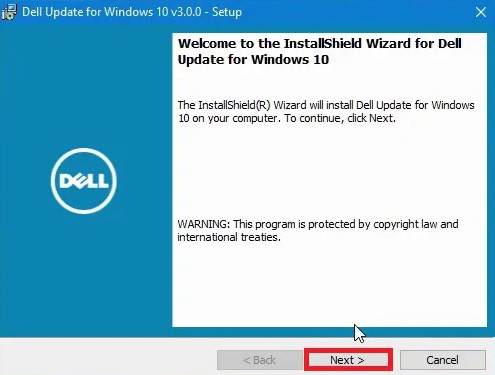
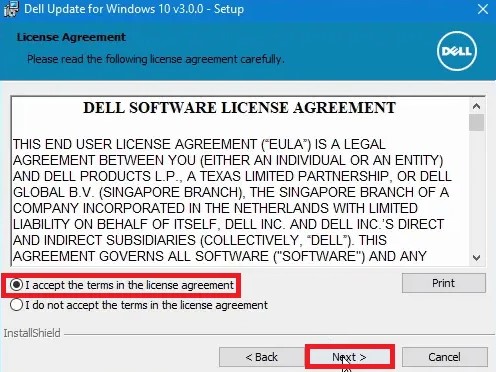
- And then, when you are on the License Agreement screen, you have to choose this: I accept the terms in the license agreement and then you have to click on the Next button.
- You have to click on Install on the Begin Install screen.
- During the installation process, you can click on this: Yes, I want to participate in the program option which is available on the Improvement Program Consent screen to participate in the Dell Command update Improvement program.
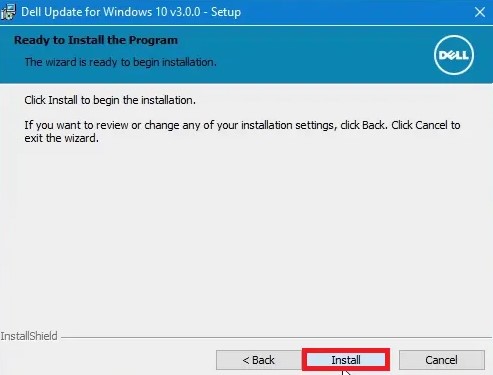
- In this step, you have to click on Install on the Ready to Install the Program screen.
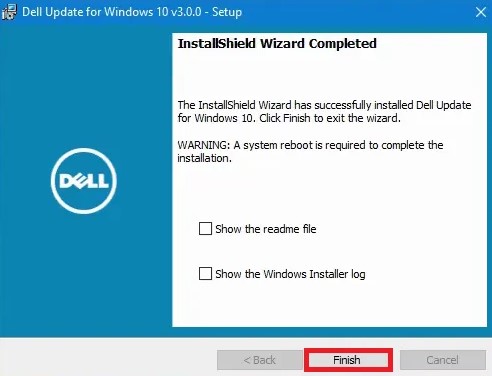
- And last, when you are on the Installation Wizard Completed screen, you have to click on Finish.
Uninstalling Dell Command Update
Do you want to uninstall Dell Command Update? You are able to do that by following the steps below.
-
- The first thing that you have to do to uninstall Dell Command Update is to click on Start.
- After that, you have to choose Control Panel and then click on Program And Feature.
- Here, you have to choose Dell Command |Update for Windows 10 and then you have to click on Uninstall.
Upgrading Dell Command Update
If you want to upgrade Dell Command Update, you are able to do that in these ways.
-
- If you want to do a self-update, you are able to use the Check feature which you can find on the Welcome screen to check for updates.
- If you want to do a manual update, you are able to download and install Dell Command Update from dell.com/support.
In case any latest versions of Dell Command Update are available, you will be able to see that the latest version of Dell Command Update is listed under Recommended Updates. You have to choose the update and install the latest versions of the applocation.
It is important for you to note that in case of minor upgrades, the preferences settings and policies will be retained. In case there are major upgrades, the application is uninstalled and the settings and data will be removed.
How to Download and Install Driver Libraries
If you want to downlaod and install a driver library on a Dell system, follow the steps below.
-
- First, you have to choose the click here to download and install a complete driver library option on the Welcome screen. It is important for you to note that the Preparing for driver restore screen is shown and the driver is installed. You are able to click Cancel if you want to exit this activity and go back to the Welcome screen.
- If the installation of the drivers is complete, then you can click on Close to the Welcome screen.
Checking For and Install Updates
If you want to check for and install updates on a Dell System, you are able to follow the steps below.
-
- On the Welcome screen, you have to click on Check.
The Checking for Updates task will begin and the Checking for Updates screen will be displayed.
The Checking for Updates task includes checking for component updates, scanning for system devices, and determining available updates.
The Checking for Updates screen shows the status of the system scan. If there are updates which are found, Dell Command Update will take you to install the updates. However, if there are no updates which are found, the No Updates Available message will be displayed and it indicates that the devices on the system are up to date. So, you are able to click Close to exit Dell Command Update.
-
- You have to click on View Details if you want to choose the updates that you want to install on the system. You will be shown the Customize Selection screen.
- It is optional but if you want Dell Command Update to restart the system automatically after installing updates, then you have to choose Automatically Restart System (when required).
- You have to click on Install to install the selected updates on the system.
How to View Update History
If you want to view update history, you are able to do that by doing these steps:
-
- When you are on the Welcome screen, you have to click on Update History. Then, the Update History screen will appear. If you see that there are multiple updates which exist, you are able to modify the length of each column to be able to view the details.
- Now, you have to click on Close to go back to the Welcome screen.
AUTHOR BIO
On my daily job, I am a software engineer, programmer & computer technician. My passion is assembling PC hardware, studying Operating System and all things related to computers technology. I also love to make short films for YouTube as a producer. More at about me…







Leave a Reply