
A lot of people think that a text box is such a good and effective way to organize the thought visually. It is also good at differentiating a set of text on a page. Besides, it can also make documents look more formal and professional.
Unlike the other word processing programs, Google does not make adding text boxes in Google Docs so obvious. The good news is that, there are some methods to insert a text box in Google Docs, as follows:

Method 1: Inserting a text box in Google Docs by using the drawing tool
Using a drawing tool to insert a text box in Google Docs is easy, even though it is not the easiest way. By using this method, you will be able to manipulate text boxes throughout the file. The drawing tool is able to be used to upload the drawing as an image to Google Drive and add it to the document. Not only that, it is also possible to add a lot of different kinds of shapes, line styles, callouts, and arrows. The tool opens a dialog box in the document, the place where you will make, edit, and format the shapes and text boxes by using the commands of this tool.
If you want to insert a text box in Google Docs by using the drawing tool, here is step by step to follow:
- Firstly, you should open your document.
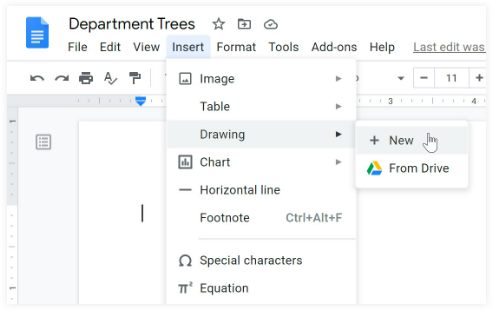
- When it opens, click Insert > Drawing and then click New to be able to create a text box.
- In the next step, click the Text box icon.
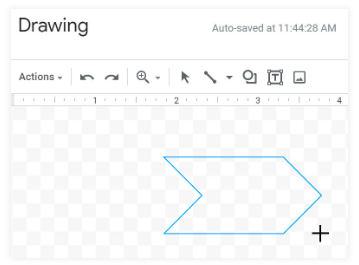
- After that, you can create the text box by clicking and dragging in the drawing area, and then release the mouse for the text box to show up. Feel free to add text and customize any text box that you want and when everything is done, do not forget to click the blue Save & Close button that is able to be found at the top right side of the drawing area.
Method 2: Inserting a text box in Google Docs by using shapes
- First and foremost, you have to click Insert > Drawing > New.

- Then, click the Shapes command.
- After clicking the Shapes command, the next thing that should be clicked is Shapes to choose the shape that you want to use.

- It will also be needed for you to click and drag your mouse in the drawing area to make the shape that you chose.

- After doing that, release the mouse.

- If you want to add text in the shape, you can just double click anywhere within the shape and then enter your text.
- Feel free to add more shapes, lines, arrows, callouts, or even equation symbols to the drawing area if you want.
- Click Save & Close after finishing drawing so it can be inserted into the document.

- If you want, you can also resize the shape by clicking and dragging the resizing handle to the size that you want.

- For those who want to edit the shape, you can do it easily by choosing it and then clicking Edit from the options that show up.
- In case you want to delete a shape, all that you have to do is to press the Delete or Backspace key on your keyboard.
- Besides, it is also possible to customize the shape. To be able to do that, click the formatting command that you want such as color, adding an image, adding lines, and so on.
- In addition, you can also reposition the shapes in case they overlap one another. In order to reposition them, you can choose Bring forward or Send backward and get the ordering that you want. To reposition the text boxes or shape, please right click the text box or shape in the Drawing dialog box, hover the mouse over Order and then click to choose an ordering option.
- First and foremost, you have to click Insert > Drawing > New.


Method 3: Inserting a text box in Google Docs by using a single cell table
The next method that you can try to insert a text box in Google Docs is by using a single cell table. You can do it with one column and one row. If you want to try this method, you can just click Insert > Table and then click on a single cell with one row and one column (1×1). By following the instruction, the single cell will show up on the document. When it shows up, feel free to adjust the length and width of the text box to the size that you want. Aside from that, you can also enter the text in the cell. In case you want to highlight the text or make the document look more professional, you are suggested to adjust the front color, style, and size to anything that you want.
Method 4: Inserting a text box in Google Docs by adding images
In addition to these methods explained above, there is another way that you can try to insert a text box in Google Docs, which is by adding images. To be able to do that, please follow the following guide:
- The first thing that you have to do is to click on the text box or shape.
- When it is clicked, click Edit to open the drawing tool.
- Then, click the Image icon on the menu.
- Now, you can insert an image by uploading it from your computer. The other options are to add it from a URL, your albums, Google Drive, or looking for one from Google search.
- To insert the image, please click Select.
- After selecting an image, you will have to use a text box to be able to layer the text on the top of the image or shape.
- Make sure to click on the text box that you made and then choose Edit from the menu below to be able to go back to the drawing area.
- Next, click the Text box icon to choose it and then change the fill color to set the transparency for the text box.
- Hit save and Close to insert the text box into the image.
- Please click on the image again, choose Image Options, and then choose Wrap text from the right pane.
- Lastly, layer the image and text box by dragging them to the position that you want.
- If you want to move an image in Google Docs, you can click on the image and then change the mode to Wrap Text.

AUTHOR BIO
On my daily job, I am a software engineer, programmer & computer technician. My passion is assembling PC hardware, studying Operating System and all things related to computers technology. I also love to make short films for YouTube as a producer. More at about me…


Leave a Reply