
If you are an iPhone user, you may feel annoyed when a hollow arrow appears on your phone’s screen. Basically, a hollow arrow icon that shows up in the upper-right corner on your iPhone means an application on your device will use your position under certain conditions.
Even though a hollow arrow will be active when you go to a certain place, for some users, a hollow arrow is very annoying. So, they will try to look for an easy way to get rid of hollow arrows on their iPhone. Okay, you can dive into our post to find the guide. Here you go!
![]()
Getting Rid of Hollow Arrow on iPhone, Here’s How!
Getting rid of hollow arrows on the iPhone is pretty easy to do. There are two possible methods for you to get rid of the hollow arrow on their phone. Here are two methods you can take to get rid of hollow arrow on iPhone:
Method 1: Disable location services
Due to the location services are on, the hollow arrow will appear. What you should do is to disable it. If you disable the location services, you will disable your phone’s location permission.
Here’s how to turn off location services on your iPhone!
- First, you can choose the ‘Setting’ application.
- You can then pick the ‘Privacy’ option and choose ‘Location Services’.
- Here, you need to disable the ‘Location Services’ button.

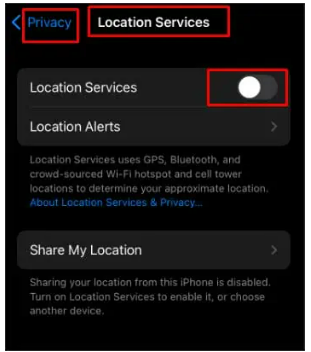
Okay, that’s how to disable Location Services to get rid of hollow arrows on your iPhone screen.
To get rid of the hollow arrow, you may need to disable Location Services for certain apps only. Certainly, there are a lot of apps which will not work correctly if you prevent them from accessing ‘Location Services’ on your iPhone.
Thankfully, the settings in the ‘Location Services’ give you the option to allow specific apps to access your location while preventing all other apps. Of course, you can turn on ‘Location Services for only some apps by doing the following steps:
- First, you can go to ‘Settings’ and go to ‘Privacy’.
- You can then pick the ‘Location Services’.
- Make sure that the toggle for Location Services is enabled, you cannot change the settings per app.
- Here, you need to scroll down the page to find the apps whose location settings you really want to change.
- In the following page, you will have four options to select from, here are they:
- Never: This option is used to prevent the app from accessing your location, regarding the circumstance.
- While Using the App: This option means that the apps can only gain your coordinates when on screen. It will stop applications from getting your location in the background.
- Always: This option will allow chosen apps to gain your position data at all times and it must be used for apps you believe in.
- Ask Next Time: This option will bring up a prompt in the chosen app the next time you use it. The selected app here allows you to either allow it once, not allow it or allow it only when using the application.
Method 2: Turn off the status bar icon
Another effective and efficient method you can take to get rid of the hollow arrow from your iPhone’s screen is to switch off the ‘Status Bar’ icon. By doing this, it will stop the location icon from appearing on the status bar.
Here’s how to turn off the status bar icon!
- First, you need to select ‘Settings’ on your iPhone device.
- Then, you can click on the ‘Privacy’ option and choose the ‘Location Services’ option.
- Make sure to scroll down and choose the ‘System Services’.
- After that, you can go to ‘Status Bar Icon’ and switch the button off.

Okay, that’s how to turn off the status bar icon to get rid of the hollow arrow on the iPhone.
What Does Different Arrow on iPhone Indicate?
There are four arrow icons that will appear on your iPhone screen. Of course, each arrow will indicate a certain meaning. Here are different arrows available on iPhone with each meaning:
- Hollow Arrow: This hollow arrow will denote that an application on your iPhone is geofencing.
- Gray Arrow: This grey arrow actually indicates that a website or an application has accessed your location in the past 24 hours.
- Purple Arrow: This purple arrow means that an application has recently accessed the Location Services.
- Arrow with Blue Circle: This icon means that the website or application that you are using is trying to access your ‘Location Services’.
Can You Remove Navigation Arrow from Mac?
Aside from iPhone users, Mac users also face the issue of the Location Arrow on the status bar. As a Mac user, you can see the location arrow on Mac when the ‘Show Location Icon in the Menu Bar When System Services Request Your Location’ option is turned on.
If you want to remove the navigation arrow from Mac, you will have to uncheck the aforementioned option. Of course, you can apply the following steps to get through the process:
- First, you need to choose the ‘Apple Logo’ from the top panel.
- After that, you can select ‘System Preferences’ from the list.
- You can now choose ‘Security & Privacy’.
- In the following step, you have to click on the ‘Privacy’ tab.
- By clicking this, you will see a lock icon on the bottom and then click on it.
- By doing this, it will require you to enter your Password. To unlock the lock icon, you can type your password.
- Ensure to check the ‘Enable Location Services’ option.
- You can now choose ‘Location Services’.
- You can go to and select the ‘System Services’.
- After that, you can hit the ‘Details’ option.
- You can then unselect the ‘Show Location icon in the menu bar when System Services Request your Location’ option.
- Last, you can click on the ‘Done’ button to remove the navigation arrow from Mac.
Okay, that’s how to remove the navigation arrow from Mac. It’s pretty straightforward to remove the navigation arrow from Mac, isn’t it?

AUTHOR BIO
On my daily job, I am a software engineer, programmer & computer technician. My passion is assembling PC hardware, studying Operating System and all things related to computers technology. I also love to make short films for YouTube as a producer. More at about me…


Leave a Reply