Roblox is the place to sharpen creativity. The players are offered the chance to make the games and the contents. The things known as Avatars are the ones that represent the players in the game. They are described as characters that are able to be customized. Each player is free to customize their own avatar with clothing and accessories that are available in the Avatar Shop. Aside from purchasing from the Avatar Shop, they can also get clothing and accessories for their avatar by making their own.
One of the things that can be created in Roblox is a T-shirt. T-shirt is known as an image decal that is applied to the front of the avatar’s torso. It is simpler compared to the shirt which consists of a design for the front, back, sides, top and bottom of the torso. This guide will teach you how to create a Toblox T-shirt with a thing called GIMP.
In order to create a Roblox T-shirt with GIMP, here is step by step to follow:
-
- The beginning of the process is to open an image editor. One of the most recommended is GIMP.
-
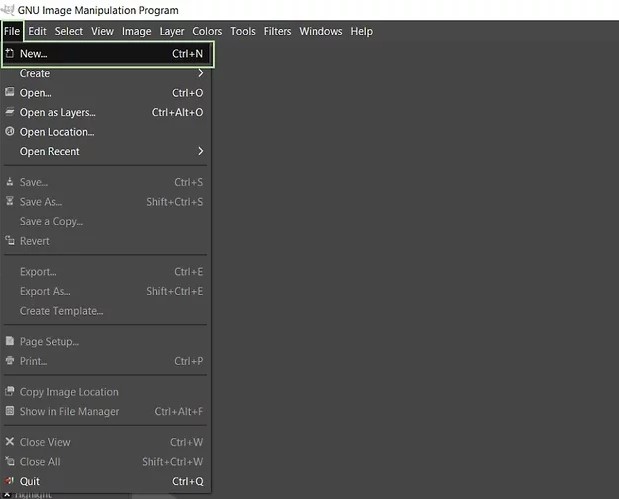
- Once it opens, make a new file, which can be done by clicking File that is located in the upper right corner and clicking New.
-
- In this step, you will have to set the image dimensions to 128 x 128 pixels since it is the recommended image size for Roblox T-shirt decals. Actually, it is not a rule, just a suggestion. Feel free to make them a little bigger if you want, but please do not forget to make the height and width of the image the same number of pixels. If you have no idea, setting the dimensions can be done by choosing Pixels or px in the drop down menu beside Height and With and entering 128 in the boxes beside Height and Width.
-
- It is time for you to design the T-shirt decal. Designing the decal can be done with the help of the program tools. There is the Paintbucket tool to color the background, and a text tool to add text the T-shirt decal. If you want to draw or add texture to the T-shirt decal, you can use Brush. Feel free to also use the marquee tool in case you want to copy and paste an image or pattern from another image and then paste it onto your T-shirt. It is your chance to put what is in your mind.
-
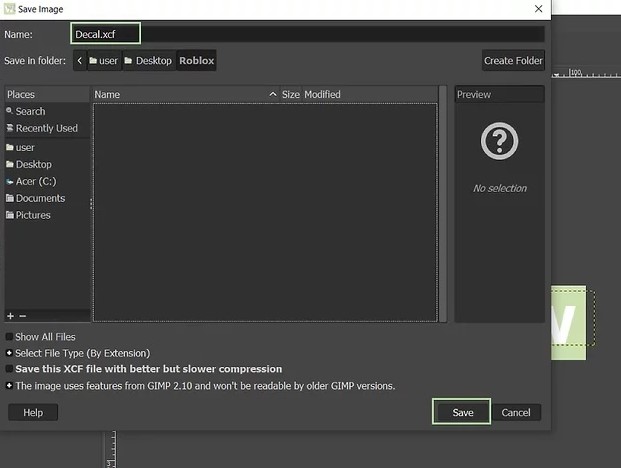
- When everything is done, do not forget to save the file. It is best to save the image in its native GIMP format just in case the image has to be edited. To save the image in its native format, you can click File, click Save As, enter the name for the file beside Filename or Name, and then click Save.
After creating a Roblox T-shirt with GIMP, it is time for you to upload it to Roblox. For those who have no idea how to do so, below are the instructions to follow:
-
- First of all, turn off the layer with the template. It is needed for the layer with the template to be on the bottom in the Layers panel in GIMP. Please click the icon that looks like an eyeball in the layers panel to turn off the layer with the template. By now you should see the T-shirt design without the template.
- Then, save the image in a PNG format. By using GIMP, click File in the menu bar located at the top, click Export as, click Select File By Type (By Extension), scroll down and click PNG Image, and click Export.
- After saving it, go to https://www.roblox.com/develop. Do not forget to log in to Roblox if you have not done it yet.
- Once you are in, click the My Creations tab, the first tab found at the top of the page. In case it is nowhere to be seen, click Manage my games found at the bottom of the banner at the top of the page.
- The next thing that should be done is to click T-shirts, which is in the menu bar to the left of the page.
- Then, click Choose File, which is the first at the top of the page under Create a T-shirt. Uploading T-shirt decals is easy as you do not need to have a subscription.
- The seventh step is to click the PNG file for your T-shirt decal and then click Open. By doing so, the T-shirt design image that you made before will be uploaded to Roblox.
- Do not forget to type a name for the T-shirt decal. Apparently, the file name for tehT-shirt will autofill by default. For anyone who wants to use a different name for the T-shirt, you should enter it in the box beside the T-shirt name.
- After naming the T-shirt, please click Upload to upload the image to Roblox.
- When everything is done, the last thing is to go to the verification process. This process is important to verify that you are a person. In the process, you will be shown two images. If you have no idea of what to do, you can just click the arrow icons on the left or right to rotate the image. When the image is right side up, it is time for you to click Done. In just a second, your T-shirt design will be available.
It should be easy for you to create a Roblox T-shirt by following these steps above. Just like creating a Roblox T-shirt, it should also be easy to upload it to Roblox. In case there is something to ask, do not hesitate to reach out to the representative of Roblox. Another thing that you might want to consider is to visit the communities or forums related to Roblox where everyone who shares the same interest gathers in the same place.
AUTHOR BIO
On my daily job, I am a software engineer, programmer & computer technician. My passion is assembling PC hardware, studying Operating System and all things related to computers technology. I also love to make short films for YouTube as a producer. More at about me…









Leave a Reply