
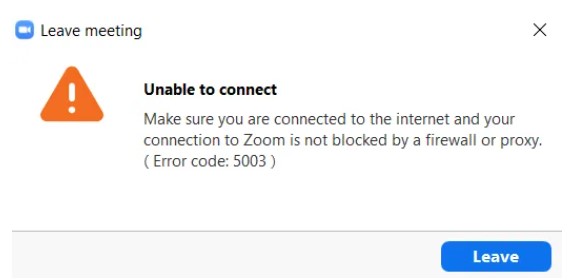
Zoom is a popular video conferencing app. But, there are lots of users who report that they encounter an error code 5003 when they try to connect to Zoom. Apparently, this error code is only appearing in the desktop application of Zoom. So, how to fix Zoom Error Code 5003? Find that solution here.
How to Fix Zoom Error Code 5003
Here are some methods to fix Zoom Error Code 5003:
Method 1: Restart your Zoom App
The first method to Zoom Error Code 5003 is by restarting your Zoom application. Actually, this not only helps you fix the error code 5003, but will also speed up the connection and reduce lag. To reach this, you have to close Zoom completely. Then, wait for a few seconds before you start the app. The app will not be closed completely by simply clicking the close icon on the window. To exit the Zoom app completely, do these steps:
- Firstly, navigate to the Taskbar. Then, click on the up arrow for opening the system tray.
- In the system tray, right-click on the Zoom icon and choose Exit.
In alternative, you are also able to shut it down completely by using the Task Manager. Here is how:
- Firstly, right-click on the Taskbar and choose Task Manager.
- In the Task Manager window, under the Processes tab, you are able to go to Windows processes. Please check if the Zoom app is still running. If it is still running, just right-click on the Zoom Meetings app and choose End task.
- This is going to shut down the Zoom app completely. Then, you are able to try reconnecting to the Zoom meeting and see if the error is resolved.
Method 2: Check the status of the Zoom’s servers
Frequently, you may see the error code 5003 if the Zoom servers are down. This was able to be due to unexpected rise in traffic, or due to their technical glitch. In this case, we highly recommend you to check the status of the Zoom servers.
Here is how to check the status of the Zoom servers:
- At the first step, Launch your browser and visit this link; https://status.zoom.us/ to check the status of the Zoom servers. Here, you will be able to check the current status of all the Zoom services individually.
- If it shows All Systems Operational, it means that the server status of Zoom is fine.
- But, if any problem is shown here, we suggest you wait until the servers are up and running.
- After the Zoom servers are back up, you are able to try connecting to your Zoom meet again.
Method 3: Reset your Network Adapter Settings
Occasionally, resetting the network adapter may assist solve the network connectivity problem, thus solving the Zoom’s inability to connect issue.
Here are steps to reset your Network Adapter settings:
- At the first step, you have to right-click on Start and choose Run to launch the Run command window.
- In the Run command search box, you are able to type cmd and press the Ctrl + Shift + Enter to open the Command Prompt window in elevated mode.
- In the Command Prompt window, simply you are able to run the command; ipconfig /flushdns. Then, hit Enter.
- Afterwards, run the command; netsh winsock reset, in the same Command Prompt window and hit Enter.
- After it is done, just exit Command Prompt and restart your PC.
- Now, you are able to try connecting to the Zoom meeting.
Method 4: Change to a different DNS server
Changing to a different DNS server will be able to help boost the network speed, thus helping you to connect to Zoom meetings without any error.
Here is how to change to a different DNS server:
- At the first step, you have to press the Win + R keys on your keyboard to open the Run command window.
- In the search field, please write ncpa.cpl and press Enter to open the Network Connections window.
- In the Network Connections window, you have to right-click on the active WiFi connection and choose Properties.
- In the WiFi Properties window, under the Networking tab, you have to go to This connection uses the following items field. Now, choose Internet Protocol Version 4 (TCP/IP4) and click on the Properties button.
- In the Properties dialogue box, under the General tab, you have to choose Use the following DNS Server addresses.
- Now, you need to type the following figures into the respective fields;
Preferred DNS Server: 1 . 1 . 1 . 1
Alternative DNS Server: 1 . 0 . 0 . 1
- Please, press OK to save the changes and exit.
- Now, you are able to try connecting to your Zoom meet and the error code 5003 should be solved.
Method 5: Add Zoom as Trusted website in Windows 10
Just like many other sites, even Zoom may be blocked by Windows 10 considering it as insecure. The main aim is to increase the overall security of your Windows 10 system. Thus, adding Zoom as the trusted website in Windows 10 may assist solve the error code 5003.
Here is how to do:
- Firstly, right-click on the Start menu and choose Run. This is going to open the Run command window.
- After that, type inetcpl.cpl in the Run command search field. Press Enter to open the Internet Properties window.
- In the Internet Properties dialogue box, you have to choose the Security tab and choose the Trusted sites. Please click on the Sites button.
- In the Trusted sites window, in the Add this website to the zone field, you are able to enter the Zoom website url (Zoom.us) and press the Add button next to it.
- Please press Close to return to the Internet Properties window.
- In the Internet Properties window, you need to press Apply and OK to save the changes and exit.
- Now, you are able to visit the Zoom app and try connecting to your meeting.

AUTHOR BIO
On my daily job, I am a software engineer, programmer & computer technician. My passion is assembling PC hardware, studying Operating System and all things related to computers technology. I also love to make short films for YouTube as a producer. More at about me…


Leave a Reply