
What is Putty? According to Puttygen, it is a terminal emulator. It is an open source, light-weight and free SSH client. It is able to support some network protocols and it includes SSH, SCP, Telnet, rlogin, and raw socket connection. Also, it is able to connect to a serial port.
Originally, PuTTY was written for Microsoft Windows. However, it has been ported to various other OS. This application was written and is maintained mainly by Simon Tatham, a British programmer. This application can support a lot of variations on the secure remote terminal. Also, it provides user control over the SSH encryption key and protocol version, alternate ciphers such as RC4, AES, 3DES, DES, Blowfish and Public-key authentication.
Do you want to download PuTTY installer for Windows 10 64 Bit? If you want to download it, you may need the guide for doing it since you are afraid that you make a mistake. Well, you are able to read the explanation about it below.
Downloading PuTTY Installer for Windows 10 64 Bit
- If you want to download PuTTY installer for Windows 10 64 Bit, the first thing that you have to do is to access the official website of PuTTY which can be accessed at www.putty.org.
- When you are on that site, you will be able to see Download PuTTY at the top of the page and there you can see words saying ‘You can download PuTTY here’. You are able to see that there is an active link so you have to click on that.
- You will be brought to another page and there you will be able to see the options of the download link. If you need PuTTY for your 64-Bit Windows, then you are able to click on it in the option: 64-bit putty-64bit-0.74-installer.msi.
You are also able to download it in other sites which provide you the link for downloading it such as File Horse site, PuTTYgen and some others. According to the File Horse, if you download PuTTY, you will get these tools:
- PuTTY which is the Telnet and SSH client itself.
- PSCP which is an SCP client for example command-line secure file copy.
- PSFTP which is an SFTP client for example general file transfer sessions much like FTP.
- PuTTYtel which is a Telnet-only client.
- Plink which is a command-line interface to the PuTTY back ends.
- Pageant which is an authentication agent of SSH for PuTTY, Plink and PSCP.
- PuTTYgen which is a key generation utility of RSA and DSA.
Installing PuTTY
If you have downloaded PuTTY, now you have to install it. If you have Windows 10, the Edge browser offers to execute the installer when the download is done. However, if you use the older versions of Windows, you have to execute the installer manually. You have to open the Windows Explorer by right clicking on the Windows logo in the bottom left corner and then you have to navigate to the Downloads directory or the place where you saved the installer. And then, you have to double click on the file name.
It is important for you to know that when you install it, it must be performed with administrator rights, it can be either using the administrator account of your personal account. Here are the steps that you are able to follow for installing PuTTY.
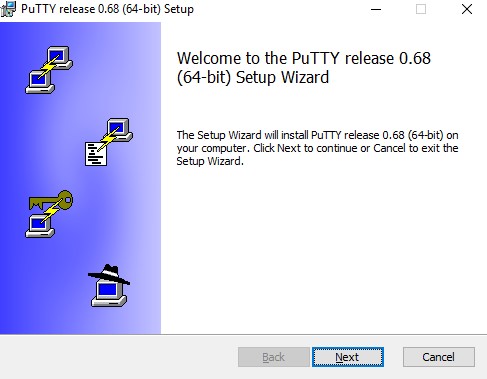
- When the installer begins, you will see that it displays the welcome screen. The thing that you have to do is just click on Next.
- After that, the installer will ask for the Destination folder in which to install the program. It is recommended for you to use the default value. So, you just have to click on Next.

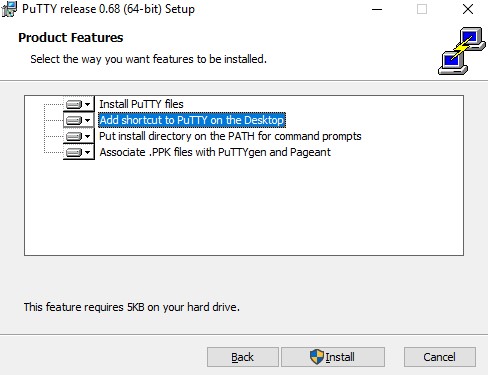
- In this step, the installer will ask you to choose product features to install. Probably you wish to add a shortcut on the desktop if you want to use the program often. All the other options usually will be enabled. When you are ready, you have to click on Install.
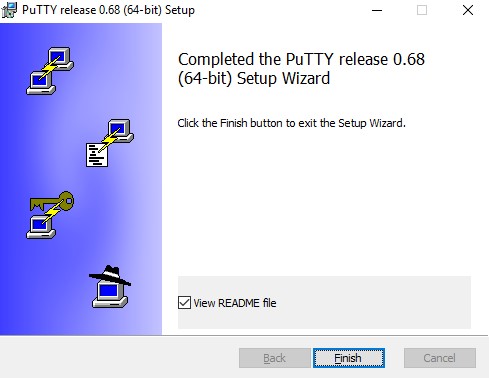
- You have to wait for the process of installation until it is complete. If the process is complete, it will display a message saying that it is completed. And here, you have to click on Finish to exit the installer.
How to Run PuTTY
If the installation process is done, now you are able to test to make sure that this program can run properly and you are able to find the program. If you install a shortcut on the desktop, you will be able to see the icon of PuTTY there. So, you are able to try to double click on it. Then, it should begin the software.
Besides using a shortcut, you can also find the software from the Windows Start menu that you can find in the bottom left corner of the screen of your computer. It is important for you to know that the menu will look different in each version of Windows. If you use Windows 10, you have to scroll down until you are able to see PuTTY and then open the group and choose PuTTY.
When you see that the software begins, you will get a window with the title PuTTY Configuration with a field Host name that you are able to find in the upper middle part. You are able to try to enter a host name to be able to connect to in that field and then click on Open.
Getting a Server
Do you know that an SSH client is intended to be used for connecting to an SSH server? Well, because you are installing it, you will have a server to connect. The server can be at your home, work or even university. You need a host name such as students.example.edu or IP address to be able to connect to. You have to enter the name of the host or IP address in the Host Name field. In case you do not have a server but you want to have one, you are able to try installing Tectia SSH Server for Windows or IBM mainframes or OpenSSH on Linux.

AUTHOR BIO
On my daily job, I am a software engineer, programmer & computer technician. My passion is assembling PC hardware, studying Operating System and all things related to computers technology. I also love to make short films for YouTube as a producer. More at about me…


Leave a Reply