
SQL Server Management Studio or abbreviated as SSMS, according to Microsoft site, is an environment which is integrated for being able to manage any SQL infrastructure, from SQL Server to Azure SQL database.
It will provide tools to be able to configure, monitor, and administer instances of SQL Server and databases. With it, you are able to deploy, monitor, and upgrade the data-tier components which are used by your applications and also build queries and scripts. But, how to download Microsoft SQL Server Management Studio?
Steps To Download Microsoft SQL Server Management Studio
- The first thing that you have to do to use Microsoft SQL Server Management Studio is to download the installation files of SQL Server Management Studio or SSMS from the SQL server download page in the Microsoft site.
- More info: How to Open JNLP File with Java Web Start

- If you have downloaded the file as per your server type, then you have to execute it. And you will be brought to the first screen and it is SQL Server Installation Center. It is important for you to know that that is the main installation screen of the SQL server. From here, other SQL server tools installations also can be launched. If you are on this screen, you have to choose “New SQL Server stand-alone installation or add features to an existing installation” to start the installation.

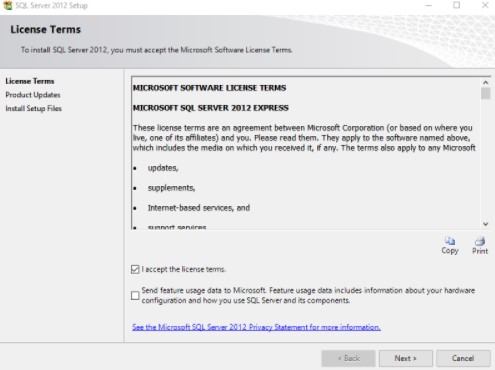
- In this step, if you choose the option that we mention above, it will check the rules of setup on the server and you will be directed to the license terms screen. You have to make sure that you read the license terms and then do not forget to accept it like any other license terms of other applications. It is important for you to know that your server needs to pass the rules of setup to be able to proceed with the installation.
- In the fourth step, if you have accepted the license terms, now you have to scan all the available product updates. You will see the updates which are required, size and also the details there. Do you need further details? If so, you are able to choose More Information which will bring you to the support page. On that page, you will be able to find all the details which are related to the updates. If you want to ignore these updates, you can do that by deselecting the Include SQL Server Product Updates option. However, it is recommended for you to download these updates along with the installation. Depending on the size of the update files, it will take some time. So, you have to be patient in the process.

- Next, it is about the Install Setup Files step. What is this? It is where SQL Server Management Studio (SSMS) setup will download, extract and also install all necessary setup files to your server.
- If the SQL Server Management Studio setup has been done with the install setup file, now it verifies the setup support rules to be able to proceed. Then, you will be brought to the feature selection screen. It is a comprehensive screen where there is detailed information about each feature. When you run the SQL Server Management Studio installation, you will see that it chooses Management Tools by default. So, you do not have to choose anything in this step. You are able to choose Management tools – Basic. If you want to get more information on this feature, you are able to view the detailed feature description on the right side. On this screen, you will also be given the ability to choose and unchoose all features in one go. It makes you save a lot of time when you have to install a lot of features. Also, it gives you detailed information about the prerequisites, the chosen features which prerequisites have already been installed and which will be installed via this installation. To continue, you just have to click on the Next button.
- What do we have to do in this step? Now, the setup of SQL Server Management Studio will check the installation rules. The thing that you have to do is to click on the Next button.
- Now, the SQL Server Management Studio setup will verify the space of the disk. You have to make sure that there is enough disk space. If there is not enough disk space, it will make the installation incorrect. Now, you must click on the Next button to continue.
- Here, you can decide whether or not to send the error notifications to Microsoft. It is important for you to know that it is recommended to be able to help Microsoft improve future releases and to fix any bugs in the existing release.
- Don’t miss: How to Use Jupyter Notebook Online for Python
- If you have clicked on the Next button, setup checks the installation configuration rules and if you see that it passed, the setup will continue. In this process, it will take some time to install SQL Server Management Studio, so you have to be patient waiting for it to complete.
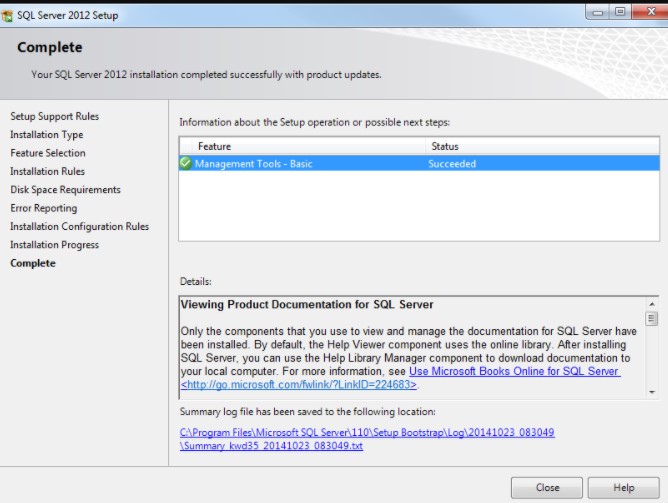
- In this step, the screen will show the status of the installation of SQL Server Management Studio along with each feature. This screen will be able to help you to check what things have been installed and what has not. If you see that there is a feature which could not be installed, then you are able to re-run the similar installation steps and then install that specific feature.
- If you want to check if SQL Server Management Studio has been installed successfully, you have to choose the Start menu of your server and then you need to choose the SQL Server 2012 menu. There will be a link to SQL Server Management Studio.
Conclusion
Well, you are able to follow the steps above as a guide for you to download and install SQL Server Management Studio. However, it is important for you to know that the steps of installation above are for a standalone installation of SQL Server Management Studio. You are also able to install SQL Server Management Studio together with the SQL Server installation. If you want to do that, just make sure that you have chosen Management Tools in the feature screen.

AUTHOR BIO
On my daily job, I am a software engineer, programmer & computer technician. My passion is assembling PC hardware, studying Operating System and all things related to computers technology. I also love to make short films for YouTube as a producer. More at about me…


Leave a Reply