
This post is for you who want to know how to use the scripts on Roblox. Since it is not easy and requires some focus, it is better for you to write down everything so that you can look at the note every time you forget something.
Introduction and Getting Started
- It is important to know the basic knowledge about the script. In the world of Roblox, scripts refer to the line of code with instructions that should be followed by a game of program. The functions of the scripts vary. Some of these include giving or taking away the health points of the player, making objects move, or any other ones. There is a programming language in this platform called Lua.
- Roblox has a development program known as Roblox Studio. First of all, you will have to open this program that looks like a blue square. In case there is no Roblox Studio in your device, you can go to https://www.roblox.com/create and click Start Creating before clicking Download Studio.
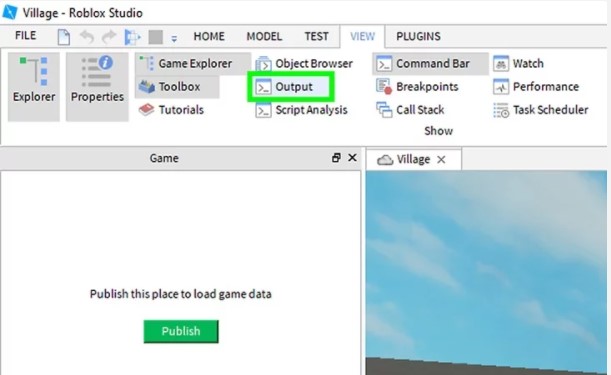
- Next, click View. If you have no idea where it is, it is in the menu bar at the top. Doing so will display a panel of windows that can be opened in Roblox Studio.

- Then, click Output. This one is in the View panel at the top of the screen. Clicking it opens the Output window that allows you to view the script in action and to see if there is any error message in your script.
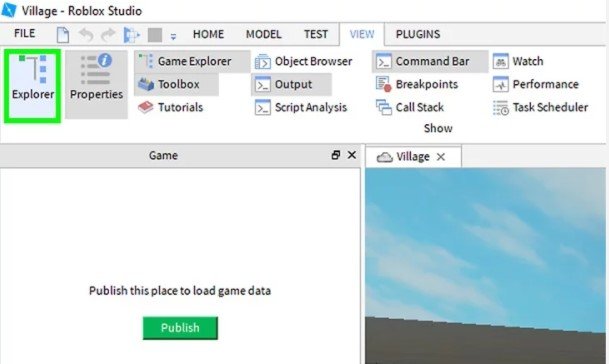
- Afterward, click Explorer, which is in the upper left corner of the View menu. It should be done by opening the explorer window. The Explorer menu can be used to browse objects in the game and add new objects.
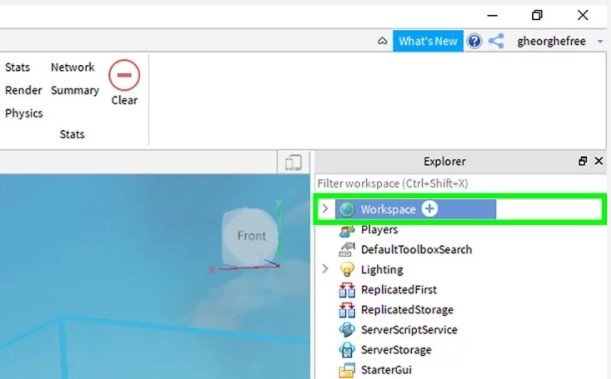
- Please expand World in the explorer by clicking the arrow icon beside World.
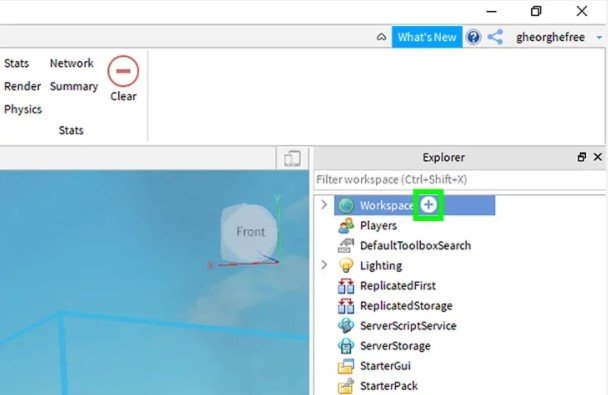
- There is + beside Workspace, please click it to show up a pop up menu with the different scripts that you can add.
- Click the thing beside the icon that looks like a blue page called Script. You can do it to make a new server script with a Hello World! Print function. Clicking Play found at the top of the screen will test your game and you will be able to see the message Hello World! In the Output menu. Not only that, everyone is also able to find the options to make a new local script and a new module script located in the upper right corner. You are encouraged to try changing the text parenthesis. The function of the Print command is to show up the text in the Output window.

- Lastly, name the script. To name it, you can click the name of the script below Script in the Explorer menu and then enter any name that you want.
Referencing Objects
- Firstly, add a part to your game by clicking Model, Part, and a part.
- Remember the location of the part in the Explorer window to reference it in a script. Usually, it is under Workspace.
- Back to the script and reference, write the code that references the object. Try “game” to reference the part in the game and then add the location of the part (Workspace) as well as the object name.
- The next thing is to open the Properties window and click View found in the menu bar at the top and click Properties in the upper left corner. Please click the part to see the list of possible properties.
- By using a script, you have to change the properties of a part. To do it, add a period (.) and then the name of the properties that you want to change. After that, add an equal (=) sign as well as the value of the property. It is needed to make a new line of the code for every property that you want to change.
- After that, make a variable that references a part. Enter the location and name of a part if you want to reference it. The best idea to make it simple is to make a variable that references the part. Tap local and the name of the part to make a reference variable. Also, add an equals sign and the location and the name of the part.
- Feel free to use the variable name to change the properties of the part and then use that to reference the object after the line that made the variable.
- When everything is over, it is time to test the
- Firgame by clicking the Test menu and clicking the Play icon.
Making a Death Block
- This tutorial will teach you to make a block that is deadly when it is touched. First of all, you should add a block to your game.
- Then, add the script to the block, which is found under Deathblock in the Explorer window. Inserting it can be done by right clicking the block, clicking Insert Object and clicking Script.
- Delete the Hello World code as you do not need it.
- Enter the function onTouch(Deathblock) in the first line.
- Enter local humanoid = Deathblock.Parent:FindFirstChild(“Humaoid) in the line after that.
- Enter if (humanoid ~ = nil) in the next line.
- Enter humanoid.Health = 0 to drop the health of the player to 0%.
- Enter the end of the next line, which ends the if/then function.
- Do not forget to add another end of the next line in order to end the script.
- Enter part.Touched:Connection(onTouch) on the line after to return the script to the original one. Besides, you need to allow it to run again the moment the player touches the block. When everything is done, it is time for you to test the game to check the way it works.
If it is hard for you, it might be better to go to Youtube and find a tutorial video.

AUTHOR BIO
On my daily job, I am a software engineer, programmer & computer technician. My passion is assembling PC hardware, studying Operating System and all things related to computers technology. I also love to make short films for YouTube as a producer. More at about me…
![Roblox Greenville [Auto Farm] Scripts](https://www.alfintechcomputer.com/wp-content/uploads/2025/08/Roblox-Greenville-Auto-Farm-Scripts-450x240.jpg)


![Roblox Universal Script [Noclip]](https://www.alfintechcomputer.com/wp-content/uploads/2025/03/Roblox-Universal-Script-Noclip-450x240.jpg)


Leave a Reply