Resisting attacks by motivated hackers is one of the most important responsibilities of a system administrator. This is especially true for websites with sensitive customer information and large numbers of users. Therefore, it is important that system administrators take proactive steps to find and fix vulnerabilities on websites.
The one tool that can help you in this case is Vega Vulnerability Scanner, that’s a free open source graphical web audit tool developed by security company Subgraph. This tool includes some cool features like a proxy scanner, but we’ll focus on the automated security testing aspects to help you find and verify sensitive information that has been accidentally exposed, cross-site scripting (XSS), and many more of vulnerabilities case.

There are web application crawlers similar to Vega. Portswigger’s Burp Suite Scanner and Netsparker Security Scanner use premium vulnerability scanners, but the Vega Scanner can do many of these things for free. Vega scanners clearly and clearly mark useful resources with each scan, making it easier to find and understand the severity of web application vulnerabilities.
Step 1: installing Vega
Vega Vulnerability Scanner was preinstalled in previous versions of Kali Linux, but if you are using the latest OS you need to install it. But there is a really quick way to check. First, make sure all packages are up to date.
https://gist.github.com/c219dd06ca6e71b51bf7167943c6318d
Now check if Vega is already installed.
https://gist.github.com/930da0083fa6b461f7d8291a2e77dc21
If you receive an error, there are several steps you can take to try to fix it (see the explanation in the previous version of this article), but to avoid crashes, it is easier to use the following process:
To install Vega you need to download and unzip the Vega file. But first tweak dpkg so that there are no more errors. Then you need to install some dependencies and tools. Vega requires WebKit 1.0. Otherwise, it will not be installed. You will also need Java. Unzipping will extract the Vega download file.
https://gist.github.com/0afd908cd4093059066bc27387756614
Now head over to Subgraph Vega’s manufacturer, and get a download link for the version of Vega you want. Don’t download here, just copy the link. If you need 64-bit Linux, you can use the link in the following command below.
- Vega download link here

Now install the zip file to your system using wget. If you want, you can first navigate to the cd folder where you want to save the download.
https://gist.github.com/b6a2d173535e4b1e5e7fccaedce2b675
Then, if you want to check what the zip file is, create a list with ls and copy the file name.
https://gist.github.com/14866b0664a1e376a77433eaa0036a80
Then unpack the archive using the unzip utility you have installed.
https://gist.github.com/a59bcce748c9043df70c097e8a6c2d82
That’s it for installing Vega on Kali or any other Linux system. However, you may need to switch the Java version you are using in order to successfully open Vega later. If you think you are already using Java 8 in passive mode, you don’t need to do this. If you are unsure the latest Java does not work with Vega, so if you want to switch to Java 8 from manual mode use:
https://gist.github.com/b6721e5ecb1880224a3ef98a7a2af069
Step 2: starting with Vega
In previous versions of Kali with Vega preinstalled, you can go to Applications -> Analyze Web Applications -> Vega. But now cd into the Vega folder and do ls.
https://gist.github.com/a419340091c40e3e8d64ab35954150ee
You will need the Vega tool to get started with Vega, so start with:
https://gist.github.com/87a281d285171776f496809d4a0208c7
If that worked, you should see the Vega splash screen before Vega fully opens. If not, make sure you are using the correct Java version as described in Step 1.

Step 3: Vega configuration
I would like to see the default settings and options available after the first launch of the application. Click the Window menu in the upper left corner, then check Preferences.
Vega’s proxy (optional)
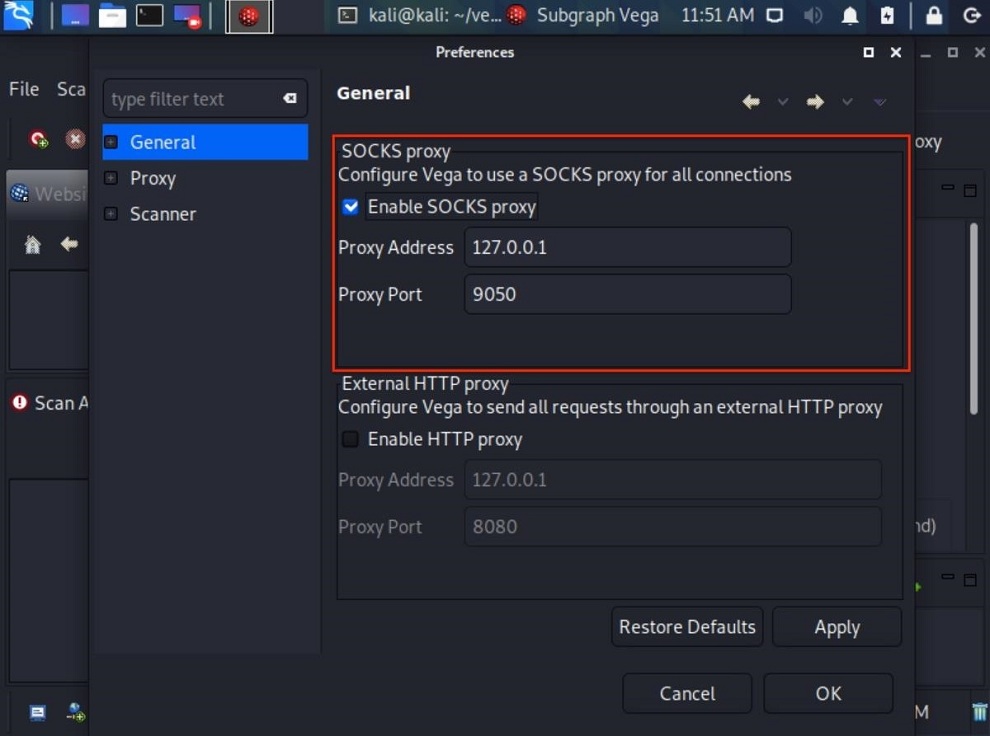
To anonymize Vega scans and proxy all connections, select the Enable SOCKS Proxy option in the General section and enter the address and port of the proxy server. When using Tor, enter the default Tor address and port (127.0.0.1:9050). It should already be filled in automatically. This helps to hide the source of the scan. Otherwise, if you are using a free or premium proxy service, please select the correct address and port.

Using Tor’s User-Agent (Optional)
If you decide to proxy Vega scans over Tor, you might also consider changing your Vega user agent to a Tor browser user agent. This will give you access to some (but not all) websites that are blocking Tor HTTP requests.
To change the Vega user agent, click on the Scanner category and enter the Tor Browser user agent next to User Agent. Then click “Apply” and “OK” to save the changes. Here is the Tor Browser user agent as of November 2020.
https://gist.github.com/8f867b2f84326ae57d3691d5a8994319

The Tor browser user agent changes with all major Tor browser updates. To find the latest user agent, I was able to navigate about:config in the Tor browser and double click on general.useragent.override. But that option disappeared with Firefox 71. Instead, open the Tor tab and ask “What user agent do I have” in the search bar to tell me if you are using DuckDuckGo.

HTTP requests (optional)
Another thing that can be changed in the Scanner menu is the Maximum transmission requests per second option. By default, the software is configured for 25 requests per second.
There may be too many or too few requests per second depending on your scenario. Assuming you have permission to crawl your website with Vega, it is recommended to start at 10 requests per second. For your site, 100 requests per second may be more appropriate. It all depends on you.
It is safe to set this number large, since using more requests per second will not result in a significant increase in processing power. Do not worry. Vega is not a DDoS tool. The bandwidth of the internet and website automatically limits requests.

It’s all about Vega’s preferences. The listener setting for Proxy is the default, not scanner related. The default “Debug” setting in the scanner section is for Vega developers.
Step 4: scanning with Vega
Now that you have Vega installed and configured, you are ready to start crawling your website. To start scanning, use the Control-N shortcut and click the Start New Scan icon in the upper left corner, or click Scan in the menu bar and select Start New Scan. Vega displays a window for choosing what to scan. Enter the target URL in the box under Scan Target and click Next.

Vega has dozens of modules designed to search for a wide range of common web server vulnerabilities such as SQL Injection, XSS and XML Injection vulnerabilities. Make sure Injection Modules is selected to activate all scanner modules. If not, expand “Injection Modules” and select the ones you need, then deselect the ones you don’t need.
You can click Next multiple times to configure your settings or authentication options, but this is not required. Instead, click Finish to start crawling your site.

Depending on the size of your website and the number of requests per second set earlier in the article, the scan can take anywhere from 2 minutes to 8 hours. When the website appears on the Scan Alerts tab and alerts start to propagate, the scan has started. Upon completion of the scan, you will receive a report detailing all detected vulnerabilities.
Step 5: keep secure
Upon completion of the scan, Vega displays a clear and concise summary of alerts.
If Vega reports a “high” alert, don’t panic. False positives aren’t necessarily bad. However, we recommend that you review the report and manually examine each alert. Think of these warnings as areas that deserve further study, rather than as clear signs that something needs to be fixed.

Vega explains perfectly what each warning means, how it affects your site, and how to fix vulnerabilities. It also contains helpful links to help you better understand how to deal with vulnerabilities.

Vega is a great tool to help security researchers better understand penetration testing of web applications. An extensive selection of modules allows even novice users to dig deeper into potential security risks and assess the severity of their website. Anyone interested in making your website more secure and improving their web hacking skills will love Vega and its easy of use.
AUTHOR BIO
On my daily job, I am a software engineer, programmer & computer technician. My passion is assembling PC hardware, studying Operating System and all things related to computers technology. I also love to make short films for YouTube as a producer. More at about me…


Leave a Reply