
Windows Subsystem for Linux is a new feature of modern Windows computers that allows users to run Linux operating systems natively on Windows 10 computers. In addition to Windows 10, administrators can run Windows Subsystem for Linux on versions of Windows Server 2019.
WSL first appeared in the Windows 1st Anniversary Update 2016. Since then, Microsoft has optimized and improved the Windows Subsystem for Linux, receiving a lot of user feedback via Twitter, GitHub, and User-voice.

This is a real revolutionary technology that allows you to run your favorite Linux right in Windows: Ubuntu, Red Hat, Kali Linux, Alpine, Pengwin, Debian or openSUSE. In this article, we’ll see how to install WSL and test some of the great features it has to offer.
What is Windows Subsystem for Linux?
The Windows Subsystem for Linux is a new tool that allows Windows users to run Linux right in Windows. This includes command line tools, utilities, and applications that typically only run on Linux machines without the additional overhead of a typical virtual machine.
It is a Linux kernel built on top of 4.19 and fully managed by Microsoft, including support for Windows updates. WSL uses an unconventional form of virtualization with a very small footprint. It looks more like a container than a traditional virtual machine.

- Traditional VM: WSL
- Isolated: Integrated
- Slow To Boot: Less than 1 second boot time
- Memory Intensive: Small memory footprint
- Needs to be managed manually: Only runs when needed
Subsystem quick overview
- Install the most popular Linux distributions from the Microsoft Store. It’s nice to be able to choose between Ubuntu, openSUSE, Kali Linux, Debian, or Alpine WSL.
- Access a genuine Linux shell right from Windows and run whatever you want commands like grep, sed, awk, ls, pwd, and others.
- Take advantage of the following tools, programming languages, and services
tools: vim, emacs, and tmux
languages: Node.js, PHP, Python, C/C++, Rust, GoLang, and more.
configure: Nginx, sshd, MySQL, Hadoop, and MongoDB. - Windows File Access – DrvFs mount options
- Interop – launch Windows Binaries
- /etc/wsl.conf – Configuration Options
- wslpath – translate paths from one env to the other
- $WSLENV – share env variables between Linux and Windows
- background task support

When one or more installed Linux distributions are installed, they can be viewed using the wsl -l command.
https://gist.github.com/ea1e74f17e3226917d2f3dfcd369704d
How does it work?
As we saw above, users can get many Linux distributions available from the Microsoft Store. These distributions are provided by Microsoft partners. Below is the WSL translation layer implemented as a driver.

A Windows driver that implements the Linux kernel ABI that handles system calls, virtual files, and file systems. This architecture is based on the Windows NT kernel.
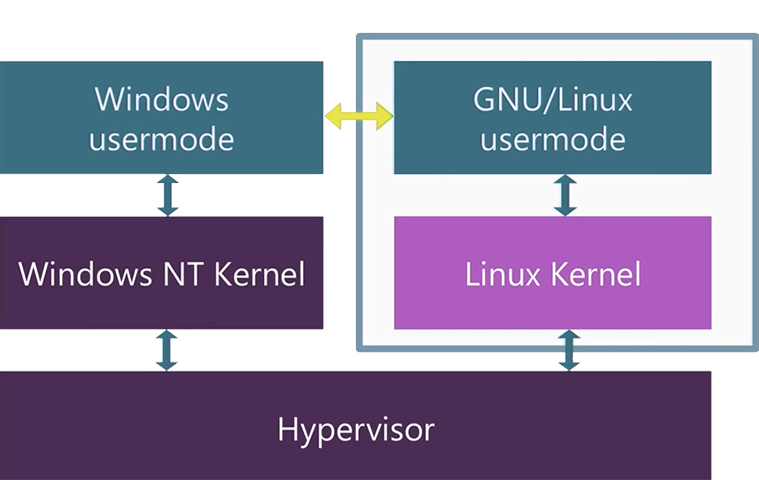
Linux binaries use system calls to perform tasks such as accessing files, requesting memory, and creating processes. In the latest version of WSL, it is exposed through a dedicated Linux kernel with full syscall compatibility.
Installing process
Now that you know a little about what WSL is and how it works, let’s install it on your Windows 10 computer. You can install WSL in several ways. You can enable it as a Windows feature or enable WSL using Windows Powershell.

To enable WSL as a Windows feature, first type “Turn Windows features on or off” in the lower left corner of the screen, then click the Best Match option.

This will bring up a dialog box titled “Windows Features” with a list of various features that can be enabled or disabled in Windows. Check the corresponding checkbox to enable the function. To disable this feature, uncheck the box. A filled field means that only some functions are enabled. Go ahead and click the empty box next to Windows Subsystem for Linux and click OK.

This will allow Windows to find the files it needs and change the system to use WSL. After that, you will need to restart your computer to complete the installation.
WSL Installing process
Alternatively, you can install WSL using Powershell. To do this, you need to open Powershell with administrator rights. If you have a new Windows terminal, you can start Powershell from there. Then you can type the following command and press Enter.
https://gist.github.com/aaab509117bc5117e31005279191227b
As with the first method, you will need a reboot to complete the installation.
Linux distribution
Now that you have WSL installed, you can add any version of Linux you want using one of the following links below:

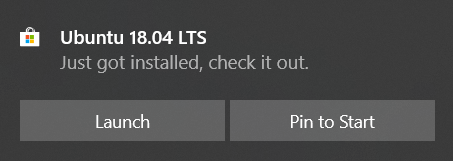
I choose Ubuntu 18.04 LTS for installation, which looks like a popular version of Linux these days.

Select your Linux distro and you will see how it boots.

When the download is complete, you will receive a notification that Ubuntu is installed and you can launch it immediately or pin it to the Start Menu.
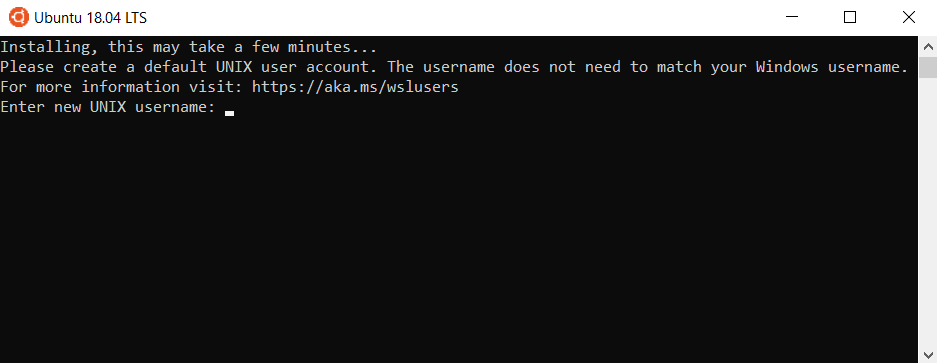
When you start the Ubuntu shell for the first time, you will see several messages.
You may receive this message if the system adds an unwanted username.
adduser: Please enter a username matching the regular expression configured
via the NAME_REGEX[_SYSTEM] configuration variable. Use the `–force-badname’
option to relax this check or reconfigure NAME_REGEX.
In our case, it seems that Ubuntu does not use capital letters for usernames. Use all lowercase letters and add the password twice for confirmation and it worked!
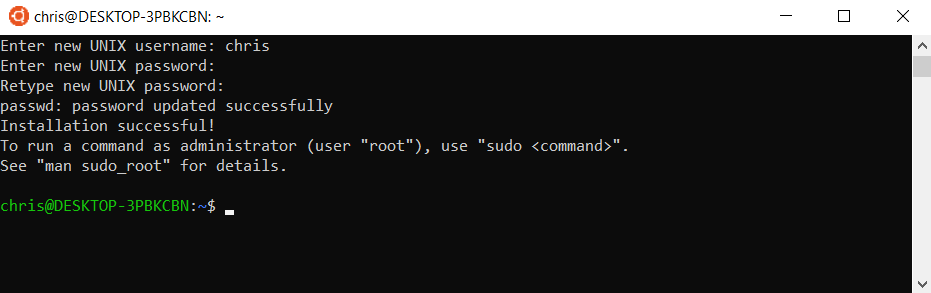
Installation successful!
To run a command as administrator (user “root”), use “sudo “.
See “man sudo_root” for details.
You’ll see an Ubuntu shell that runs right in Windows
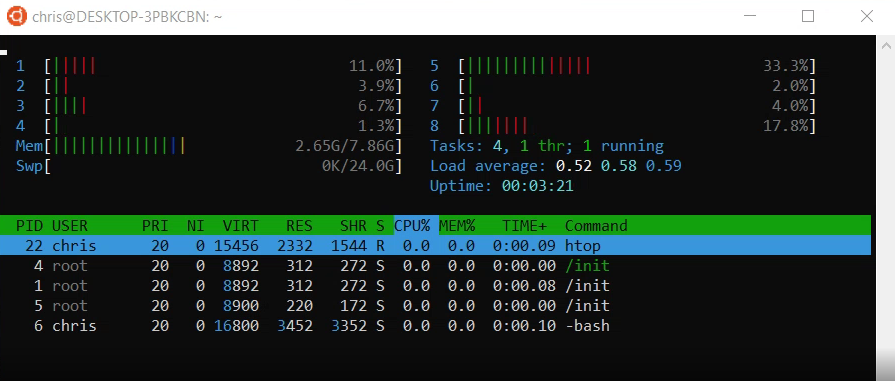
You can run htop in Ubuntu to display the real Ubuntu shell.
Conclusion Summary
WSL is evolving rapidly and is a big topic. Microsoft seems to be popular with many developers and sysadmins, so it quickly repeats this technique. In this tutorial, we’ve covered what WSL is, the architecture of the system, how it works, and what you can do with it.
If you’ve had to build an open source project in the past that relies on a Linux installation, set up a dual boot Windows and Linux system (not fun), install VirtualBox or VMWare Workstation, and set up a memory intensive VM or a Docker container.
All of these parameters come with a lot of overhead and steep learning curves if you’re not familiar with how to set these parameters. Now, if you have Windows Subsystem for Linux installed, you can access your entire Linux shell in less than a second.

AUTHOR BIO
On my daily job, I am a software engineer, programmer & computer technician. My passion is assembling PC hardware, studying Operating System and all things related to computers technology. I also love to make short films for YouTube as a producer. More at about me…


Leave a Reply