
For those who are looking for information about Roblox Image ID Search/Finder, you should read this entire article. Here we are going to talk about Roblox Image ID Search/Finder. So, ensure you will not go anywhere.
About Roblox Image ID Search/Finder
When you search for Roblox Image ID Search/Finder, then you are going to find a result; Roblox Image ID Finder By kituato. The description of this: Convert Decal id’s to Image id’s here easily. Apparently, Roblox Image ID Search/Finder was created on December 22, 2018. The last update of Roblox Image ID Search/Finder was on August 18, 2020. The server size is 50. Roblox Image ID Search/Finder has all genres. According to the research, it has place visits around 131.2K+. Also, it has 1,265 favorites.
To try playing Roblox Image ID Search/Finder, simply you are able to open Roblox. Login to your Roblox account. Then, you are able to search ‘Roblox Image ID Search/Finder.’ After that, you are going to find Roblox Image ID Search/Finder by kituato. Please click at the green Play button to start playing. As explained at the description of Roblox Image ID Search/Finder, Convert Decal id’s to Image id’s here easily!

What is Image in Roblox?
Talking about Roblox Image ID Finder, now we are going to explain what Image in Roblox is. You have to know that in Roblox platform, an image is used for graphical elements like textures, decals, or GUI. Of course, they are many images on the website of Roblox, but the images cannot be accessed through the catalog. The users of Roblox make images whenever they upload a decal, shirt, T-shirt, or pants. However, Administrators are able to make an image directly without making a decal, shirt, T-shirt, or pants. When a user of Roblox uses Roblox Studio to add a picture to a Decal from their files, then the image is automatically uploaded.
Keep in mind that the Roblox ID of an image is the number which you are able to find in every image link that identifies the image with a number. The Images are moderated, and they are reviewed before they are displayed. If the image violates Roblox’s term, then the user of Roblox will be terminated. Usually, the players of Roblox use this way to rage quit, not quit completely but just stop playing, along with changing their own password to a really hard phrase.
Using Decals in Roblox
You may be wonder how you can apply decals to objects in Roblox. By the way, do you want to add images to different surfaces on your game? In this paragraph, we are going to teach you how to add decals to your Roblox Studio.
For those who do not know, decals are images you are able to add to objects in Roblox. You are able to use this feature to add designs, details, and also logos to surfaces or base parts when you are making a game. Decals work similarly to Textures in the terms of how they work. The latter repeats the image depending on the surface, the former stretches it across the whole part instead. With the help of decals, you are able to customize objects on your game. If you are wondering how to use this feature on Roblox, again, we are here to help you. Just follow our guide below on how to add decals from the Image Marketplace or your device.
How to add decals in Roblox?
If you want to add images to surfaces of objects on your Roblox game, simply you are able to apply decals to parts of your model through the Explorer tab. You are able to select to use images from the platform’s library or upload one of your own.
Here is a way to add decals to your objects when you are making a game through the Roblox Studio:
Step 1: Select a decal to use
First, you have to select an image you want to use. You are able to select to use an image from the platform’s Marketplace or upload one from your device. In this example, we are going to go with the first option.
- Please launch the Roblox Studio on your computer and login to your account.
- After that, choose a game you want to edit.
- On your Toolbox, go to the Marketplace tab, open the menu and then choose the image option. If your Toolbox is not visible on your screen, go to the View tab on your toolbar and enable it from the Show section.

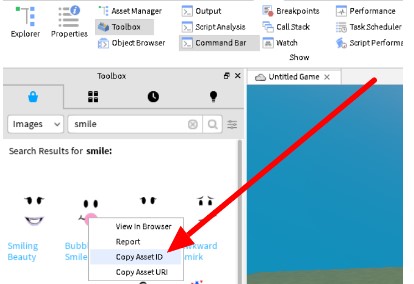
- Using the search bar, you are able to look for an image to use as a decal. You will be able to use the filter button to narrow the search results. Also, you are able to choose the creator and sort the results by their relevance, latest updates, ratings and a few more.

- After you find the one you want, just right-click on the image and choose “Copy Asset ID.”


Step 2: Use Image as a Decal
Now you have the Roblox Asset ID of the image you want to use, it is time for you to add that image to your game as a decal.
- Using your Game Editor Window, you are able to click on an object to edit it. Also, you are able to choose one through your Game Explorer.
- On your Explorer, you have to click on the arrowhead beside an object to see all its parts.
- Hover on a part, you need to click the plus button and select “Decal” on the menu.

- Please paste the Roblox Asset ID of the image on the Texture property. And then press Enter.

- You are able to apply decal to a certain surface by changing the Face property to Left, Right, Back, Front, Top, or Bottom.


Aside from changing the position of decal, you are also able to adjust its transparency and color on the Properties window. For note: Its size depends on the surface where you applied it.

AUTHOR BIO
On my daily job, I am a software engineer, programmer & computer technician. My passion is assembling PC hardware, studying Operating System and all things related to computers technology. I also love to make short films for YouTube as a producer. More at about me…
![Roblox Greenville [Auto Farm] Scripts](https://www.alfintechcomputer.com/wp-content/uploads/2025/08/Roblox-Greenville-Auto-Farm-Scripts-450x240.jpg)


![Roblox Universal Script [Noclip]](https://www.alfintechcomputer.com/wp-content/uploads/2025/03/Roblox-Universal-Script-Noclip-450x240.jpg)


Leave a Reply