
Have you ever swiped in the wrong direction, touched the wrong part of the screen, or pressed the wrong button while using your favorite iPhone app? While your kids love to watch YouTube videos on their iPhone, we don’t recommend touching the app on their phone or flipping through emails.
Guided Access can limit your device to one application and control the available functions. You can turn on Guided Access if you allow your child to use the device or if random gestures might distract you.
Available through your phone’s accessibility settings, disables all tabs, gestures, button presses, and other actions on your iPhone other than what’s required for the current apps. This way, you can swipe, and touch icons in any app on the screen.

After enabling the Guided Access, press the side button three times to turn it on and three times to turn it off. Guided Access is a convenient way for your kids and your iPhone to focus on one app. Let’s take a look at the steps required to activate this valuable feature.
Overview
You can also create a “guest mode” with Guided Access. Sharing the device with someone else allows users to use Safari, iBooks, videos, or games without fear of personal information being tracked.
Like most people these days, you do a lot. I want my children to be safe, but I cannot control every movement of my children. Technology is a big part of children’s lives. Children use smartphones and tablets like natural programmers, and Internet access is everywhere. However, not everything available is suitable for children.
Don’t worry, because Apple has built some great features into its operating system to help you control the access level of your mobile device. Guided Access and restrictions are two easy ways to set restrictions, prevent changes, and give you more control over your device.
Would you like your kids to play Angry Birds for example?, but do you need to prevent them from participating in other games? We know from experience that it is very easy for little people to grab a cell phone and start pressing a button. Then your contacts disappear, and you are 2 years old and your phone is locked!
Locating Guided Access

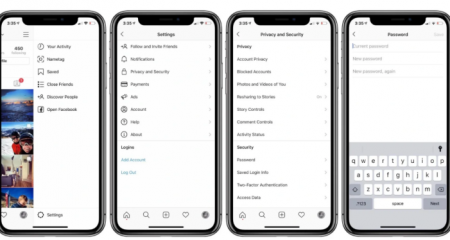
To use Guided Access on iPhone, tap Settings > General > Accessibility. Swipe down to the learn section and click Guided Access for configuration your device.
Turn on Guided Access

Open your Guided Access settings, then go back to the home screen and open the app you want to focus on. Press the side button three times to display the Guided Access screen.
Enter a passcode

Click Start to use the default Guided Access. Your iPhone will ask you to create a passcode to enable or disable Guided Access. Enter and confirm your password.
Using Guided Access

Now try the app as you can see, the application itself is fully functional. You can navigate and use the current application by touching, swiping, and other gestures. However, the Home button and physical button are disabled so you won’t accidentally lose your app. Whatever you do, the current application remains on the screen. This is especially useful if your kids are stuck in a particular app or game and don’t want to spy on emails and text messages.
To exit Guided Access Mode, press the side button three times. The Guided Access screen appears. You can now click Log Out to disable Guided Access.
Customizing Guided Access

You can customize Guided Access by enabling or disabling certain options. Open the app you want to focus on and bring up the access call by pressing the side button three times. After entering Guided Access Mode, press the side button three times again. Instead of entering your password and choosing Sign Out, click the Options link.
You can now enable or disable certain options like sleep / wake button, volume button, gesture, keyboard and touch input. You can also set a time limit to automatically stop guided access. Set the Options and click Done, then click Resume.
Passcode settings

You can also customize some of the settings for Guided Access. Go back to Settings > General > Accessibility > Guided Access > Passcode Settings. To change your password, click the “Set password for access” link, enter and confirm your new password. You can also end guided access by double-clicking the side button and choosing the option to use Touch ID or Face ID.
Time Limits

By setting a Time Limits, you can get a notification when the time is up. The time limit setting can sound or announce the remaining time.
Whether it’s business, entertainment, education, research, or just restricting access to your kids’ devices, Guided Access is a great tool that gives you complete control over what your iPhone and iPad displays on the screen.
This feature is useful in many scenarios. For example, before handing over the device to a child for use in a specific game or app, you can put the device into Guided Access mode to prevent the child from logging out or leaving the app or being distracted by random gestures. You can avoid this annoyance by limiting the area of the screen that allows touch input. It can also be used to prevent erroneous clicking on in-app ads that can occur when some apps place ads over gameplay and other app content.
- Don’t miss: iPhone 12 Pro Max Cyber Monday Deals Info
Guided Access has been around for a while, but it’s often underutilized and many users may not even know if their iPhone or iPad screen has the ability to lock apps. The instructions here cover this feature in newer versions of iOS and iPadOS, but if you have a much older device sited around it, the functionality works pretty much the same, but the interface and some other aspects are slightly different.
Do you want to restrict access to multiple apps on your iPhone and iPad? This isn’t possible with Guided Access, but you can take advantage of Apple’s Screen Time feature, which lets you set a time limit for your app in minutes. Screen Time offers many other parental control features such as setting communication restrictions, blocking in-app purchases, installing apps, and more.
We hope you can easily set up and use Guided Access on your iPhone and iPad. Are you using this feature and find it helpful? Have you ever used other accessibility features in a similar way? Please share with us your thoughts and opinions on Guided Access in the comments section below.

AUTHOR BIO
On my daily job, I am a software engineer, programmer & computer technician. My passion is assembling PC hardware, studying Operating System and all things related to computers technology. I also love to make short films for YouTube as a producer. More at about me…


Leave a Reply