
Terrain is a feature in Roblox that was introduced in 2011. It features a particular object in Workspace which integrates voxel-based terrain into Roblox. It utilized a preset of meshes to render its terrain. In May 2015, Smooth terrain was introduced, which later replaced the old style of terrain in the year of 2017. Consequently, all games which were still using the old terrain were converted to have this new terrain.
Importing Terrain on Roblox
By the way, how to import Terrain from one game to another? We are sure that you are very curious to know how to import Terrain from one game to another? Do not be sad, here we are going to explain the way to do that.
If it is already a FBX file, then you are able to add a MeshPart into Workspace. After that, you have to find the MeshId property and click the little file image. Next, simply you are able to select the FBX file.
Actually, there are some methods of importing it. As we explained above, you are able to go to File > Open From File > then choose the FBX file. Also, you are able to drag it into Roblox Studio from the file.
Generating Terrain with Heightmaps
Roblox Studio allows you to import heightmaps and colormaps to generate terrain automatically. Imported maps will generate biomes with structures similar to terrain which you generate in Roblox Studio. Need to know that a heightmap is a 2D representation of a 3D terrain map. Brighter areas of a heightmap result in higher terrain like the mountains, while darker areas result in lower regions like the valleys.

A colormap determines terrain materials like ice or grass when importing a heightmap. Based on the colors painted on the image file, Roblox will generate terrain of the corresponding kind, Now, you are able to follow these guidelines for best results when using heightmaps and colormaps.

Scaling
- Terrain is built on a system of the voxels. For your information, 1 voxel has dimensions of 4×4×4 studs. Importer settings are in studs.
- When importing a heightmap/ colormap, the default scaling factor is 1 pixel = 1 voxel = 4 studs. For instance, a heightmap with a 5×5 pixel square will make a 20×20 stud square on the terrain.
- If you give map dimensions at a different scale, Roblox will scale and smooth the map to respect those dimensions. If you want sharp edges in your terrain, stay close to the default scaling factor.
Heightmaps
- You should use .jpg or .png formats (8-bit or 16-bit).
- A maximum of 4096×4096 pixels are supported.
- 1 pixel in a heightmap represents four studs.
Colormaps
- You have to save your colormap in the sRGB color profile. For the best results, you are able to download the RobloxColorMapIndex file and sample colors directly from it.
- You have to use hard edges when painting a colormap. Anti-aliasing or edge smoothing makes pixels outside the expected RGB material settings range.
- The table will describe the RGB mapping to their corresponding material. If your colormap contains a color which is not in the table, then Roblox will choose the closest matching material.
Importing a Heightmap
Here are steps to import a heightmap in Studio:
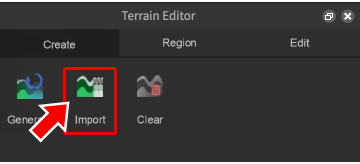
- At the first step, you have to open the Terrain Editor.

- From the Create tab, you are able to click the Import button.

- In the Map Settings section, please click the blank square in the Heightmap section to choose an image.
- Additionally, enter X, Y, and Z values for Position (the center of the generated terrain) and Size (in studs). For note: Roblox applies maximum dimensions of 16384×1024×16384 studs. Minimum and maximum terrain heights based on the darkest and lightest areas of the heightmap image in relation to the Y size during import. For example, if you select a height of 128, pure black areas are 64 studs below the center position, and pure white areas are 64 studs above the center position.
- In the Material Settings section, you need to choose the material or colormap that you want to generate terrain with.
- To use a material, you have to click the Material button and select a default material.
- To use a colormap, you have to click the Colormap button and click the blank square to select a colormap.
- Lastly, you only need to click the Generate button to make the terrain.
- At the first step, you have to open the Terrain Editor.

Using Terrain Tools
The Terrain Editor is utilized to make realistic landscapes like rivers, mountains, and canyons. To practice your own skills in sculpting terrain, you are going to make a version of Old Faithful , a famous geyser which is part of Yellowstone National Park in the United States.
To create a New Project:
- In Roblox Studio, you are able to click the New button in the upper-left.
- Then, choose the Flat Terrain template.
Using the Terrain Editor
Using the Terrain Editor, you are able to generate random terrain, add rocks and other material, and also make the landscapes.
- In the Home tab, you have to click the Terrain Editor.
- In the Create tab, you are able to click on Generate.
- At the bottom, under Other Settings, please click Generate.
- Lastly, you need to wait until the progress bar has finished.
Sculpting Terrain
With a basic map, now you are able to add rocks and salt to the environment by using the Paint Tool.
- Under the Terrain Editor, you have to click the Paint button. This tool will allow you to change the appearance of terrain with different materials, like rocks, grass, or water.
- With the Paint tool selected, you need to find Material Settings and pick the Rock material.
- Please change the Base Size to be larger, such as a number of 14. Next, left-click and drag the tool across the center of the terrain to make a rock formation.
- Now, you are able to change the Paint Material to salt and add it near the center.

AUTHOR BIO
On my daily job, I am a software engineer, programmer & computer technician. My passion is assembling PC hardware, studying Operating System and all things related to computers technology. I also love to make short films for YouTube as a producer. More at about me…
![Roblox Greenville [Auto Farm] Scripts](https://www.alfintechcomputer.com/wp-content/uploads/2025/08/Roblox-Greenville-Auto-Farm-Scripts-450x240.jpg)


![Roblox Universal Script [Noclip]](https://www.alfintechcomputer.com/wp-content/uploads/2025/03/Roblox-Universal-Script-Noclip-450x240.jpg)


Leave a Reply