
To get a new old look of your island, you may need to get some old custom designs from any previous Animal Crossing versions; New Leaf and/or Happy Home Designer. Aside from that, you can also use a number of custom designs that other people might have created and shared online.
How to do it? Yeah, you can only get the old custom designs by importing the designs either from New Leaf or from Happy Home Designer. Keep in mind, to import the custom designs, you will need a design’s QR code. So, let’s see the way to import the custom design to New Horizons?
Importing the Custom Designs to New Horizons, Here’s How!
As long as you have the design’s QR code, you will easily import the custom designs to New Horizons. To scan the design’s QR code, you will have to use the NookLink service that you can find on the Nintendo Switch Online mobile application.
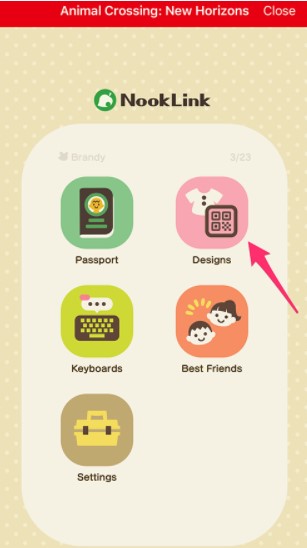
In order to use some app’s features, you may also need to set up your NookLink access. After you have access to NookLink within the Nintendo Switch Online mobile application, you can then click on the ‘Designs’ tab.
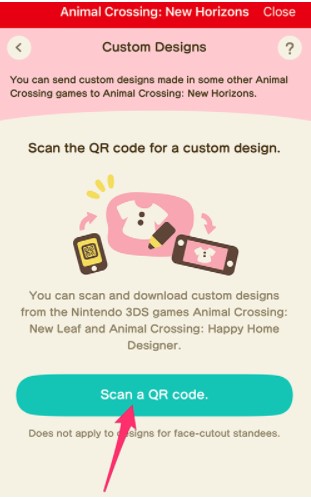
After that, click on the ‘Scan a QR code’ option. You will be required to give the app permission to access your device’s camera if this is your first time using the camera on the Nintendo Switch Online app. Then, click the ‘OK’ button.
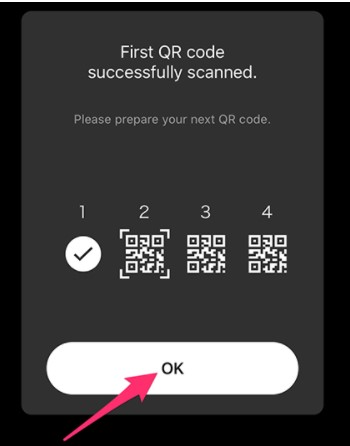
Here, you need to point your device’s camera at the QR code that you want to scan. Make sure to position your device so that the code within the box will be displayed on the screen. Then, the app will scan the code automatically.

Your app may ask you to get ready to scan the next code in the series if the design has more than one QR code. After that, click on the ‘OK’ button to scan the rest of the codes in the series.
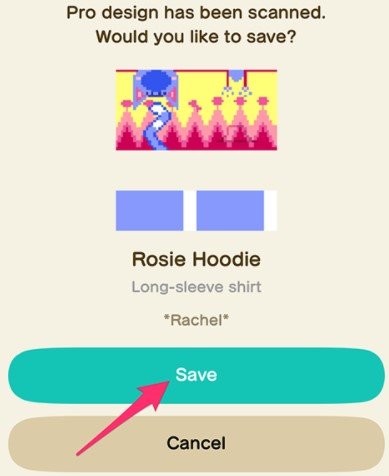
After you have finished scanning the code for a design, you can then click on the ‘Save’ button.
You will now have to open the Animal Crossing: New Horizons. Then, download the design from your NookPhone, so you will be able to use it in the game.
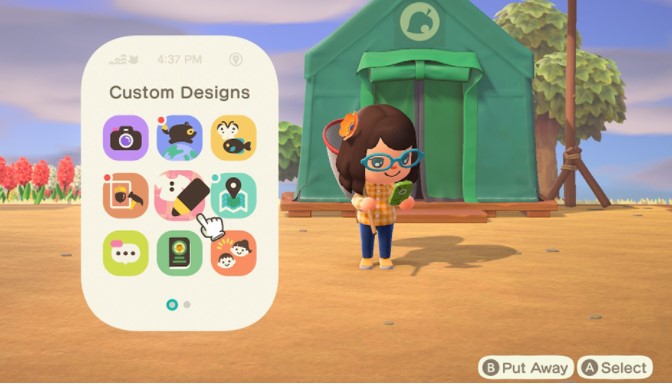
How to open your NookPhone?
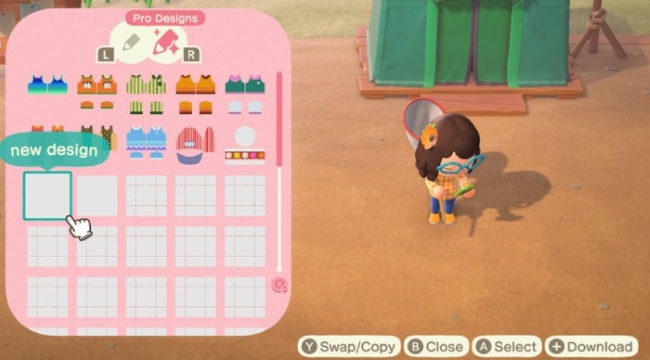
Afterwards, you may need to open your NookPhone to choose the ‘Custom Designs’ app.
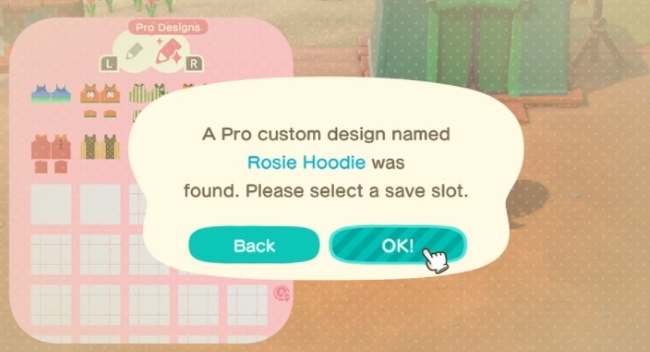
- To open it, you need to press (+) button. Then, choose the ‘Download’ option, After the design has been downloaded, you need to click on the ‘OK’ button.


- Then, choose the slot where you want to save the design.
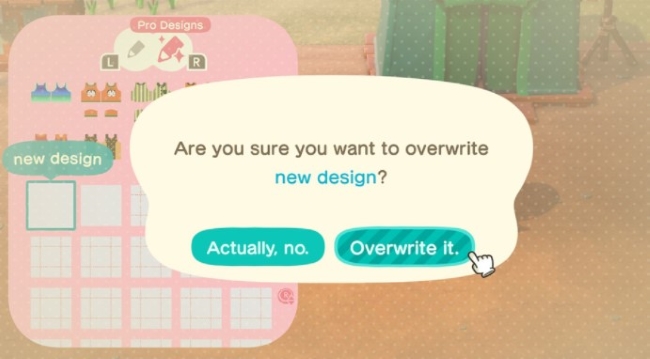
- Choose the ‘Overwrite it’ option.

- Then, you will have the design that you have downloaded into New Horizons, so that you can wear clothing and more.
- To import additional designs, you may need to head back to the Nintendo Switch Online app. To confirm that you have done with the previous design, you may need to click on the ‘Scan a new QR code’ option and then tap the ‘OK’ button.

- To open it, you need to press (+) button. Then, choose the ‘Download’ option, After the design has been downloaded, you need to click on the ‘OK’ button.


Congratulations! You successfully import the old custom designs from either New Leaf or Happy Home Designer into New Horizons.
Alternative to Import Custom Code
There’s also another option to import custom code, that’s by using the Custom Design Portal that you can find in the Able Sisters Shop. However, this way is not available when you first begin the game, since it takes a bit of time to open the shop. Well, it is the only way to import alphanumeric codes into the game.
To access the Custom Design Portal, you need to sign into your Nintendo Switch Online account. After you have opened the Able Sisters Shop, you have to go back to the store . Here, you will see a bright pink kiosk located in the right corner.
If you see it, that’s totally the Custom Design Portal in which you can search up the specific custom outfits, find out the different designers and also share your own custom designs.
You can then click on the ‘Search by Designer ID’ option to search for a specific outfit. You can also click on the ‘Search by Creator ID’ to find out a specific designer or also click on the ‘Post’ in order to upload your own creations.
Well, to look up a specific design or designer, you just simply enter the code when prompted and the custom outfit will appear immediately.
Here’s how to access the Custom Designs Portal!
- Visit the Able Sisters clothing store.
- Then, you need to head to the back and interact with the pink kiosk.
- Choose the option of ‘Access the Kiosk’. Make sure to wait for your Nintendo Switch to connect to the internet.
Sometimes, you may find the Able Sisters store is closed, making it impossible for you to access the portal. No worries! Nintendo Switch have created an alternative way to access the portal through their Nook Phone. Here’s how!
- First, open your Nook Phone with ZL.
- Then, choose the Custom Designs app.
- Press ‘X’ and follow the instructions to access the Custom Designs Portal.
Within the Custom Designs Portal, you may need to find your creator ID. How to do it? To find your creator ID, you need to access the portal by either pressing ‘X’ in the Custom design app on your NookPhone or interacting with the pink kiosk at the Able Sisters Store.
Once you have created a design and posted it to the portal, your creator ID will appear in the bottom left corner of the screen.
To share your design, you only need to click one the ‘Post’ option at Custom Designs Portal. Then, the game will make a new Design ID where other people can search for it. If your Nintendo Switch has been connected to your Switch account or Twitter, you can choose ‘Share It’. Then, it will post to your accounts.
Alternatively, you can also write down the code. Then, give it to your friend or post it on your social platforms, so people can copy and paste the code at Custom Designs Portal.

AUTHOR BIO
On my daily job, I am a software engineer, programmer & computer technician. My passion is assembling PC hardware, studying Operating System and all things related to computers technology. I also love to make short films for YouTube as a producer. More at about me…


Leave a Reply