
When you are trying to open your Adobe Photoshop on your PC, you may find that there is an error which says ‘Could not initialize Photoshop because the scratch disks are full’. There are some reasons why you can have this error on your PC. What are the reasons? We will inform you below. But now, we will inform you about how to fix this issue first.
Methods for Fixing Photoshop Scratch Disk Are Full – Could Not Initialize the Process
If you find this error, you have to fix it so that your Photoshop can work properly again without having to face any error. There are some methods that you are able to apply for fixing this error. You are able to try the first method below and it cannot fix the issue, you are able to try the other methods below.
Opening Photoshop by Holding Control + Alt Keys
If the error happens on your Photoshop app which cannot open in a Windows 10 computer because of the scratch disks are full error, opening Photoshop by holding Control + Alt keys is one of the methods that you are able to apply.
- The first thing that you have to do is to open your Photoshop app and you have to soon press and hold Control + Alt when the app begins. By doing it, it will open up the Scratch Disk Preferences dialog box.
- Nextm under the Scratch Disks section, you have to specify the first scratch disk location that has sufficient free space. Let say D: Drive.

- In case you have a lot of partitions on your internal storage drive, you have to allocate more than one drive as scratch disks to be able to tackle low disk space on the first scratch disk. If you have done it, then click on OK.
- Now, you are able to try to run the Photoshop app and make sure that there is no error anymore.
Removing Temporary Files
Another method that you are able to try for fixing this error is to remove temporary files. You are able to open File Explorer to see whether your storage drive is full. For your information, C: Drive is the default preference of scratch disk. If you see that it is complete, you are able to free up some space by removing temporary files.
How to remove your temporary files? You are able to follow the steps below.
- The first thing that you have to do is to press Windows + R keys. By pressing these keys, it will open Run.
- After that, you have to type %temp% and then click on OK.

- In the Temp folder, you have to press Control + A to choose all the temporary files.

- In this step, you have to press Shift + Delete key combination and then do not forget to click on Yes to confirm.
- If you see that some actions cannot be done, do not be worried. The thing that you have to do is to close all the opened apps.
- And then, you have to choose the ‘Do this for all current items’ checkbox and then click on Try Again.
- If then you see that some files cannot be removed because of some reasons, you are able to click on Skip.
You are able to do the steps above one more time by typing temp on Run in place of %temp%. Now, there will be more free space on your C: drive. You have to run Photoshop once again and it should have free space so that the error will not appear again.
Optimizing Your Hard Drive
On the scratch disk, Photoshop needs contiguous or non-fragmented free space. So, you have to optimize your hard drive. However, it is important for you to know that this method cannot be applied for Solid-State Drive (SSD) because it does not need defragmentasi.
How to optimize your hard drive? You are able to follow the steps below.
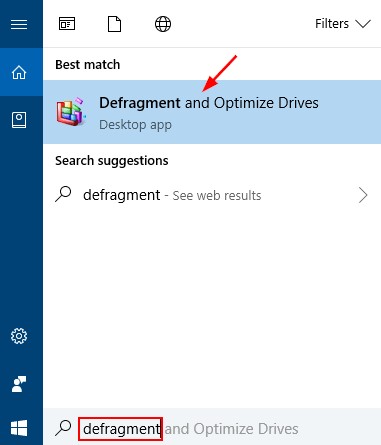
- The first thing that you have to do is to press the Window key and then you have to type defragment. After that, you have to choose the ‘Defragment and Optimize Drives’ app.
- On the Optimize Drives window, you have to choose the drive, C: Drive, and then you need to click on Analyze.
- If the analysis is over and the drive is fragmented, you have to click on Optimize to be able to defragment your hard drive and make your PC work efficiently.
Creating Separate Disk Partition
If your storage drive has only one partition, you are able to create a separate disk partition for your Photoshop Scratch Disk. How to do that? You are able to follow the steps below.
- The first thing that you have to do to create a separate disk partition is to right click on the Windows logo on Taskbar and then you have to choose Disk Management.
- After that, on the Disk Management window, you have to right click C: Drive and then choose Shrink Volume.
- On the Shrink C: dialog box, you need to click on Shrink without bothering about the shrink space.

- Then, you have to right click on the unallocated space from the Disk Management window and then you have to choose New Simple Volume.

- In this step, on the New Simple Volume Wizard, you have to click on Next. You have to specify the Simple Volume Size in MB and then click on Next. You have to click on Next to assign the specified drive letter. What do we have to do then? The next thing that you have to do is to click on Next to format the volume with specified settings. You are able to rename the Volume Label from New Volume. At last, you have to click on Finish.
- If the partition is created, you are able to start Photoshop while holding Control + Alt.
- Now, you have to choose the newly created partition as your Scratch Disk from the menu.
You are able to follow the steps above carefully to be able to fix Photoshop Scratch Disk are full and could not initialize the process. If you have applied this method, but it cannot get rid of the error, you are able to use the next method below.
Increasing The RAM Limit
If you increase the limit of RAM, it can minimize swapping of Photoshop data to the virtual memory or scratch disk. The RAM usage limit which is increased will preempt the error. How to increase the RAM limit on your Photoshop? You are able to follow the steps below.
- To increase the RAM limit on your Photoshop, the first thing that you have to do is to open your Photoshop. After opening it, then you have to go to Edit and then choose Preference and choose Performance. By doing this, it will open the Preferences window with the Performance screen.
- Now, under memory usage, you have to go to the ‘Let Photoshop Use’ option and you are able to type or drag the cursor to be able to adjust the RAM usage that you want. After that, you have to click on OK.
Deleting The Photoshop Cache
If you find that the issue which states that it could not initialize Photoshop because the scratch disks are full, you are able to check whether there is too much Photoshop cache on your scratch disk. If there are a lot of caches and then you have to delete it to fix the error, you are able to do that by following the steps below.
- The first thing that you have to do is to choose Edit on your Windows. If you use a Mac, you can choose Photoshop. After that, you have to go to Purge.
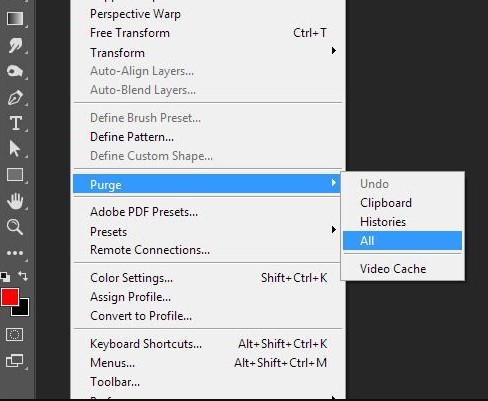
- After that, you have to click on All from the 4 different options. If you see that the item is greyed out, it indicates that the caches have been deleted.
- Now, you will get a warning message which says ‘This cannot be undone. Continue?’. If you do not need a previous version of these documents, you are able to click on OK.
It is important for you to know that this process will not delete the cache of your Photoshop completely in the system folders. If you want to prevent Photoshop caches from heaping up, you are able to run a regular disk cleanup.
Disabling Auto-Recovery Saving
As an effort to avoid an unexpected Photoshop exit such as a crash or computer reboot, this app will try to auto-recover your document. However, it is important for you to know that this process takes up some parts of your hard drive space. So, if you disable the auto-recovery saving, it may be able to fix the scratch disks are full issue on your Photoshop. How to disable auto recovery saving? You are able to follow the steps below.
- The first thing that you have to do is to open your Photoshop and then you have to navigate to the Edit if you are on Windows or if you are on Mac, you have to navigate to Photoshop. After that, you have to choose Preferences and then click on File Handling.
- In the pop up window, you have to uncheck Automatically Save Recovery Information Every [N Minutes]. Then, you need to click on OK to apply the change. Next, the size of your Photoshop temp files will be reduced.
Well, before you apply this method, it is important for you to know that this change may be able to have risk of having no auto-recovery. So, it is recommended for you to save your document timely in case of any data loss.
Reasons For Photoshop Scratch Disks Are Full – Could Not Initialize The Process
There are some reasons why Photoshop Scratch Disks Full error can happen. Those are as listed below.
- There are too many temporary files. You may close your Photoshop without giving it enough time to close down correctly. If you do so, it will make a large chunk of temporary files taking too much scratch space.
- It lacks enough space. If the RAM memory of your PC does not have enough space, Photoshop will use hard drive space, usually C Drive, as a temporary virtual storage holder. It can cause scratch disks are full issue.
- There are too many Photoshop caches. If your app cannot remove the caches automatically, it is important for you to know that the cache will grow and take up a lot of scratch space. So, it will lead to the error scratch disks are full and cannot complete the command.
Definition of A Scratch Disk and Scratch Disk Space That You Need
What is a scratch disk? This may be a question that comes to your mind when you are having Photoshop scratch disks are full. Well, it is a disk drive or SSD which is used for temporary storage while Photoshop is running. Photoshop utilizes this space to save portions of your documents and the history panel states that they do not fit in the RAM. If you only have one partition in your system, the files will be saved in C: drive. Or, you are able to change the location of scratch disks to other partitions.
If you want to know how much scratch disk space that you need, then the answer is your system needs more resources and scratch disk depends on several history states in memory. It is because you tend to increase the load on your system.
If you are performing a little bit patterns, brushes, adjustments or performing a small operation, you will need at least 1.5 GB for a scratch disk. If you are playing with pixels which are denser such as editing complex images, applying 3D effects, trying different image effects through plugins, or even using some filters, then you will need more resources. It is because when you apply more effect, the load on the system will increase. So, you will need as many times the size of the original file as there are the states of the history.

AUTHOR BIO
On my daily job, I am a software engineer, programmer & computer technician. My passion is assembling PC hardware, studying Operating System and all things related to computers technology. I also love to make short films for YouTube as a producer. More at about me…


Leave a Reply