
Side by side configuration errors might appear when you launch the app such as Google Chrome. The cause of the error might be the conflict with some of the files in the C++ runtime libraries. When you are running Chrome, it cannot load the required Visual C++ files. Here are some fixes that you can try to fix the error.
Fix 1: Run the system file checker
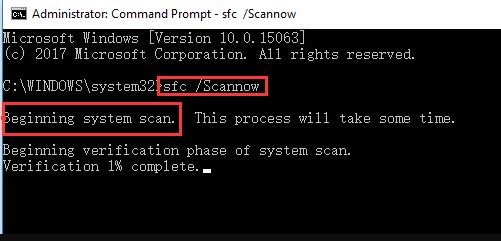
When you see the error, it is better for you to check whether or not there are some corrupted system files using the embedded tool called System File Checker or SFC. Firstly, type in Command Prompt in the search box and right click the result to Run as administrator. Then, type in sfc/scannow in the Command Prompt and press Enter to perform System File Checker. The step will make the SFC start scanning all the systems and please wait until the verification is 100% done. Next, restart the computer to see if the application can start properly. If the issue is still there, go back to the Command Prompt and type two following commands:
DISM.exe /Online /Cleanup-image /Scanhealth
DISM.exe /Online //Cleanup-image /Restorehealth
Once the process is done, you will need to close the window and restart the PC and check if it works.
Fix 2: Reinstall Microsoft Visual C++ Redistribution packages
It is possible if the Microsoft Visual C++ Runtime library error exists. Basically, when you start an application, there is no Visual C++ Runtime files that is able to be loaded. You can also make use of sxstrace to figure out which Visual C+ Runtime Libraries are missing that can cause the side by side configuration error. In this case, uninstalling and reinstalling the Microsoft C++ Redistributable can help you to fix the conflict Visual C++ runtime files and download the missing Visual C+++ runtime files.
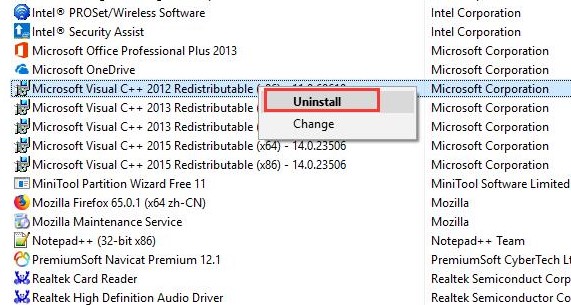
In order to uninstall Microsoft Visual C++ Redistributable, you will need to go to Control Panel > Program and Features to find all the Microsoft Visual C++ xxxx Redistributable packages, right click to make it uninstalled one by one. Once you have uninstalled all of them, please reinstall it.
There are two ways that you can choose to reinstall the Microsoft Visual C++ xxxx Redistributable packages. The first one is automatically and the second one is downloading it from the official website. Doing it automatically is using Driver Booster to scan all missing Microsoft Visual C++ xxxx Redistributable and update it fast. For those who are not familiar with Driver Booster, it refers to a professional driver downloading software with the function to scan all the missing and outdated drivers and update them by just a click. This one is also known as a game helper that can find all the game support components including all the Microsoft Visual C++ Redistributable.
If you want to download the Microsoft Visual C++ Redistributable manually, please know the reason why it is missing on your computer. After discovering which version is missing, you can go to the official website of Microsoft to download it. After the process of downloading is done, install it and you will find the error disappeared.
Fix 3: Remove configuration conflicts automatically
Aside from checking the file corruption by yourself, if you think there is no use of reinstalling Microsoft Visual C++ Redistributable packages, you may want to try Advanced SystemCare to troubleshoot some different factors automatically.
Advanced SystemCare is the name of the tool with the ability to scan all the files, registries, shortcuts, and so on at the same time. Feel free to take your time to allow it to search for all the corrupted or conflicting items on Windows 10.
First of all, you will have to download, install, and run Advanced SystemCare. Once you have downloaded it, check the box of Select All and then select to scan. The tool will be scanning the files, the registries, the startup programs, and so on. After that, press Fix to automatically remote the problematic items on Windows 10. After Advanced SystemCare is done with its job, you may want to check whether the app has failed to start because the side by side configuration is incorrect will show up again.

Fix 4: Uninstall and reinstall the error application
In some cases, installing and reinstalling the error application can fix the issue. So, if your Chrome has failed to start because the side by side configuration is incorrect, you can try to go to the Control Panel > Program and Features to uninstall Google Chrome and then download the newest version of Google Chrome. Now the application side by side incorrect error is missing and Google Chrome can run well when you restart the new Google Chrome.
Fix 5: View error in Event Viewer

The first thing that you need to do upon seeing the error is to check the applications event log to find out what the applications are meeting with Windows 10 error side by side configuration is incorrect. After that, it is time for you to use the Event Viewer to check the application logs for Windows 10 to fix the error. Firstly, open Event Viewer. After that, go to Windows Log > Application and check the event logs of apps in the middle pane. This method will not only fix the side by side configuration is incorrect but also fix the issue Activation context generated failed.
Beside the fixes explained above, you can try to make a system restore, repair Windows 10, or reset the Windows system to allow the application to work well and set the right configuration. If you face some difficulties while trying to fix the issue, do not hesitate to seek help from the community. In addition, you are also encouraged to contact the customer support of Google if you need assistance or need the answer to your question. However, before anything, please try all the methods above. Try the first one and move to another if the first one is not helping.

AUTHOR BIO
On my daily job, I am a software engineer, programmer & computer technician. My passion is assembling PC hardware, studying Operating System and all things related to computers technology. I also love to make short films for YouTube as a producer. More at about me…


Leave a Reply