
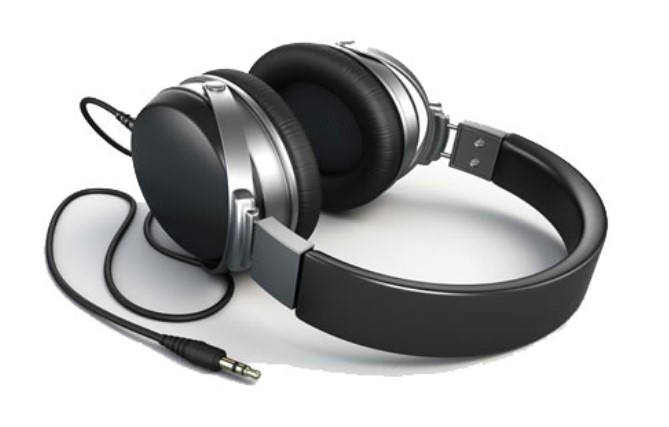
Many times if you twist or bend the wire on the headphones, the sound is going to work for a very short time. This is a good hint regarding where the wire has shorted out. For an easy quick fix, you only need to apply electrical tape to the wire where it was working once you bent it. Please keep bending the wire and once you isolate the shorted part of the wire, simply you are able to add the electrical tape in this area while you are keeping the wire bent. This will be able to hold the shorted wires together making a temporary fix to get sound to come out of both ears. Next, when you are ready to fix it permanently, you are able to read the step by step guide below.
How to Fix a Pair of Headphones
Here are things required to fix a pair of headphones yourself when sound is only coming out of one ear piece:
- 1 – Pair of wire strippers.
- 1 – Roll of electrical tape.
- 1 – Pair of wire cutters.
- 1 – Roll of masking tape.
- 1 – Small sheet of fine grit sandpaper (For optional).
- 1 – Solder gun repair kit (For optional).
- 1 – Piece of shrink tubing (For optional).
Apparently, there are some steps which you have to do in fixing a pair of headphones yourself when sound is only coming out of one ear piece. Here are steps:
- The first thing that you have to do to fix your headphones is to plug them into an audio source.
- The second step, while audio is playing and you have the headphones on, you need to move your hand up and down the wire and then bend it every 1/2 inch to isolate where the wires have shorted out.
- When you hear sound in both ears, you have found where the wire is not correctly connected or has shorted.
- After that, you have to isolate this area by putting masking tape to the left and right of where the short has been found leaving an inch or so in between the tape.
- The next step that you have to do is to take the wire cutters and cut the shorted area of the wire out carefully by cutting an inch or more on each side of the shorted area of the wire (since you discovered the faulted spot on the wire where it has shorted out, now you are removing that part of the wire completely by cutting and removing a half inch or more on each side of where you discovered the faulted wire).
- With a pair of wire strippers, you have to strip back the wire shielding on both sides to expose the wires. There should be three different wires: one black or white, one red, and one copper but yours may vary.

- When the wire shielding is stripped back, then you are going to strip the exposed wires to reconnect them.

- Please strip back each wire by using the wire strippers. If the wire is super small you may require to use sandpaper to expose the wiring underneath (those are the color wires under the wire covering, black or white, the red, and copper wire, the copper (ground) wire are going to be straight up copper and has no wire covering therefore you do not need to strip it).
- After the wires are stripped and exposed (You are able to add the shrink tubing at this step if you are using it) reconnect the wires together (black to black, red to red, etc) by using your way of choice. You will be able to splice them together by using any splicing method or use a solder gun.
- In this step, you are able to test the headphones to ensure that now you are getting sound from each side.
- After everything is working properly, you are able to use shrink tubing or electrical tape and wrap it over the repaired area of the wire to further protect it.
- Congratulations, Finally you have fixed your headphones.
If you have a high end pair of headphones costing over $50 dollars, there is a good option your broken headphones are still under warranty. For this case, simply you are able to check online for more info because lots of headphone makers offer a lifetime warranty on select audio products.
Reset Bluetooth Headphones
In this page, we also want to share how to reset Bluetooth Headphones. Some of you may have a problem with pairing wireless Bluetooth Headphones. If you get this problem, simply you are able to reset Bluetooth headphones by doing these steps below:
- At the first step, you have to turn off the Bluetooth headset before starting the Bluetooth reset procedure.
- After that, you are able to locate the power button on the Bluetooth headset.
- Please depress the power button on the Bluetooth headset. On some headsets, you will need to depress the volume + button along with the power button at the same time.

- The next step that you have to do is hold down the power button (and volume + button) for 5 to 20 seconds.
- Then, you are able to release the power button (and volume + button) on the headset.
- On some headphones the LED lights are going to blink or illuminate steady to show pairing reset.
- Please remove the Bluetooth headphones name from the Bluetooth paired list on your phone or device.
- After deleted, you have to power off and restart your phone or device.
- Please repair the Bluetooth headphones to your phone or device.
- If the reset process was successful, just pair the Bluetooth headphones with your phone or device.
- Finally, Now the Bluetooth headset is ready to be used as normal.


AUTHOR BIO
On my daily job, I am a software engineer, programmer & computer technician. My passion is assembling PC hardware, studying Operating System and all things related to computers technology. I also love to make short films for YouTube as a producer. More at about me…


Leave a Reply