
When playing the game of Destiny 2 on your PC or console, you may face an error code called olive. By the way, how to fix the error? Luckily, you come to the right place and you are going to get the solutions from this page. So, keep reading to know what you have to do.
About Destiny 2 Error Code Olive
Destiny 2 is a free and online multiplayer first-person shooter video game. Of course, the game is popular with many players. Probably, you are one of the players who play it on your PC or console. But, sometimes, several error codes appear, affecting your experience.
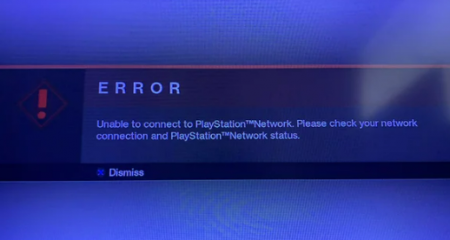
Apparently, there are some common error codes you may get in the game of Destiny 2 such as guitar, beetle, anteater, baboon, weasel, chicken, etc. Also, another common error code may happen in the game is olive. On the screen, you are going to see the error message saying that there is a problem with your Bungie account. If you try again and still experience problems, you are asked to visit help.bungie.net and search for the error code: olive.
According to research, the possible reasons for the error code olive are the Destiny 2 server problem, Bungie account not connected, Battle.net leftover data, and also a glitch caused by a long idle period. Fortunately, you are able to fix the error code olive by trying these solutions below.

Fixing Destiny 2 Error Code Olive – Here’s Solution
There are some methods you can do to fix Destiny 2 error code olive:
Method 1: Checking for a Server Issue
Before trying any other solution that was confirmed to work by an affected user, we highly suggest you begin this solution by investigating whether other users in Destiny 2 in your area are also encountering the same issue. Remember that usually this particular error code is associated with some type of server issue, thus it is highly recommended that you start by investigating whether you are actually dealing with a widespread error.
To check for this case, simply you are able to use services like DownDetector and Outage Report to see if other users in Destiny 2 in your area are reporting the same problem as you are facing. Even if you do not find evidence of issues related to Destiny 2 servers, you have to take a look at the status page of Destiny 2 and also visit Bungie’s official Twitter Destiny 2 support account to check if there are any official announcements about the server issue.
If the investigations you performed have not revealed any evidence of a server issue, then you are able to move down to the next solution below.
Method 2: Connect with a Bungie account
Oftentimes, the error code Olive in Destiny 2 is associated with a case in which the user is not connected with a Bungie account. Also, some affected users that were encountering this issue have confirmed that the error was resolved after they connected with a valid Bungie account. Thus, if you have not done this, you are able to try restarting Destiny 2 and then follow through when asked to set up a Bungie account. After you do so and validate your account, please join an online game, and see if the error code olive is resolved. If you already set up your Bungie account, you have to move down to the next solution below.
Method 3: Restarting your PC or Console
If you did not try this, you have to start this method by restarting your PC or console. This is confirmed to be effective on Windows and consoles (Xbox One and PS4).
On PC, simply you are able to close the game and use the Windows button to click on Power > Restart. Then, you are able to wait for the next startup to complete before launching the game once again.
On consoles, a restart is not enough because both Xbox One and PS4 will preserve some temp files which are not cleared with a regular restart. So, if you are encountering the problem on a console, you have to go for a power cycling procedure. Afterwards, you are able to follow the guide applicable to your console.
Method 4: Reinstalling Destiny 2 (For PC Only)
If you are facing this error on a PC (after Destiny 2 completed the move from Battle.Net to Steam) it is possible that you are getting this error due to several leftover files left behind by the old installation. If this case is applicable, then you have to try uninstalling the Battle.Net version of Destiny 2 and also clear the cache data of Battle.Net before reinstalling the game from Steam.
Here is what you have to do:
- At the first step, you have to open up a Run dialog box by pressing Windows key + R. Then, type ‘appwiz.cpl’ inside the text box. Please press Enter to open up the Programs and Features menu.
- When you are inside the Programs and features menu, you are able to scroll down through the list of installed applications and find Destiny 2. When you see it, just right-click on it and select Uninstall from the context menu.
- When you are inside the uninstallation screen, simply you are able to follow the on-screen instructions to complete the uninstallation.
- After the operation is finished, please return to the Programs and Features page. And repeat the uninstallation procedure with Battle.Net.
- After both entities are uninstalled, you are able to open another Run box again and type ‘%PROGRAMDATA%\Battle.net’ and also press Enter to navigate to the location instantly.
- When you are inside the Cache folder of Battle.net, please hit the back button. Afterwards, right-click on the Battle.net folder and select Delete from the context menu to fix any leftover files which might still cause error.
- Please repeat step 5 and 6 with the remaining cached files and remove every folder until there is no remnant file which might cause the error.
- After every relevant folder is removed, just restart your computer, download Steam, and then take ownership of Destiny 2.

AUTHOR BIO
On my daily job, I am a software engineer, programmer & computer technician. My passion is assembling PC hardware, studying Operating System and all things related to computers technology. I also love to make short films for YouTube as a producer. More at about me…


Leave a Reply